
Never solder under alcohol influence :) For that I have a homemade breath analyzer that detects the alcohol value in the air. Please never use this as a safety feature while driving, this is not the best precision measurement so you shouldn’t trust it. Is more, never drink and drive, be safe guys. That being said, in this post, the first part would be to explain to you how a small sensor is capable of detecting the amount of alcohol in the air. Then we see the connections and how to read the correct value with an Arduino and print the values on a display. Then we check the datasheet and see how to pass from analog values to percentage of alcohol or PPM or BAC which are some more standard units. Finally we assemble a crude but homemade breath analyzer and test it out. So guys, let’s get started.
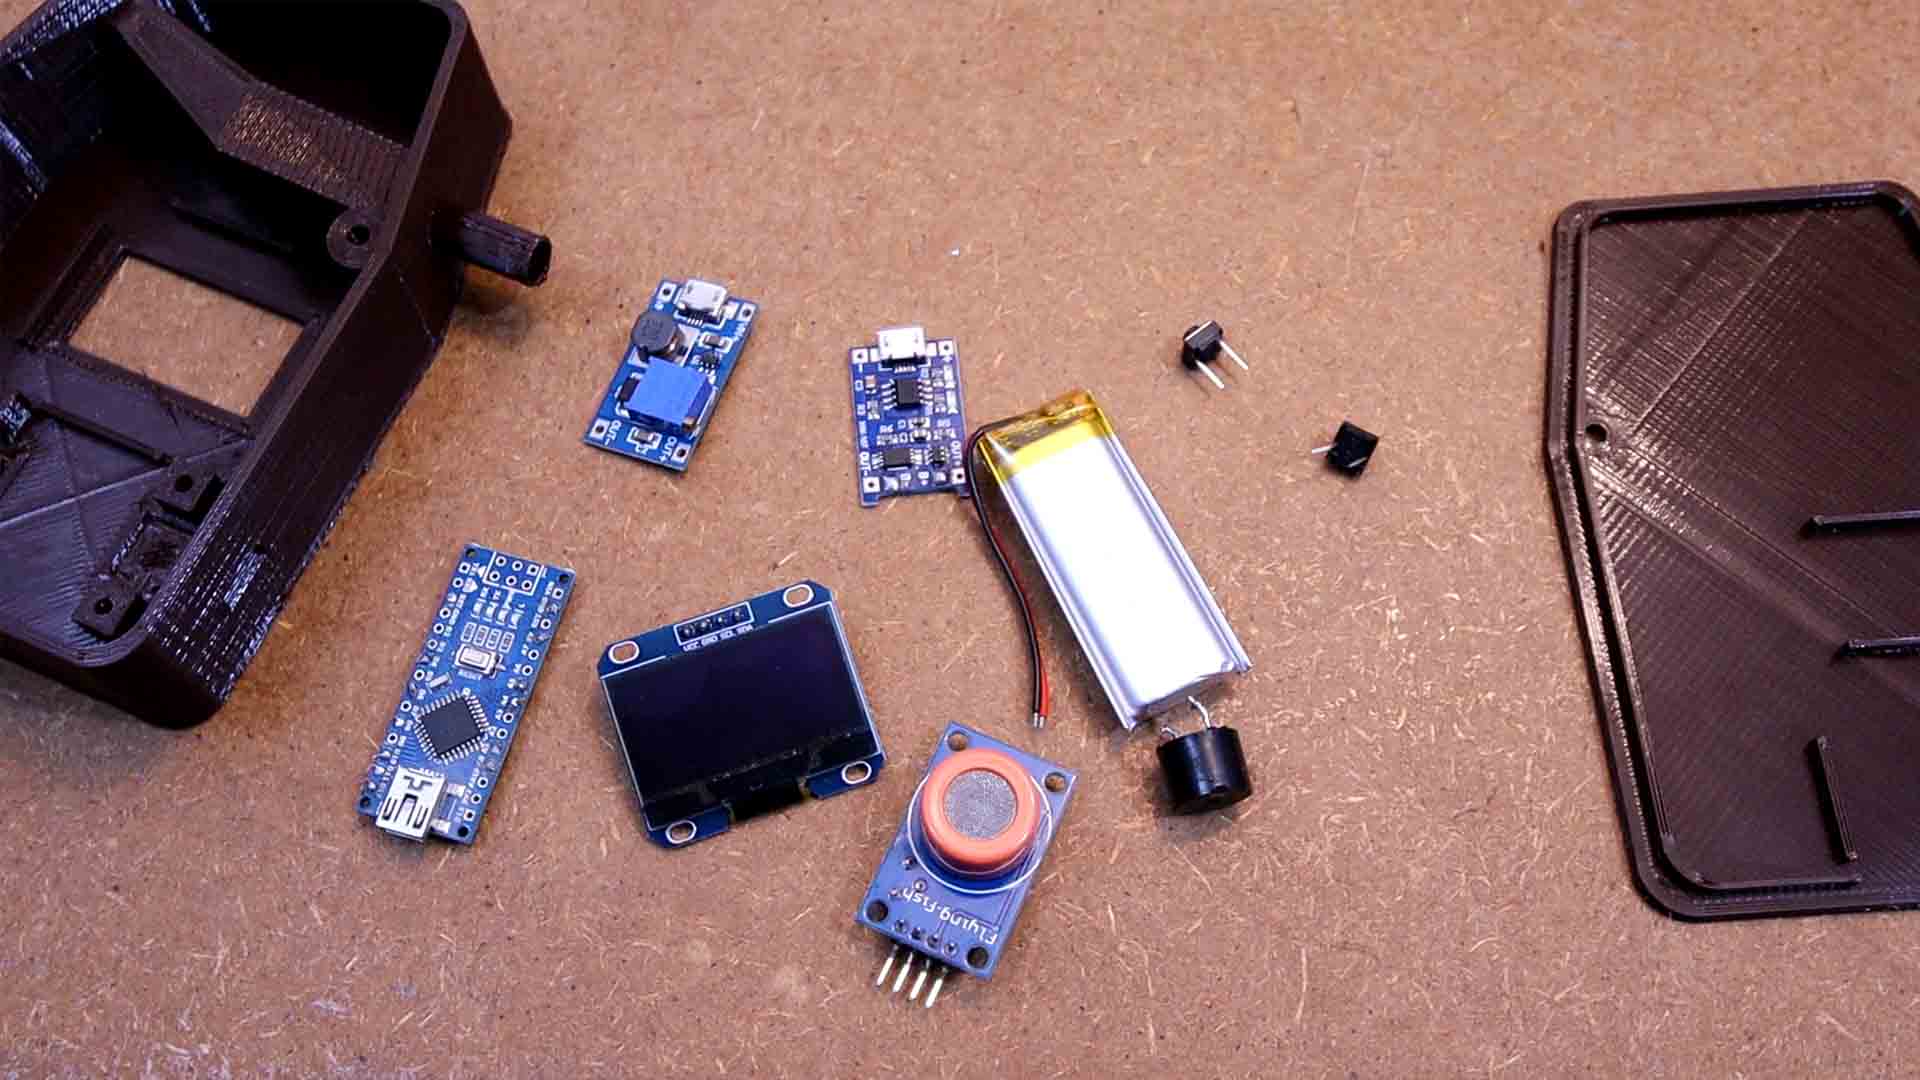
The part list is very easy. Actually, to measure the alcohol in the air we only need the MQ-3 sensor and the Arduino but in order to display the values and make a homemade breath meter we need the rest. For example, we need to supply it with a battery. Since the MQ-3 sensor needs 5V, we use a boost converter to get that and the TP4056 charger to recharge the battery. To display the values, I use an OLED display with i2c communication and for controls we need 2 push buttons and a buzzer for sound notifications.
The sensor is made out of the external plastic case, the anti-explosion mesh and the actual sensing element inside. Inside we have 6 pins connected to some sort of ceramic element. This element has two parts, the heating part and the sensing part. To be able to detect alcohol, this element must get hot, that's why we need a heating element. We can easily see a heating coil inside of the ceramic tube.
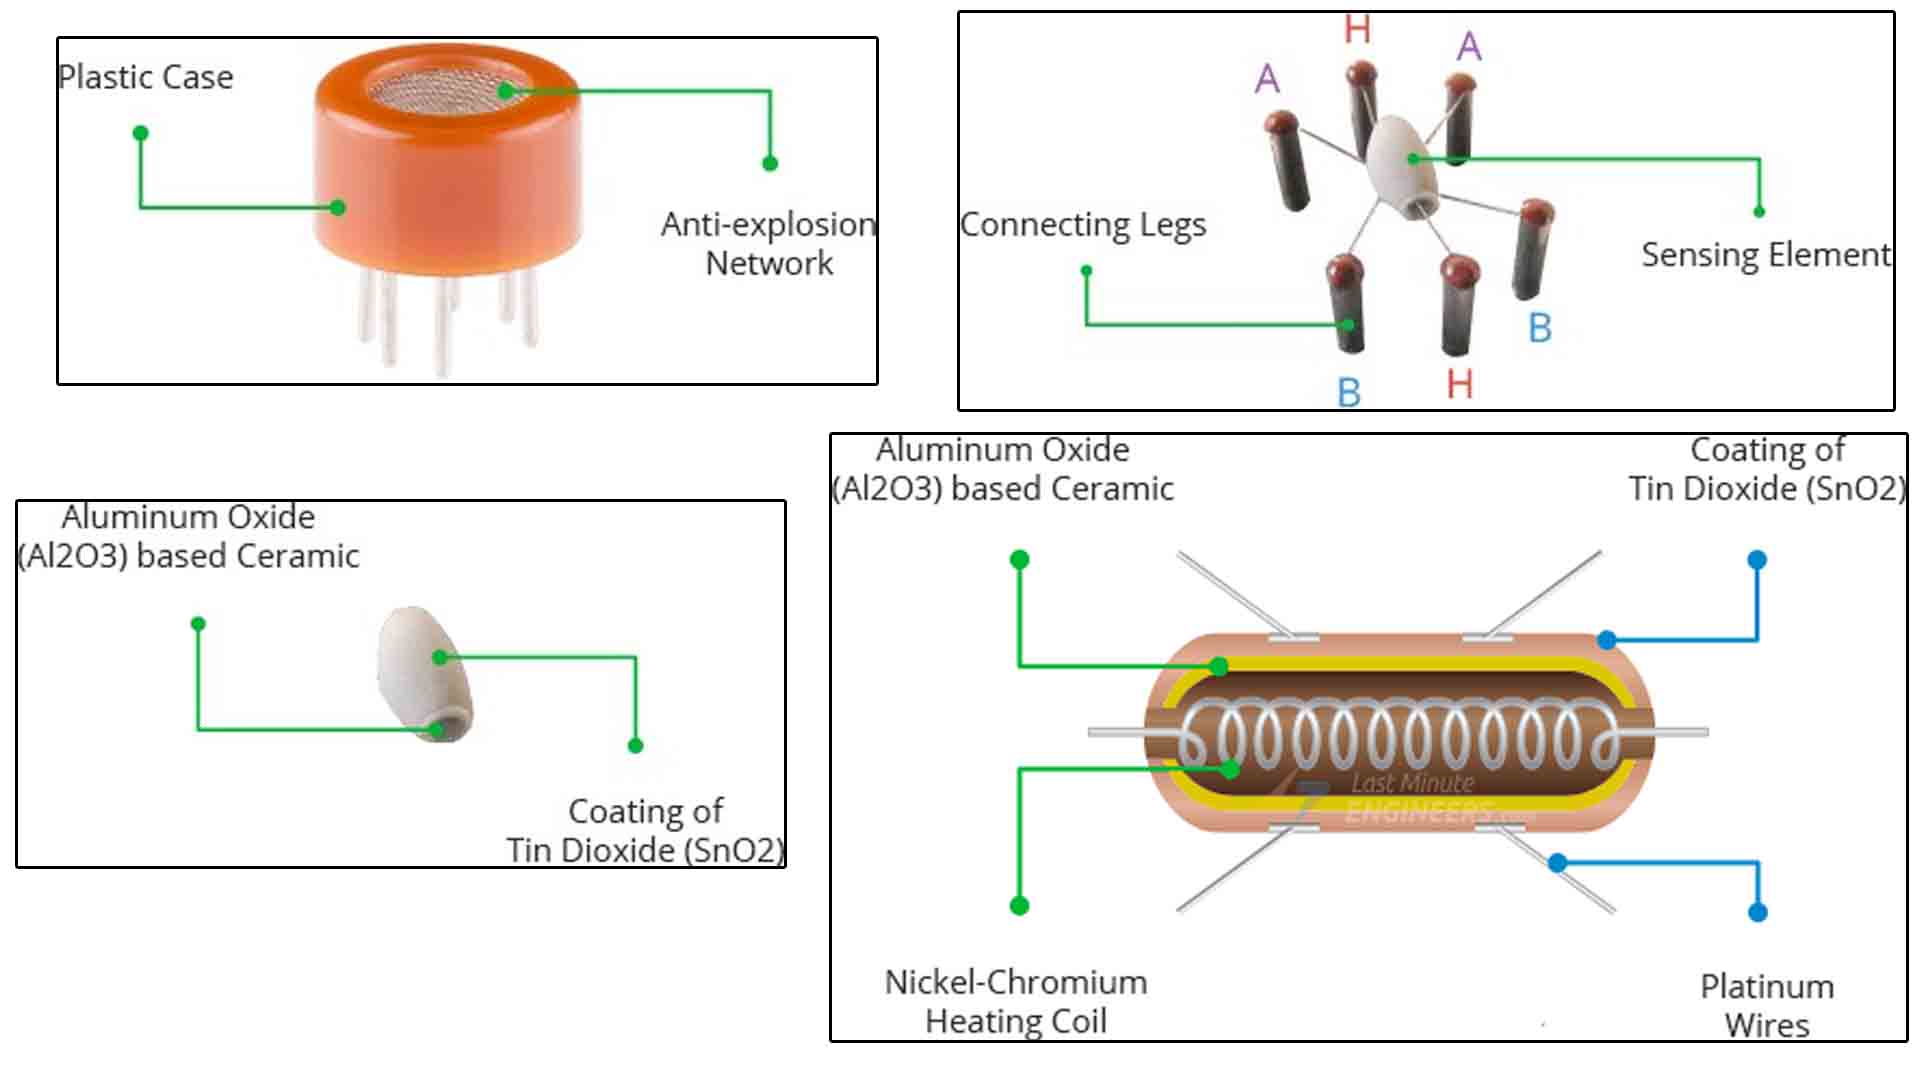
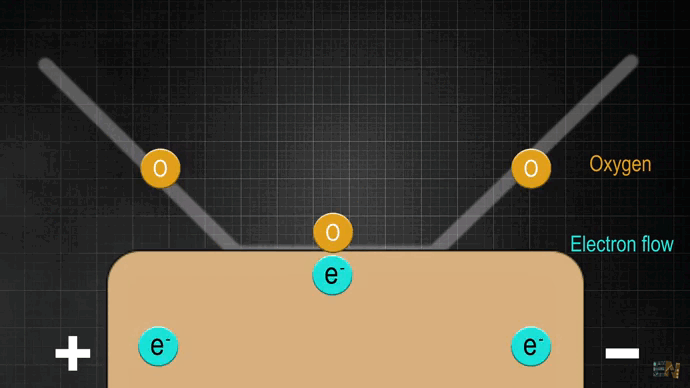
Basically the heating element is made out of a nickel-chromium resistance coil that gets hot when voltage is applied. The outer coating is made out of a layer of and then another coating of tin dioxide, and that’s important. When the tin dioxide semiconductor layer is heated to a high temperature, oxygen is adsorbed on the surface. When the air is clean, without alcohol, the electrons from the tin dioxide are attracted to the oxygen molecules, so a small gap, or electron depletion zone is created below. Basically, that lack of electrons is like a barrier, so the resistance between one side and the other increases and less current could pass. But when there is a presence of alcohol, the adsorbed oxygen is less, and the more alcohol we have in the air mixture, less oxygen is absorbed, because it reacts with the alcohol. If less oxygen is attracted to the surface, that means, we have more free electrons so the barrier is decreasing. That means that the resistance is getting lower, so more current could pass. Basically, that’s how we detect alcohol. More alcohol in the air, the resistance is getting lower. Less alcohol, the resistance is getting higher. And is very easy to measure that with an Arduino
If you connect the module to 5V and connect the analog output to the oscilloscope or a multimeter, you will see that if you get closer to the sensor with a piece of cotton with some alcohol, when the alcohol increases, the voltage output will also get higher. But these measured values mean nothing to us yet, they are just voltage values. For that, on the sensor datasheet we have two very important graphs. To get the PPM values we use the ratio of the resistance Rs and R0 where Rs is the resistance of the sensor when we measure the gas, and R0 is the resistance of the sensor when the air is clean, so it would be the default value. sor.
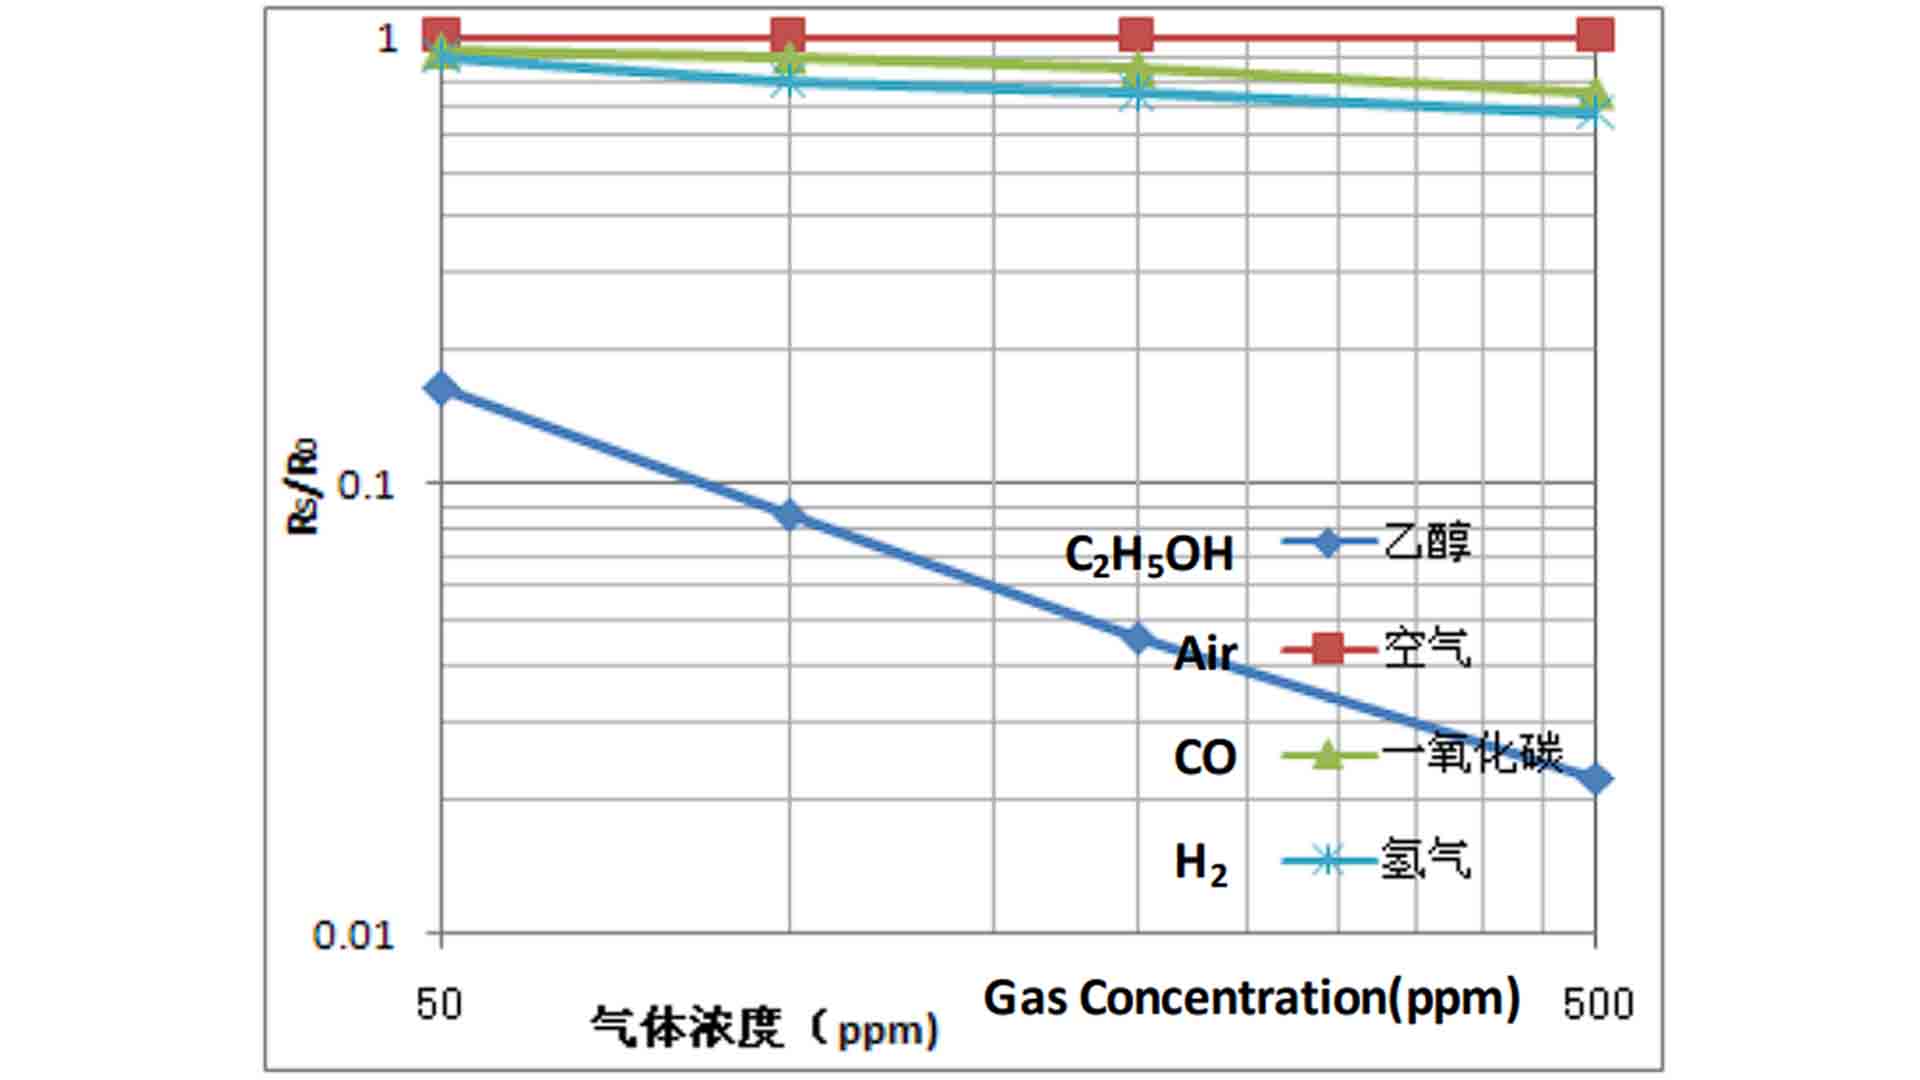
The graph above is arranged on a logarithmic scale for both axes and are generally approximately straight along these scales. So the concentration will result into something like this below:

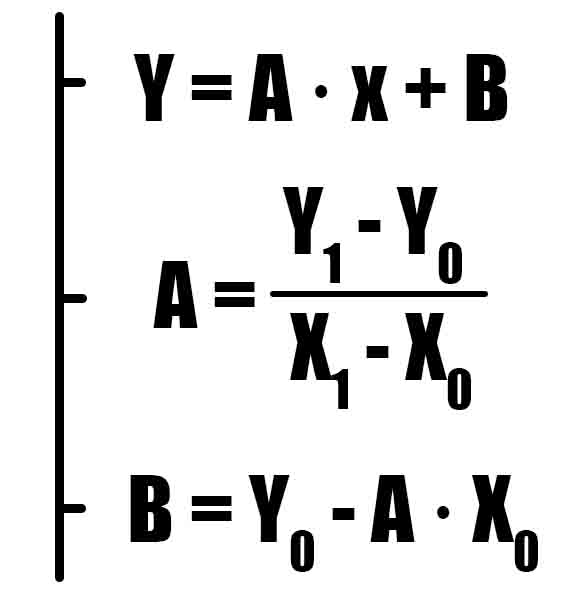
And to determine the concentration in the Arduino code, we will need the line that approximates it, for which we must take any two points from the graphs P0 = {X0, Y0} and P1 = {X1, Y1}. Using this points we ge the line equation as below where A and B are equal to those values using the data from the datahseet graph for point P1 and P2. For example we get P1 = (50, 0.18) and P2 = (500, 0.012) Wewill use these values later in the code.
In the final code we need the R0 value and that might be different for each sensor. So we need to measure it, writh the value down and then place that value in the final code. To get the value, make the connections for 5V and GND from the sensor to the Arduino and connect the analog pin of the sensor to A0 of the Arduino. Then, compile and run the code below. This will make a bunch of analog measurements and calculate the R0 value when there is clean air detected so make sure there is no alcohol near the sensor. Open the serial monitor and write down this value and save it for later.
float sensor_volt= 0;
float RS = 0;           //  Get the value of RS via in a clear air
float R0 = 0;           // Get the value of R0 via in Alcohol
float sensorValue = 0;

void setup(){
   pinMode(A0, INPUT);
   Serial.begin(9600);
}

void loop(){
  for(int i = 0 ; i < 100 ; i++){
    sensorValue = sensorValue + analogRead(A0);
  }
  delay(10);
  sensorValue = sensorValue/100.0;        //get average of reading
  sensor_volt = sensorValue/(1024*5.0);
  Serial.print("Volt: ");
  Serial.println(sensor_volt);

  RS = (5.0-sensor_volt)/sensor_volt;
  R0 = RS/50.0;                           //50 is found using interpolation from the graph

  Serial.print("R0 = ");
  Serial.println(R0,5);
  delay(100);
  sensorValue = 0;
}The circuit for the entire project should be like this below. We also add a small battery of 4.2V, a boost converter set to 5V for the Arduino, a charging module like this one to recharge the battery, the display, a buzzer and a push button to activate the measurement. And obviously, an Arduino NANO and the sensor. That’s all you need together with the 3D printed design of the case.
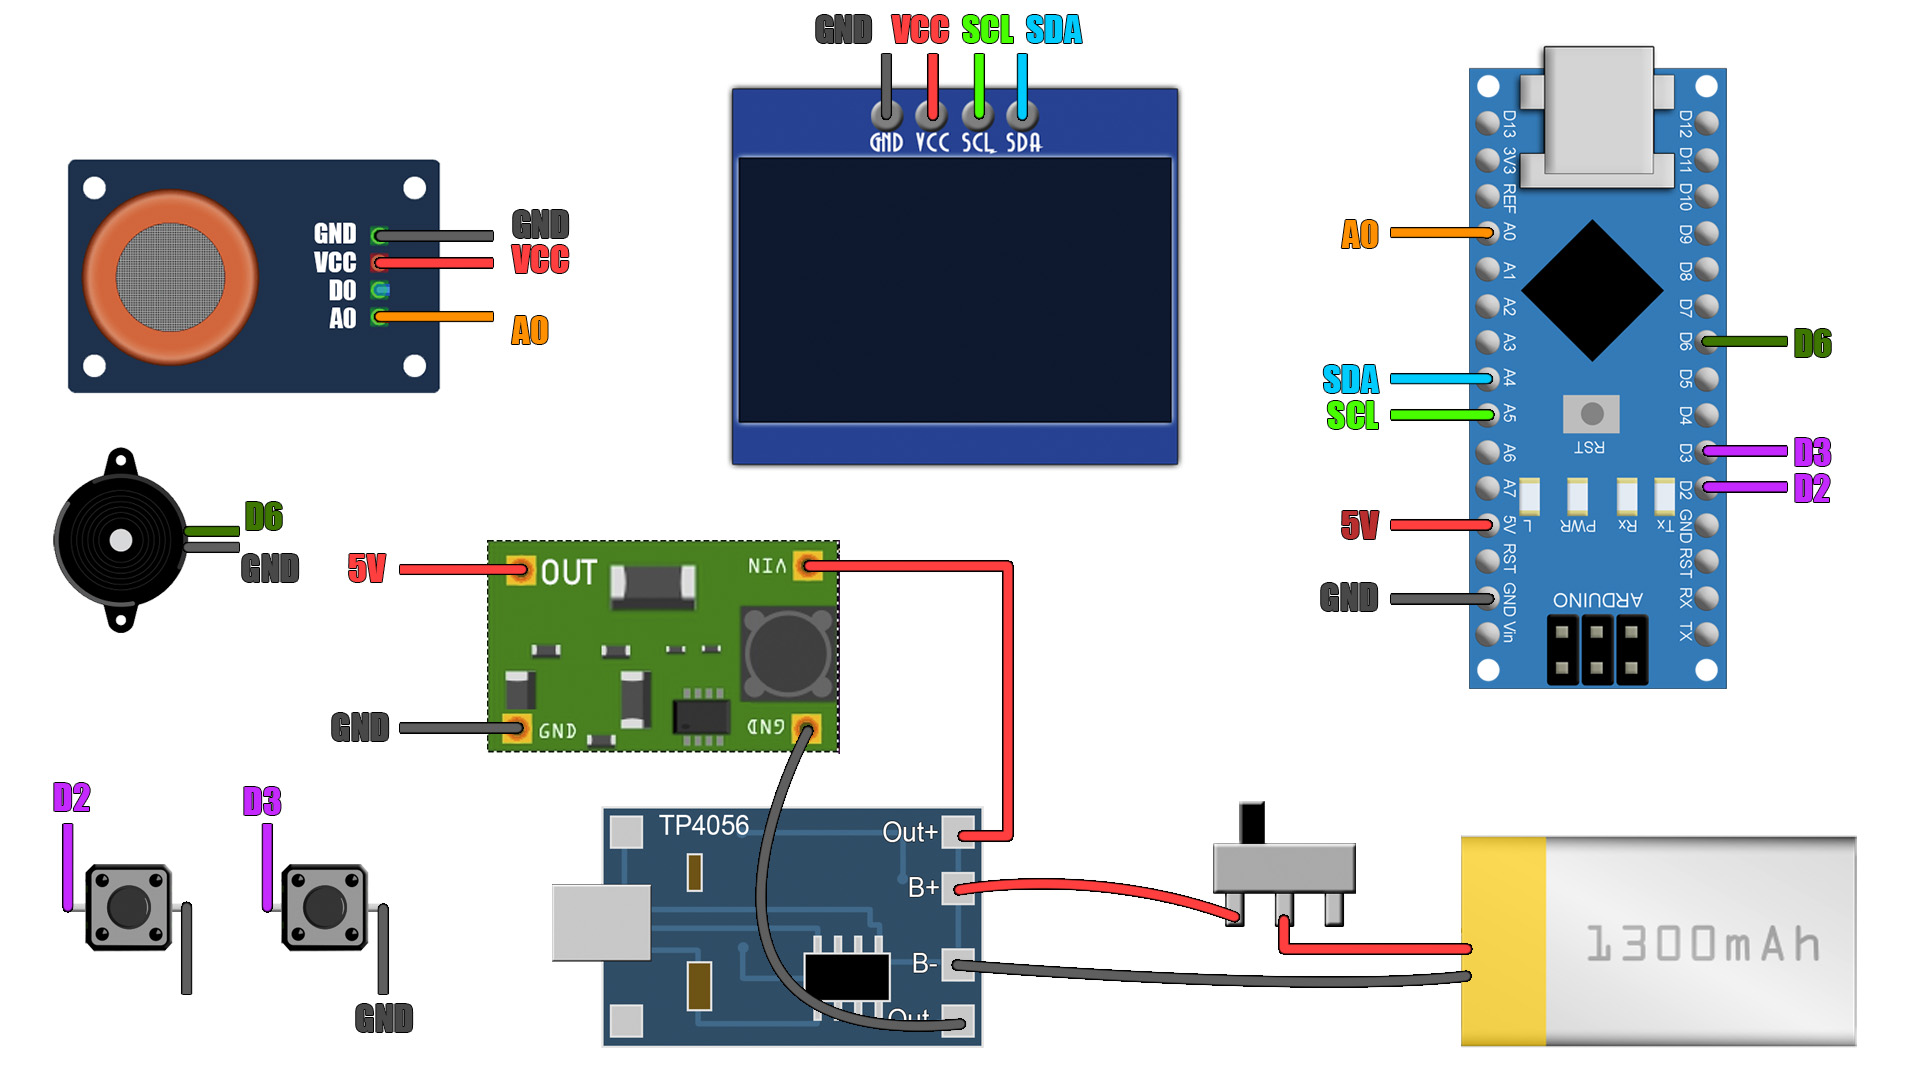
First connect the charger the battery and the booster and set it to 5V for the Arduino and glue the potentiometer so it will stay at 5V. Then I make all the connections to the Arduino as in the scheamtic above. Then use the USB cable and upload the code to the Arduino NANO. Place everything inside of the 3D printed case and that's it.
// Variables we need in the code
const int READ_SAMPLE_INTERVAL = 100;  //Time between samples
const int READ_SAMPLE_TIMES = 5;       //Amount of samples
// Add next points values according to your dataseheet Rs/R0 graph
const float X0 = 50;
const float Y0 = 0.18;
const float X1 = 500;
const float Y1 = 0.012;Since the sensor needs to heat up, each time you take a measurement, in the code we add a 20 seconds delay using this a simple variable, to give some time to the filament to get hot enough. For the example in the video that is set to only 3 seconds to make it faster. And then, after a 5 seconds reading, it displays the maximum value. We could improve the code a lot by adding different filtering and decisions. I’ve also added a label on top that I’ve printed with a basic laser printer, so it would look better.
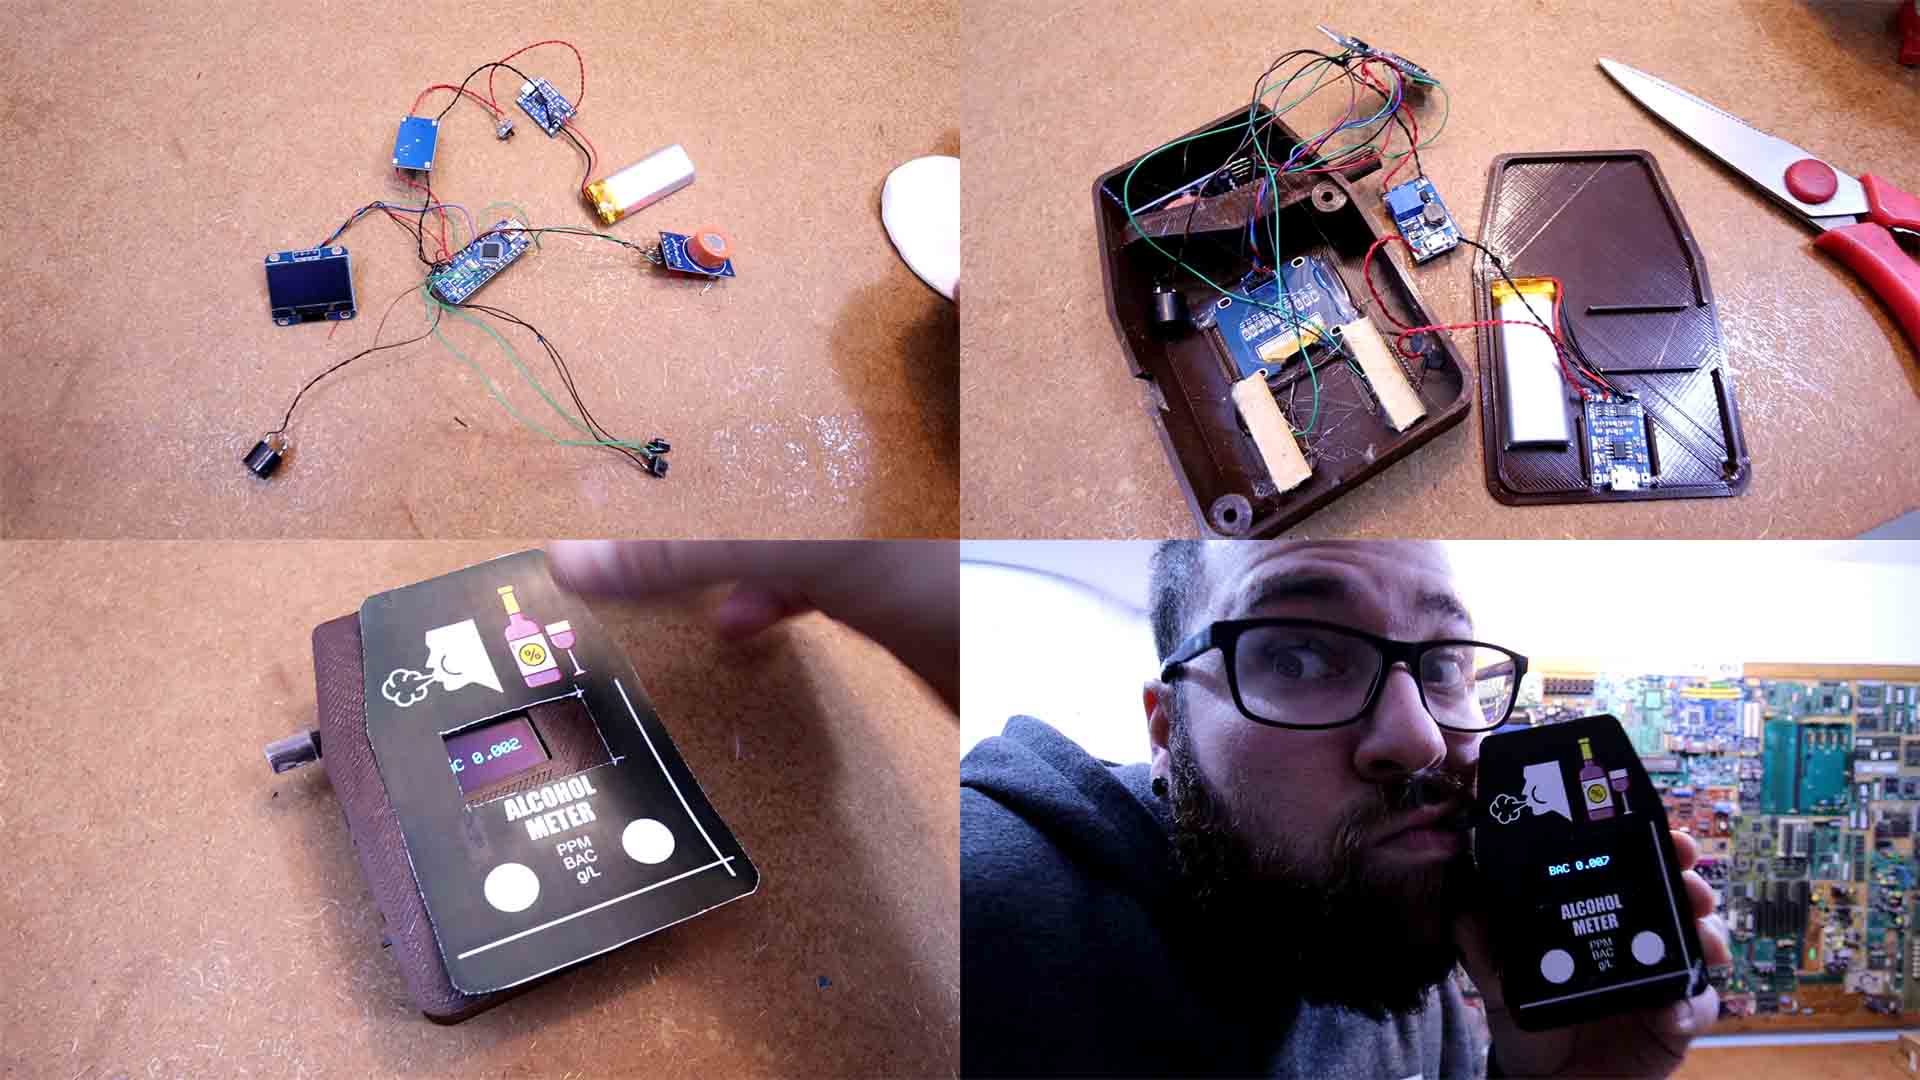
So just like that I’ve made a homemade version of the breath analyzer with low-cost components. But again, this measurement is not that precise and you shouldn't use it for legal measurements. But you now know how to read an MQ-3 sensor and how to pas the voltage read to PPM, BAC or any other values that we could use and not just voltage which means nothing to us. Get the code, part list and schematic from above.
If my videos help you, consider supporting my work on my PATREON or a donation on my PayPal. Thanks again and see you later guys.


