Hey guys. If you remember, a few months ago I made a video about a voice recognition module. That module is pretty decent. But you see, that module is a bit limited. And the worst limitation is the command time. Because if you remember, commands must be below 1.5 seconds with this module. 1.5 seconds is very short. You could only use it for simple commands such as hello, do that, turn on, turn off, and stuff like that. But for example, I was making tests with the command, “tell me a joke” and it didn’t work all the time. Because the length of the command was more than 1.5 seconds.
But today I have a way better solution for you. And with this solution you can detect full sentences.
And not just that, but this solution is able to detect any voice, not just mine. This tool could be very powerful for robotics projects and it uses google to detect the words. And the best of all, I’ve made it compatible with Arduino and UART communication. So, you want to know how to do that and also make it work with the Arduino? Well, stick till the end of the tutorial. So let’s get started.
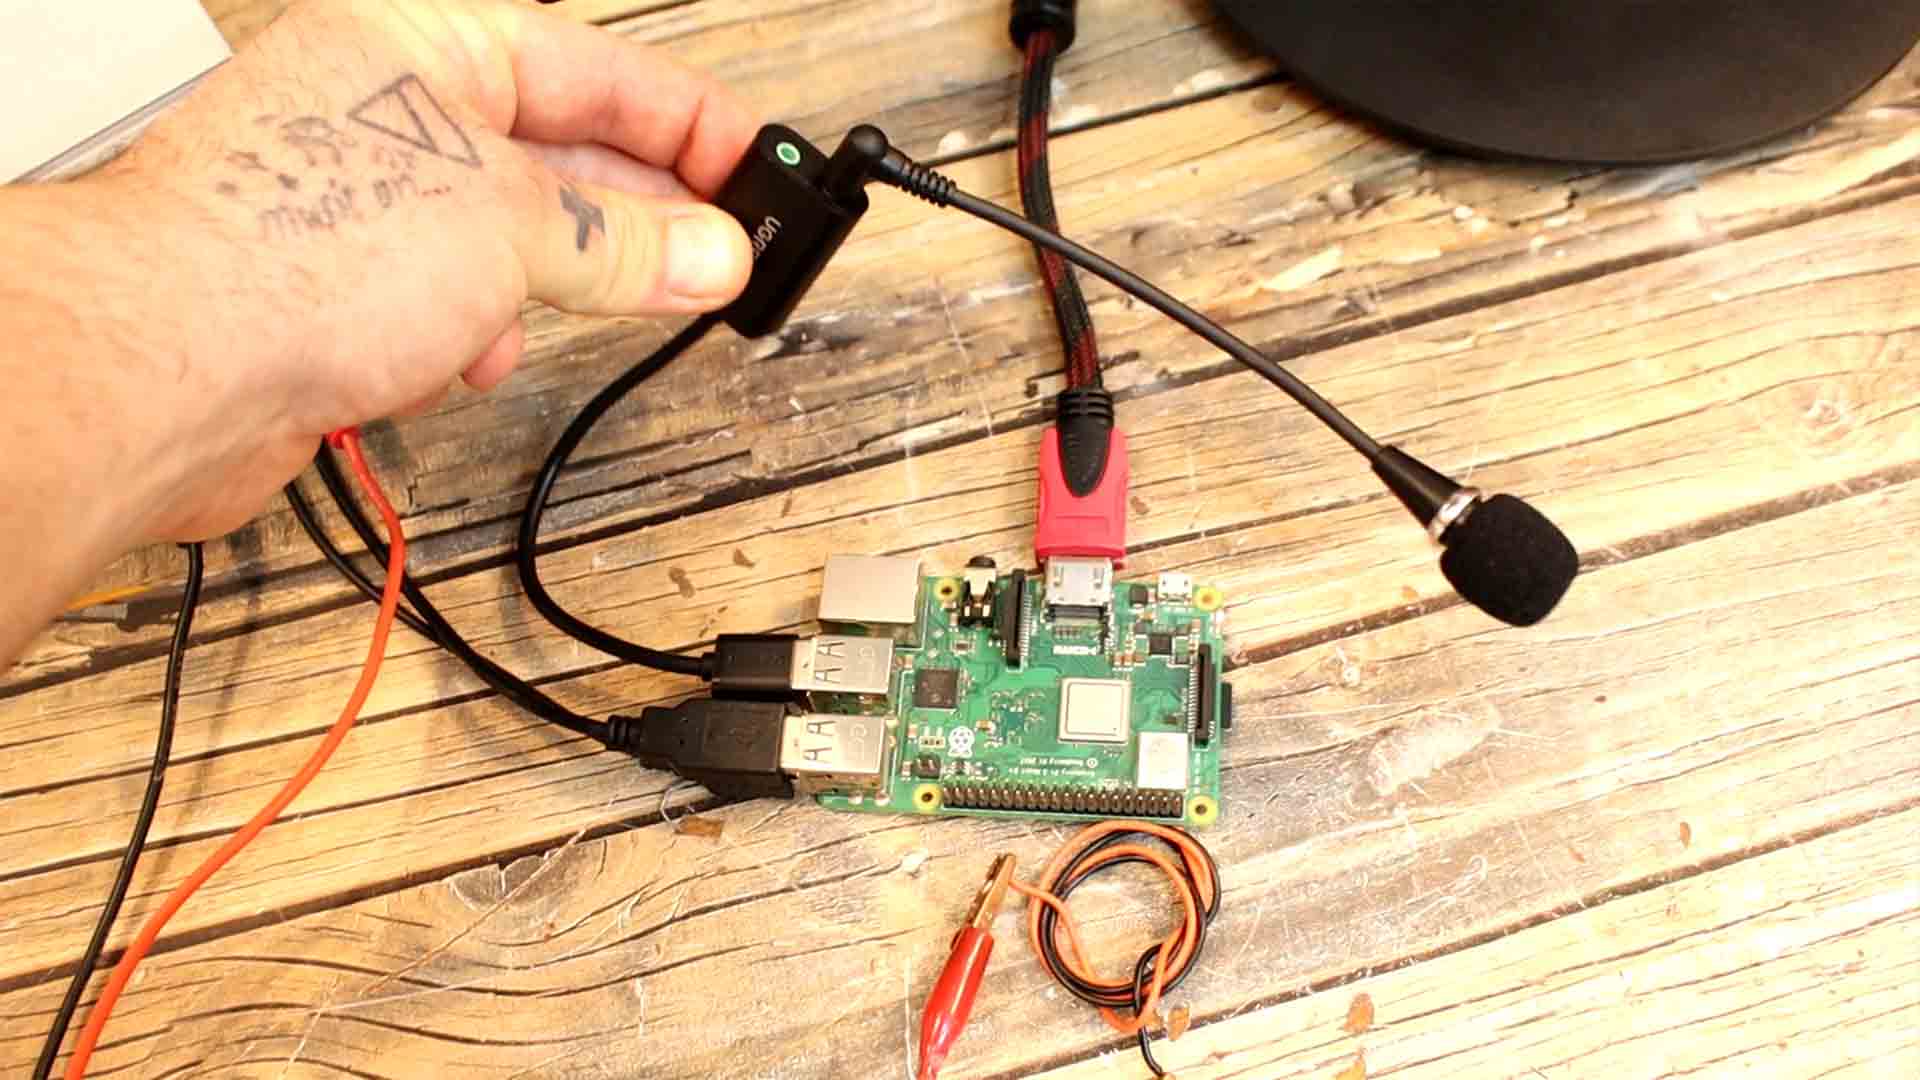
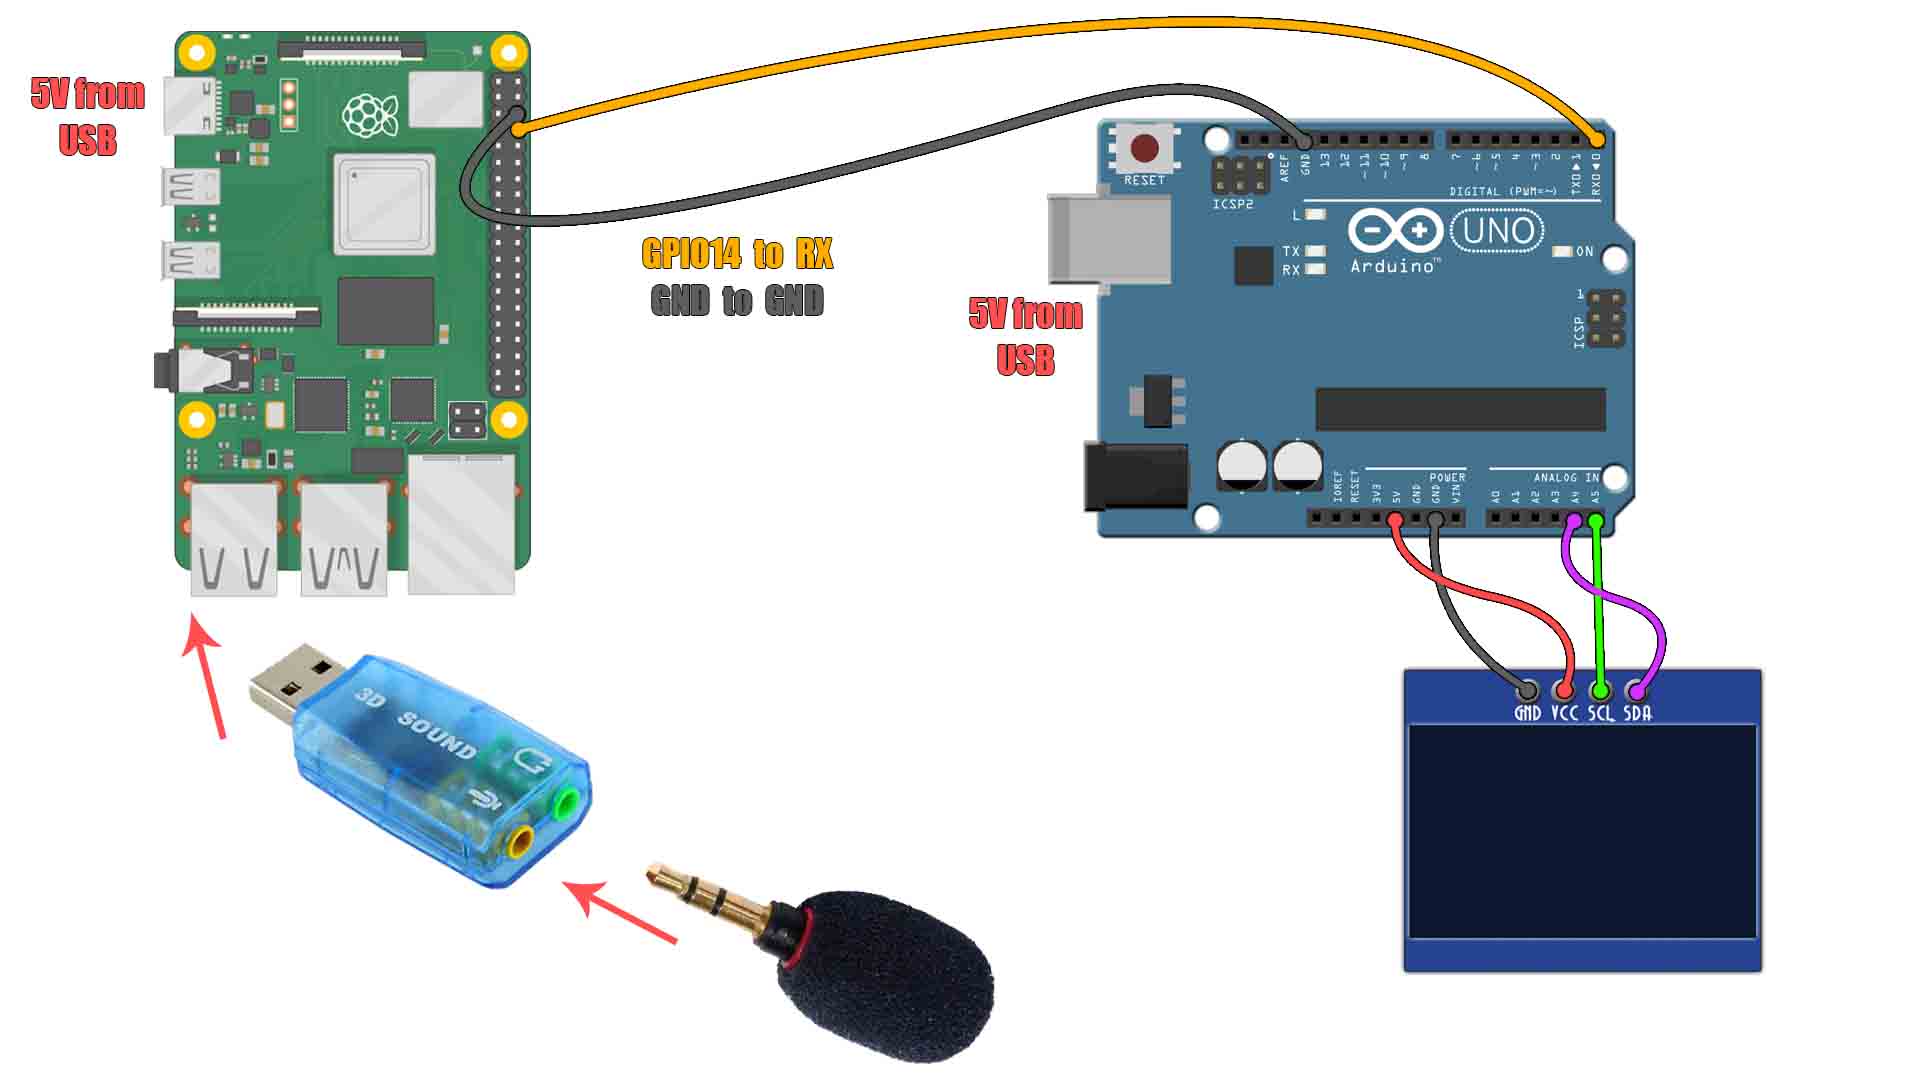
Connect the USB audio sound card to the PI and supply it with 5V using the USB connector. Also conenct a USB keyboard, moause and the HDMI cable to an LCD monitor so we could make the setup. Conenct the TX pin (GPIO14) from the PI to the Arduino RX pin and also share GND. Connect the OLED display to the Arduino so we acn test the received text. Add the microphone and the connectionsa re ready. If you ahve a powerful enough supply of 5V, you can share the 5V pins as well, but otherwise, supply both the Arduino and the PI with different USB cables.
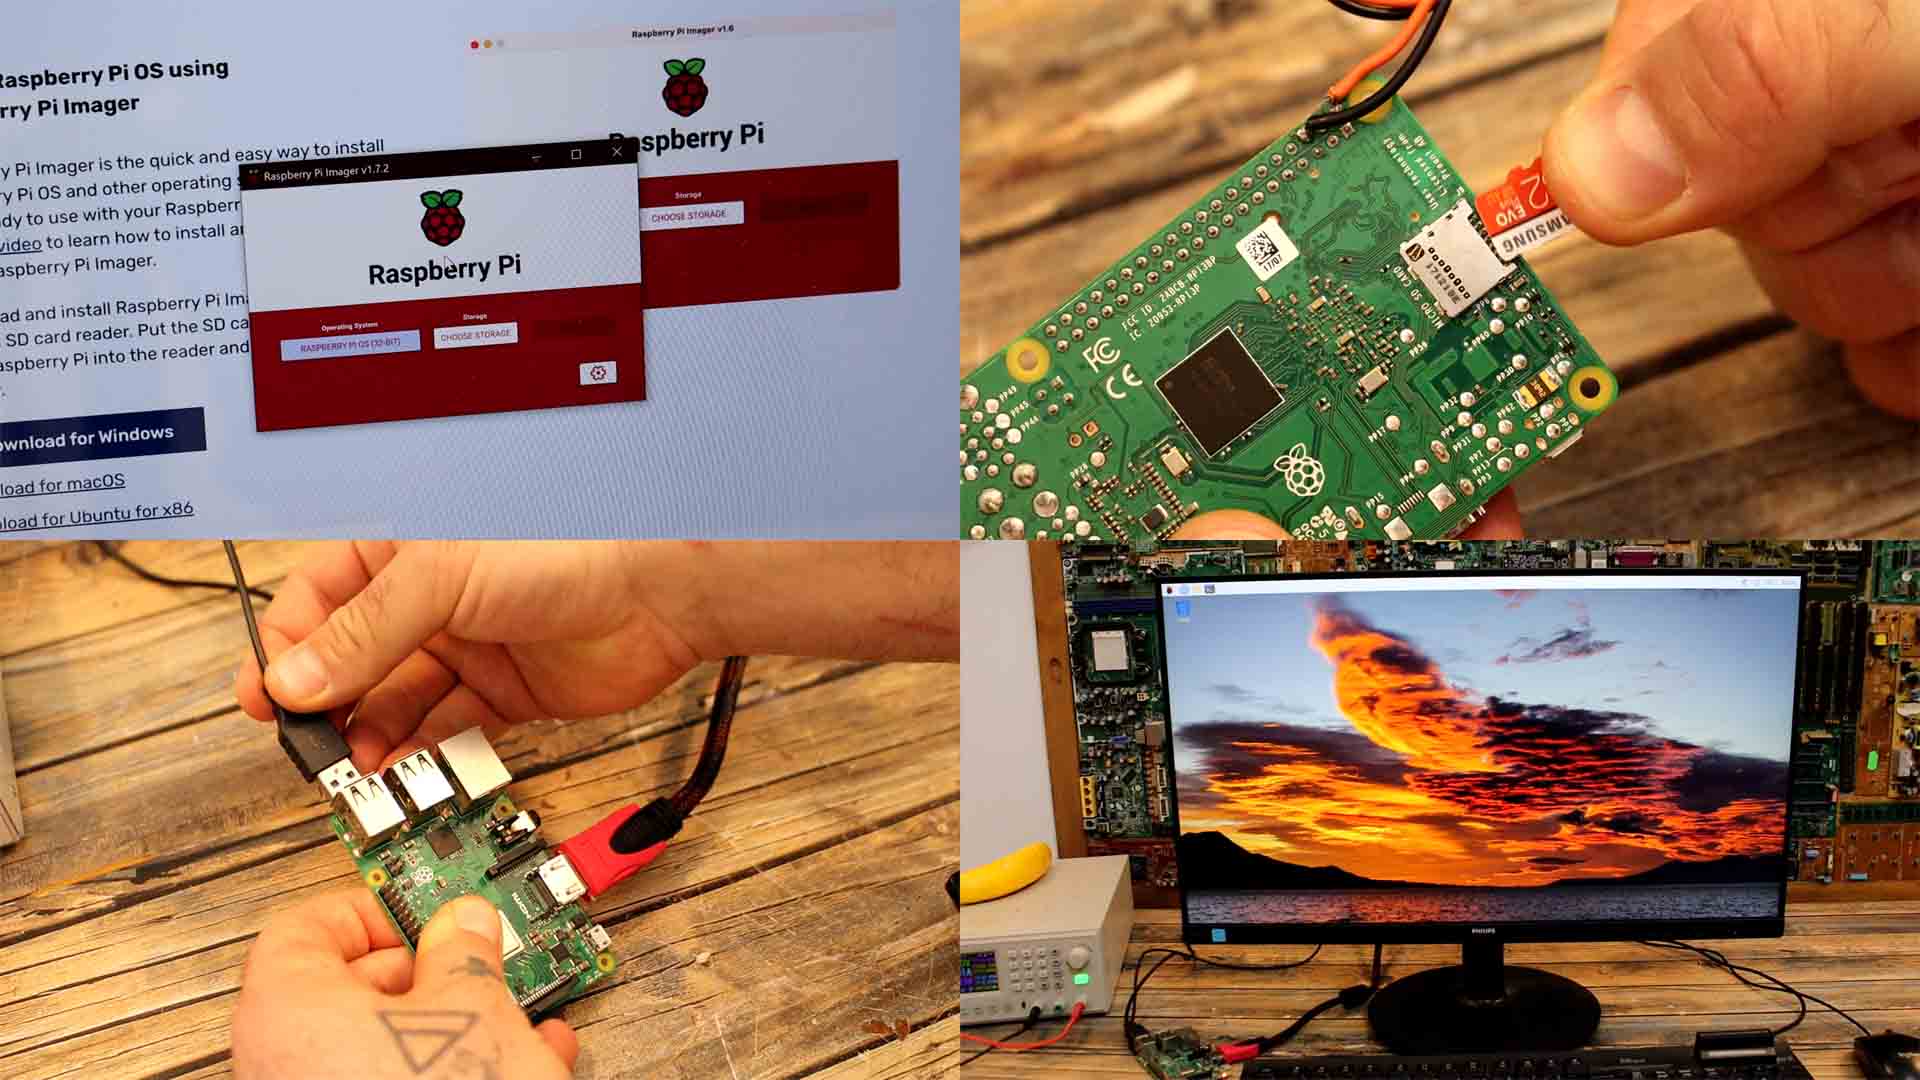
Get the raspberry pi and a micro SD card. Go to raspberrypi.com and go to software and from here download the windows or MAC version. Insert SD card to an adaptor and then to your computer. Run the downloaded imager software. Select the raspberry pi OS, for the storage select the SD card and click the write button. This process will take a while. Place the SD card inside the PI. For the first setup you will need an HDMI screen, keyboard and a mouse. So connect those to the USB and HDMI connectors. Supply 5V to the PI and turn on everything. You will have to complete the initial setup but that’s very easy so just follow the steps. That’s just adding your wifi, time zone, username, etc… Follow the steps. Now we have a working PI with the raspberry PI operating system.
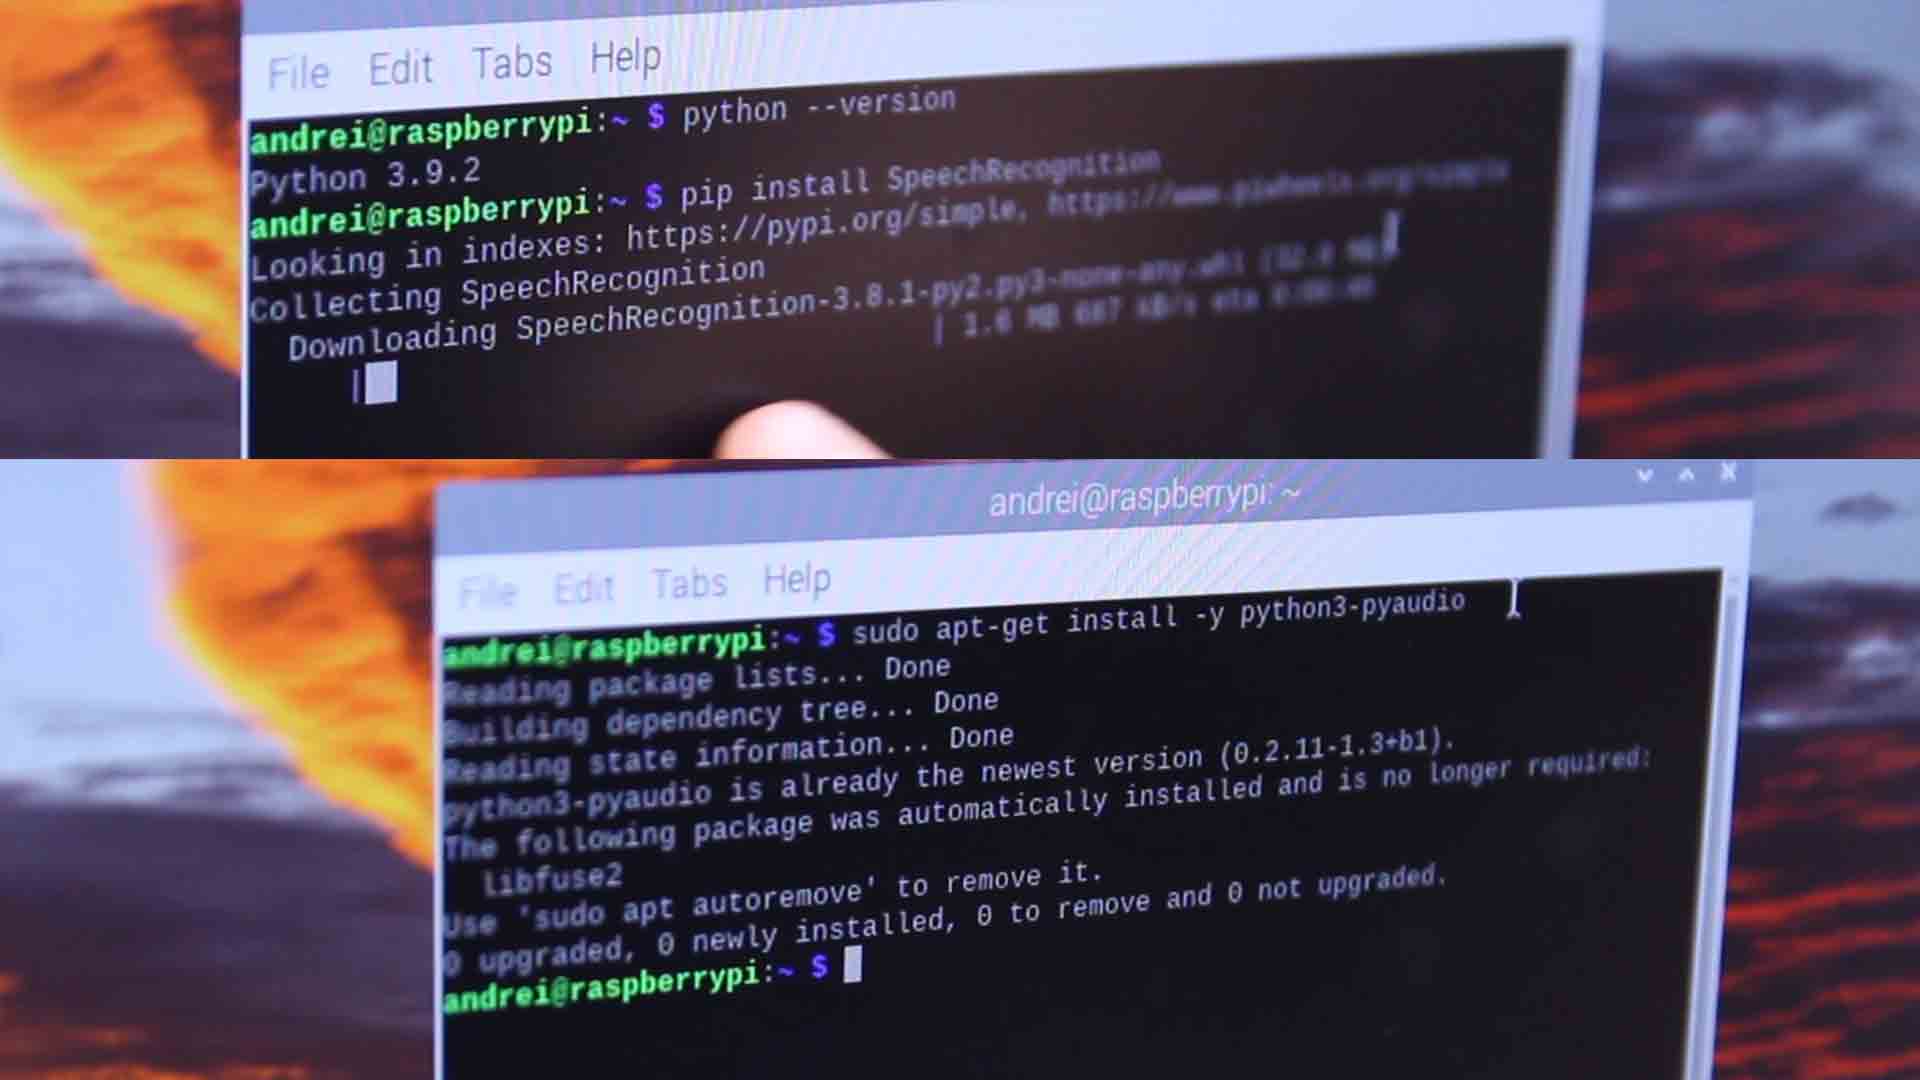
Connect the sound card and check if is working. You should see it on the audio devices. Run the terminal and type alsamixer. Then here press F6 and select the USB audio input. Lower the capture level a little bit if needed. Also make sure to be connected to the Internet since the google speech API package needs internet. Ok, so go back to the terminal. Type this line and check for the version of python. If it is older than 3.7 we should update it using the line below in the terminal but in my case I don't need to do that.
1.Check python version
2.Update version
Next we install the speech recognition package. For that run the line below with pip install speech recognition. In a few seconds we have the package installed. This package could recognise voice commands from sound files but not directly from the microphone yet. For that we need to install another package called pyaudio. For that run the next command.
3.Install speech recognition
4.Install pyaudio
Then we need one more step. This project will use google speech API and that platform needs flac encoded format of the commands. So let’s install the flac encoder by running the line below. Now we have everything we need.
5.Install flac
I have this example code from github and I will share below all the information. Copy the code from below. Now go to programming and run thonny which is preinstalled on the raspberry pi OS. In the code as you can see we import the speech recognition module first. Then we create the recognition variable. Inside of the while true, we get the audio from the microphone. We equal the words variable to the response from Google. Then we print the words so we can check the results. Run the code and let’s test it.
import serial
import speech_recognition as sr

r = sr.Recognizer()
mic = sr.Microphone()

print("Start talking!")

while True:
    with mic as source:
        audio = r.listen(source)
    words = r.recognize_google(audio)
    print(words)
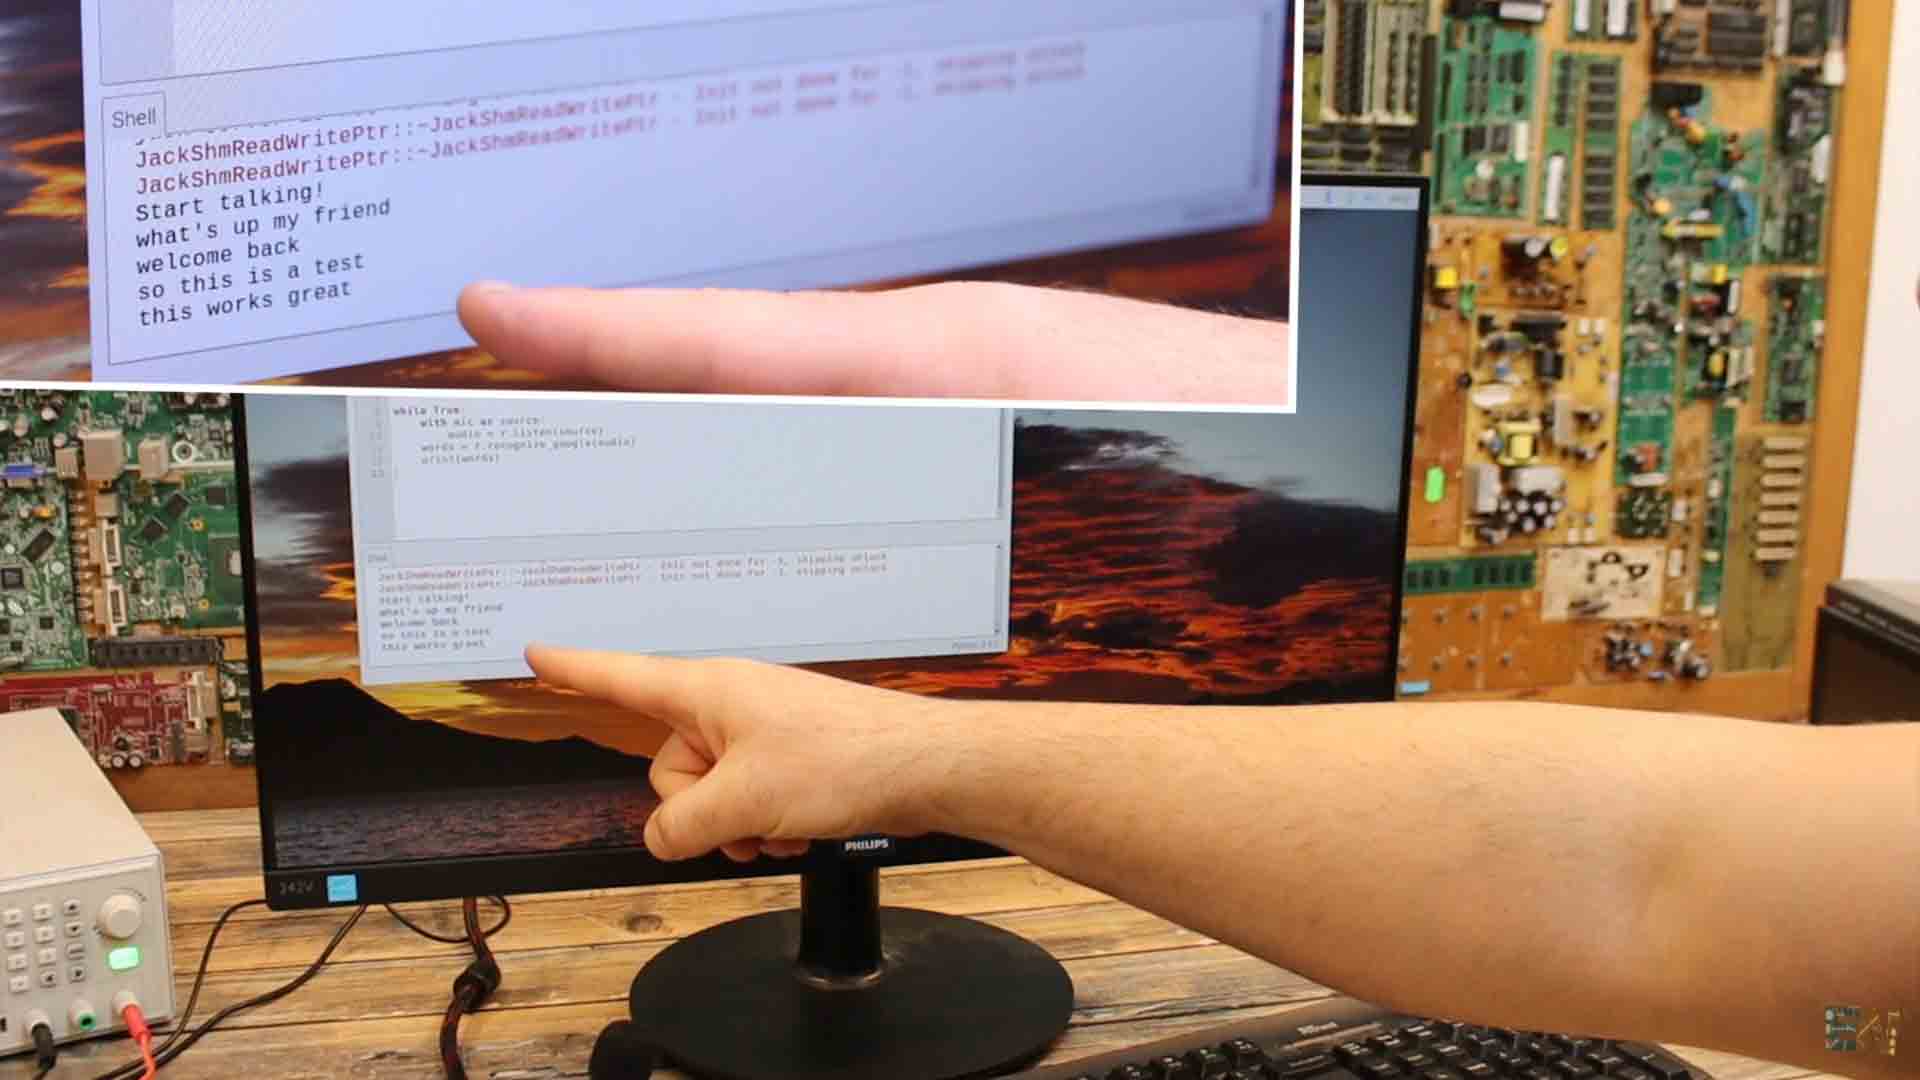
So as you can see the results are very good. I can say full sentences and it works great, way better than the other voice recognition module. But you see, I’m not a good raspberry pi programmer, but I do love Arduino. If you remember, I want to make my own automatic robot companion able to talk back to me. So I want to use this system with Arduino. Raspberry Pi has a few UART ports. We can output the results on that port and then use the Arduino to read them. On GPIO 14 and 15 we have the TX and RX pins. But by default the UART port is disabled. To enable it, on the terminal run the line below. It will open gray and blue a window. Go to interface options. Here go to i6 Serial. Select NO for the shell and on the next question select YES for the serial port enable. The UART port is now enabled but we have to reboot the PI.
6.Enable UART
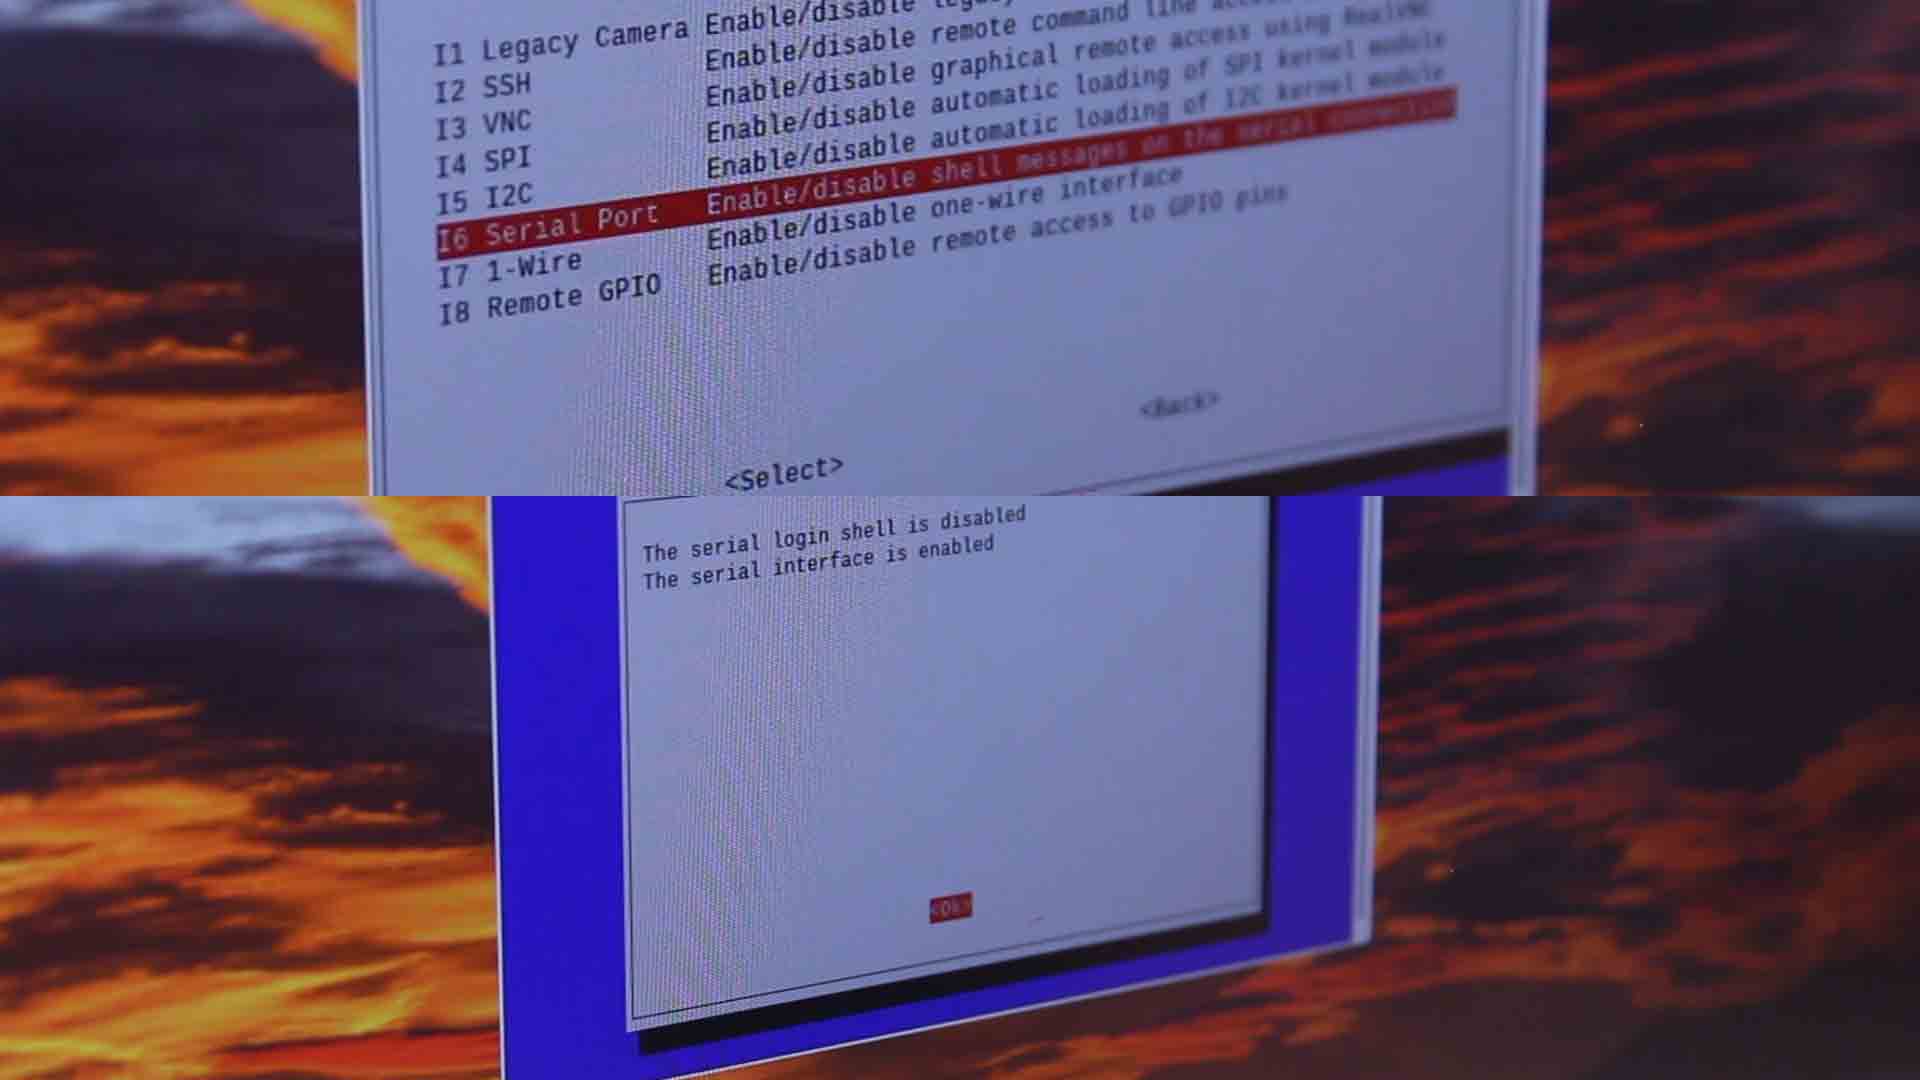
If you go to the terminal and run the line below (7), at the bottom of the .txt file you should see that the UART port is equal to 1 so is enabled. But if you try to use it at this point, it might not work. At least in my case it didn’t. That’s because the PI has several ports. In the terminal type the next line (8) and press enter. As you can see the serial 0 and 1 are mapped on the tty S0 and AMA0. But my PI has an on board Bluetooth module that is using the same ports. We need to swap these ports. Basically we need to have the tty AMA0 for serial 0 and tty S0 for serial 1. For that run line (7) once again and open the config text file. Copy the next line (9) and go at the bottom of the file and paste it there. Save the file and exit. Then reboot the PI. Once it starts up, check again the port mapping by running the line (8). As you can see, the ports were swapped. Now we can use the serial port.
7.Open config text file
8.Check port map
9.Swap UART ports
We go back to the recognition .py code. We import the serial module. We create the serial port and here we have to place the tty AMA0 port. This is the baud rate and let’s set it to 115200 because that’s common with Arduino.
Now, each time we detect a new voice command, we use these lines to send the data on the UART port. First we pass the text from String format to bytes. Then we use the write function to send the data. That’s it. Let 's test it.
Conenct the PI UART to the Arduino as in the schematic above. Then upload the enxt Arduino code to the ARduino adn connect the OLED screen. Run the enxt .py code in Thonny on the Pi and check the results.
import serial
import speech_recognition as sr

ser = serial.Serial ("/dev/ttyAMA0", 115200)  #Open serial port at 115200 speed

r = sr.Recognizer()
mic = sr.Microphone()

print("Start talking!")

while True:
    with mic as source:
        audio = r.listen(source)
    words = r.recognize_google(audio)
    print(words)
    ser.write(bytes(words, 'utf-8'))
#include <SPI.h>
#include <Wire.h>
#include <Adafruit_GFX.h>         //download here: https://www.electronoobs.com/eng_arduino_Adafruit_GFX.php
#include <Adafruit_SSD1306.h>     //downlaod here: https://www.electronoobs.com/eng_arduino_Adafruit_SSD1306.php
Adafruit_SSD1306 display(5);


void setup() {
  Serial.begin(115200);
  display.begin(SSD1306_SWITCHCAPVCC, 0x3C);  // initialize with the I2C addr 0x3C (for the 128x32 or 64 from eBay)
  delay(100);
  display.clearDisplay();
  display.setTextSize(1);
  display.setCursor(0,0);
  display.setTextColor(WHITE);
  display.display();
  delay(100);
}

void loop() {
  if(Serial.available()>0){
    String incommingString = Serial.readString();
    display.clearDisplay();
    display.println(incommingString);
    display.display();
  }
}As you can see I get the text from my voice commands on the Arduino. That’s great, just as I wanted. Now I can make my robot using way better voice commands. If my videos help you, consider supporting my work on my PATREON or a donation on my PayPal. Thanks again and see you later guys.