
The A4988 was probably the most used driver for stepper motors for a long time, especially for 3D printers and CNC machines, for example, remember the RAMPs controller board for CNCs or my GRBL PCB I’ve made for a previous project? Well, this is the A4988 step motor driver. But nowadays pretty much all 3D printers are trying to use the TMC drivers, at least for the X and Y axis in order to lower the noise or even make the printer almost silent. So what is the difference between the well known A4988 and the TMC drivers such as the TMC2209 or the 2225. How do they work internally, how to control a stepper motor and what is the sound lever each driver will create. That’s what we will see in this post. So guys, let’s get started.
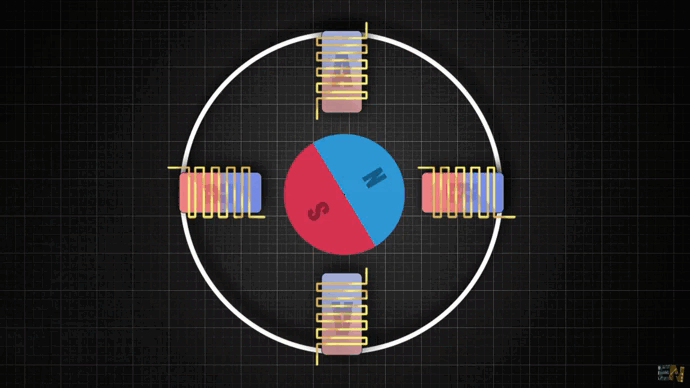
What’s up my friends, welcome back. To understand the difference between the old A4988 and the new drivers we have on the market, you need to know how a stepper motor works. Inside such a motor we have coils. Basically we have two coils named A and B. We can see 8 coils in this case, and that’s because the A and B coils are divided in 4 windings each. We apply pulses at the driver and the driver will apply pulse at the motor but in a sequence. When the driver applies the pulse at the A coils, the magnet of the rotor, since it has polarity, it will follow the magnetic field and rotate accordingly. Then the driver applies the pulse at the B coils so the rotor magnet will make one more step. So, like this, the movement is very jumpy and it will vibrate a lot and create a lot of noise. The shape of such a pulse is a square wave. Instead of this, we can microstep where we slowly pass from one coil to the other. This will make the movement smoother and the shape of the signal would be something like in the animation below. If we microstep even more the vibration would be even less. So as you can see, the shape of the signal tends to a sinusoidal wave but is not yet a perfect sinusoidal signal. That would be the perfect shape for such a control. But getting a sinusoidal signal requires better and more expensive hardware.
Use the links below and order a A4988 driver and any of the TMC drivers. These might not be genuine drivers but they work the same and are quite low cost. You will also need a power supply to apply 12V and wires,a breadboard and a potentiometer. Obviouslly you also need a stepper motor to test the driver, for example the NEMA 17 motor.
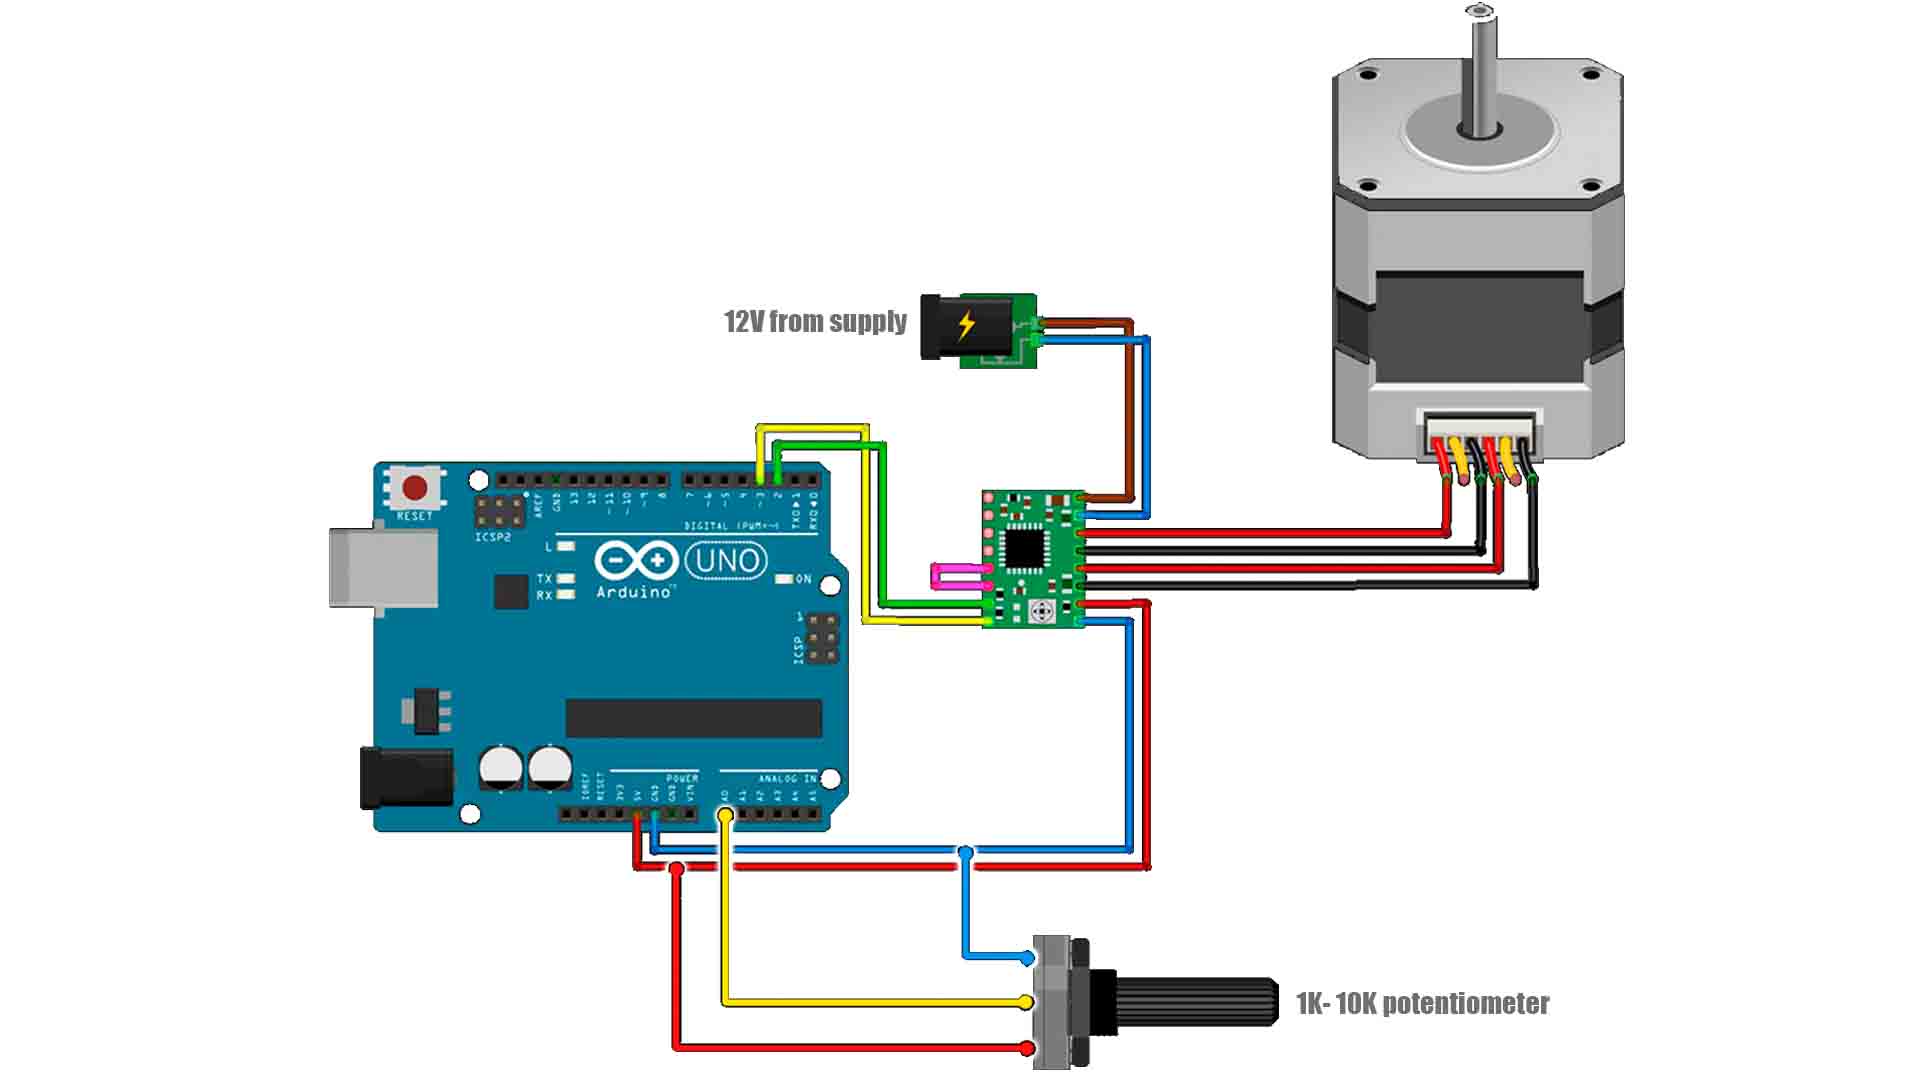
Use the schematic above and make the connections to the drivers. All drivers have the same connection. The only difference is that the A4988 need a bridge connection between the sleep and reset pins but the rest of the drivers don't! Make connections and upload the test code. Supply with 12V and use the potentiometer to adjust the speed and check the results!
// defines pins
#define stepPin 2
#define dirPin 3

int customDelay, customDelayMapped;

void setup() {
  // Sets the two pins as Outputs
  pinMode(stepPin, OUTPUT);
  pinMode(dirPin, OUTPUT);
}
void loop() {
  speedControl();
  // Makes pules with custom delay, depending on the Potentiometer, from which the speed of the motor depends
  digitalWrite(stepPin, HIGH);
  delayMicroseconds(customDelayMapped);
  digitalWrite(stepPin, LOW);
  delayMicroseconds(customDelayMapped);
}
// Custom function for reading the potentiometer and mapping its value from 300 to 3000, suitable for the custom delay value in microseconds
void speedControl() {
  customDelay = analogRead(A0); // Read the potentiometer value
  customDelayMapped = map(customDelay, 0, 1023, 300, 3000); // Convert the analog input from 0 to 1024, to 300 to 3000
}}
So I hope you now have a better idea of why the new TMC drivers are better, so consider using them with your projects. I don’t have any genuine driver from trynamic and I bought all my drivers from AliExpress and they cost only a few dollars, for example a pack of 5 drivers is around 16 dollars. Some stepper motors already have these stepper drivers installed on their body so it will occupy less space, they even have an OLED screen or an encoding sensor.
If my videos help you, consider supporting my work on my PATREON or a donation on my PayPal. Thanks again and see you later guys.


