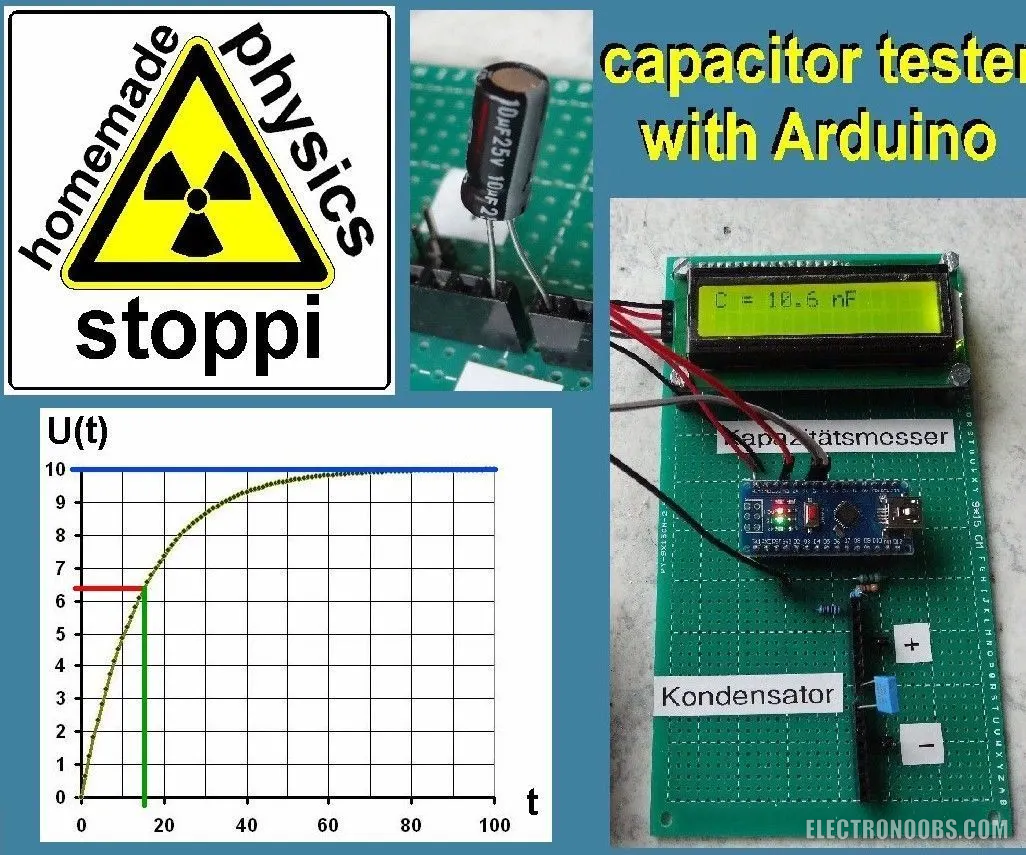
Capacitance is a measure of the ability of "something" to store electrical charge. Arduino capacitance meter relies on the same basic property of capacitors- the time constant.
by: ELECTRONOOBS on 2026-05-26
The time constant of a capacitor is defined as the time it takes for the voltage across the capacitor to reach 63.2% of its voltage when fully charged. Larger capacitors take longer to charge, and therefore have larger time constants. An Arduino can measure capacitance because the time a capacitor takes to charge is directly related to its capacitance by the next equation:
TC = R x C
TC is the time constant of the capacitor (in seconds).
R is the resistance of the circuit (in Ohms).
C is the capacitance of the capacitor (in Farads).
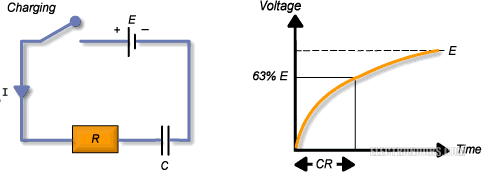
So what we are going to do is charge the capacitor through a resistor using one of the Arduino pins. We have to know the resistence value of that resistor. Using the ADC of the arduino we can measure the voltage that the capacitor reached. We start counting the sime and when the voltage reach 63.2% of the full charge we stop the charge and calculate te capacitance. We can obtain the capacitance value because we know the resistance of the circuit, the measured voltage and the time that it took to reach 63.2% of the full charge. From the equation above we obtain C as:
C = TC / R
The Arduino measures the capacitance of the unknown capacitor by recording the time it takes for the capacitor to reach 63.2% of its voltage when fully charged, then dividing that value by the known resistance of the circuit. Now we should be ready to set up the capacitance meters and start measuring some capacitors.
Range 0.1 ?F to 3900 ?F
The main problem of this setup is the values range that we can measure. It's almos impossible to be able to measure capacitors from 1pF to 100F using one simple circuit and the Arduino. That's why we are going to mount two circuits. One for ranges from 0.1uF to 3.9F and the other one from 10pF to 4.7nF. With this two setups we could measure capacitors from 10pF to almos 4F.
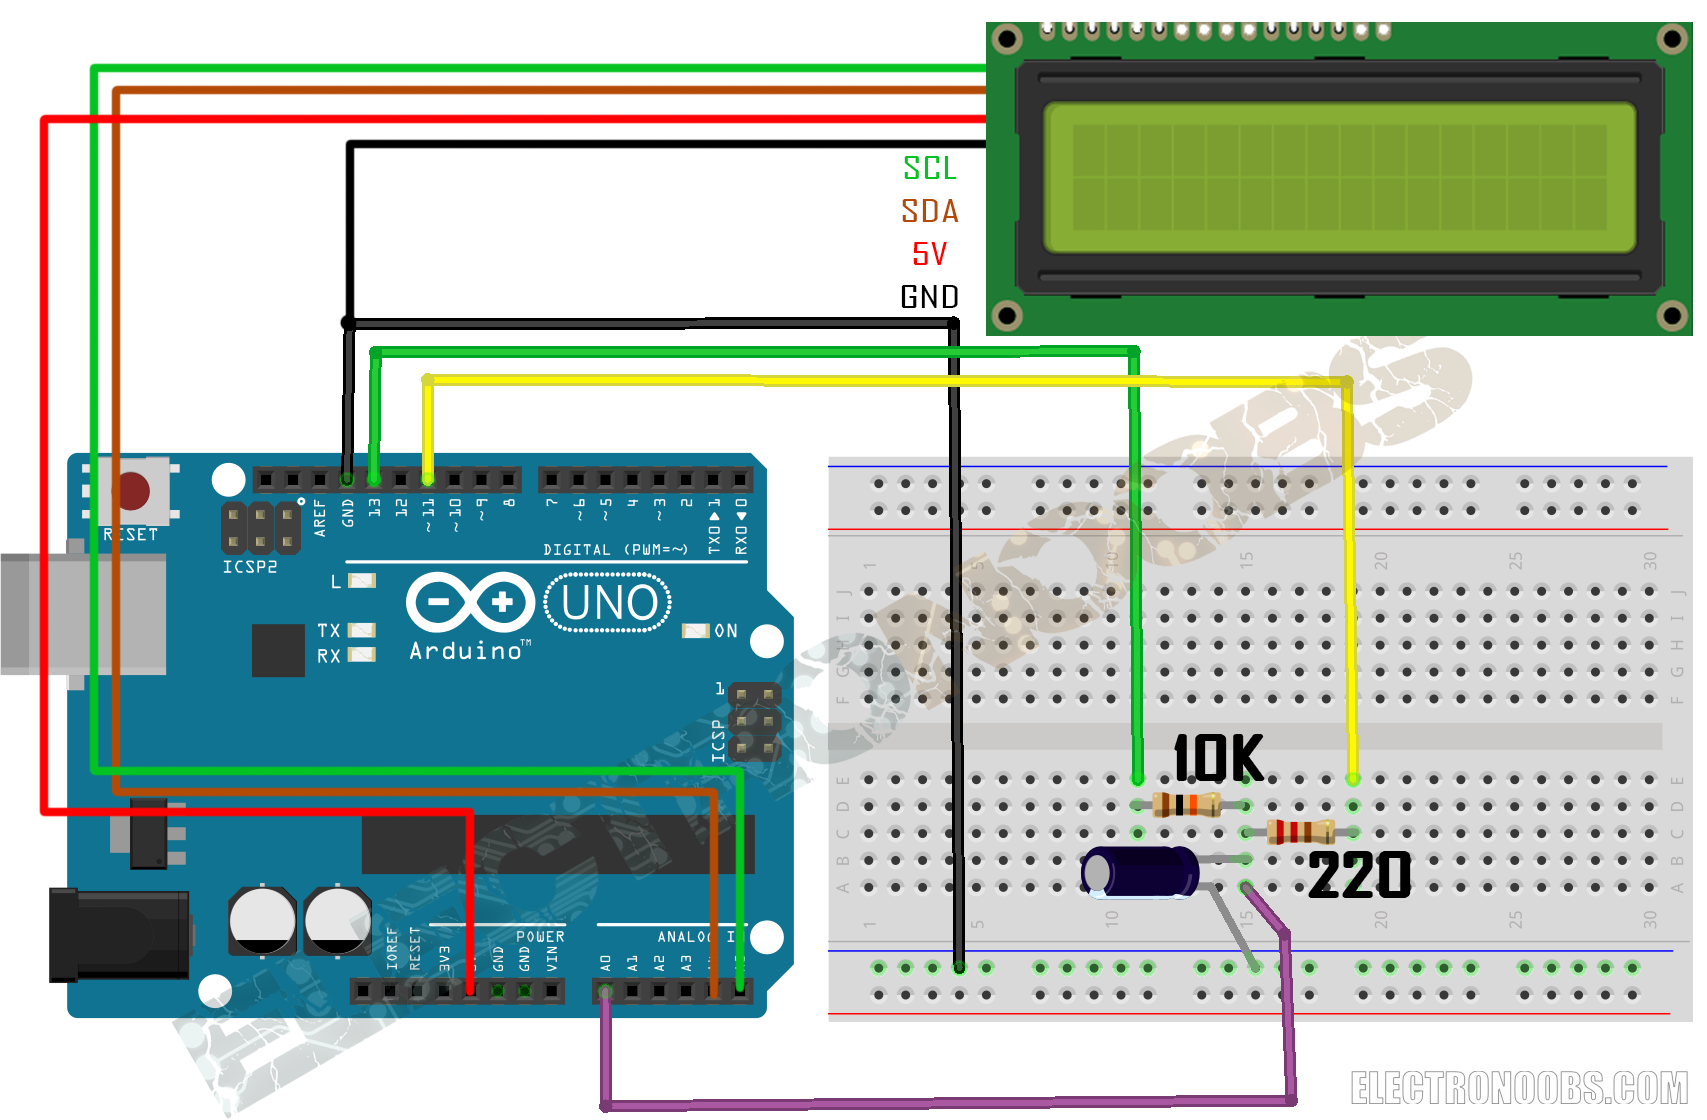
Se we will use pin 13 to charge the capacitor through the 10K ohm resistor. Once the charge starts we also start a time counter in microseaconds. We measure the voltage with the analog input A0. The Arduino ADC has 10 bits so 0 volts would be 0 and 5 volts would be 1024. So 63.2% of 1024 is 648. When the analog read reaches that values we stop charging the capacitor and the time counter as well. We obtain the C value dividing the elapsed time by the used resistor value. We connect the LCD i2c pins as shown in the schematic above and upload the next code. In order to use the LCD with i2c comunication we need to install the lyquid crystal i2c library below. Download it and install it to your Arduini IDE.
/*Thanks. Remember to visit my Youtube channel
  If you don't whant to Serial print the valeus just delete the serial. print lines
  and leave just the LCD print ones.
  I've used a i2c LCD screen module.
*/
//LCD config
#include <Wire.h>
#include <LiquidCrystal_I2C.h>
LiquidCrystal_I2C lcd(0x3f,20,4);  //sometimes the adress is not 0x3f. Change to 0x27 if it dosn't work.

#define analogPin      0
#define chargePin      13
#define dischargePin   8
#define resistorValue  10000.0F  //Remember, we've used a 10K resistor to charge the capacitor

unsigned long startTime;
unsigned long elapsedTime;
float microFarads;
float nanoFarads;

void setup(){
  pinMode(chargePin, OUTPUT);
  digitalWrite(chargePin, LOW);
  lcd.init();
  lcd.backlight();
}

void loop(){
  digitalWrite(chargePin, HIGH);
  startTime = micros();
  while(analogRead(analogPin) < 648){
  }

  elapsedTime= micros() - startTime;
  microFarads = ((float)elapsedTime / resistorValue) ;


  if (microFarads > 1){

    lcd.clear();
    lcd.setCursor(0,0);
    lcd.print("SCALE:  0.1uF-4F");
    lcd.setCursor(0,1);
    lcd.print(microFarads);
    lcd.setCursor(14,1);
    lcd.print("uF");
    delay(500);
  }

  else{
    nanoFarads = microFarads * 1000.0;
    lcd.clear();
    lcd.setCursor(0,0);
    lcd.print("SCALE:  0.1uF-4F");
    lcd.setCursor(0,1);
    lcd.print(nanoFarads);
    lcd.setCursor(14,1);
    lcd.print("nF");
    delay(500);
  }


  digitalWrite(chargePin, LOW);
  pinMode(dischargePin, OUTPUT);
  digitalWrite(dischargePin, LOW);     //discharging the capacitor
  while(analogRead(analogPin) > 0){
  }//This while waits till the capaccitor is discharged

  pinMode(dischargePin, INPUT);      //this sets the pin to high impedance

  lcd.setCursor(0,0);
  lcd.print("DISCHARGING.....");
  lcd.setCursor(0,1);


}
Range 1 pF to 1 nF
We saw in the example above that we colud measure capacitance just by charging the capacitor. But the example above has a lot of error for small capacitors with range between 1pF and 1nF. So this next example will measure with a lot more precision small capacitors. Finnaly all we need to do is to change between the two ranges using a switch connectet do one of the Arduinos inputs.

We'll use A2 to caharge the capacitor and A0 to discharge it. This circuit is quite simple and it's all based on the code. There is no extra resistor just the internal pullup and pulldown resistors. Obserbe and upload the code below. Connect the LCD to the i2c pins and start measureing capacitors. In the next step we will try to mearge the two examples toghether to have a total range from 1pF to 4F. Remember to install the lyquid crystal i2c library above.
/*Thanks. Remember to visit my Youtube channel
  If you don't whant to Serial print the valeus just delete the serial. print lines
  and leave just the LCD print ones.
  I've used a i2c LCD screen module.
*/
//LCD config
#include <Wire.h>
#include <LiquidCrystal_I2C.h>
LiquidCrystal_I2C lcd(0x3f,20,4);  //sometimes the adress is not 0x3f. Change to 0x27 if it dosn't work.

const int OUT_PIN = A2;
const int IN_PIN = A0;
const float IN_STRAY_CAP_TO_GND = 24.48;
const float IN_CAP_TO_GND  = IN_STRAY_CAP_TO_GND;
const float R_PULLUP = 34.8;
const int MAX_ADC_VALUE = 1023;

void setup()
{
  pinMode(OUT_PIN, OUTPUT);
  pinMode(IN_PIN, OUTPUT);
  lcd.init();
  lcd.backlight();
  }

void loop()
{
    pinMode(IN_PIN, INPUT);
    digitalWrite(OUT_PIN, HIGH);
    int val = analogRead(IN_PIN);
    digitalWrite(OUT_PIN, LOW);

    if (val < 1000)
    {
      pinMode(IN_PIN, OUTPUT);

      float capacitance = (float)val * IN_CAP_TO_GND / (float)(MAX_ADC_VALUE -

val);

      lcd.setCursor(0,0);
      lcd.print("Scale:   1pF-1nF");
      lcd.setCursor(0,1);
      lcd.print(capacitance,3);
      lcd.setCursor(14,1);
      lcd.print("pF");
    }

    else
    {
      pinMode(IN_PIN, OUTPUT);
      delay(1);
      pinMode(OUT_PIN, INPUT_PULLUP);
      unsigned long u1 = micros();
      unsigned long t;
      int digVal;

      do
      {
        digVal = digitalRead(OUT_PIN);
        unsigned long u2 = micros();
        t = u2 > u1 ? u2 - u1 : u1 - u2;
      }

      while ((digVal < 1) && (t < 400000L));

      pinMode(OUT_PIN, INPUT);
      val = analogRead(OUT_PIN);
      digitalWrite(IN_PIN, HIGH);
      int dischargeTime = (int)(t / 1000L) * 5;
      delay(dischargeTime);
      pinMode(OUT_PIN, OUTPUT);
      digitalWrite(OUT_PIN, LOW);
      digitalWrite(IN_PIN, LOW);

      float capacitance = -(float)t / R_PULLUP / log(1.0 - (float)val / (float)MAX_ADC_VALUE);

      lcd.setCursor(0,0);
      lcd.print("Scale:   1pF-1nF");

      if (capacitance > 1000.0)
      {
        lcd.setCursor(0,1);
        lcd.print(capacitance / 1000.0, 2);
        lcd.setCursor(14,1);
        lcd.print("uF ");

      }

      else
      {
        lcd.setCursor(0,1);
        lcd.print(capacitance);
        lcd.setCursor(14,1);
        lcd.print("nF");

      }
  }
    while (micros() % 1000 != 0);
}All in one capacitance meter
What we will do now is combine the two schematics above in just one. We will have to switch between scales and for that wt will use a rotary switch conected to 5 volts and tow f the switch pins to digitals pins D13 and D8 as we can see in the schematic below. We use this pins because in the future I whant to combine this capacitance meter with the resistance meter that we've created before.
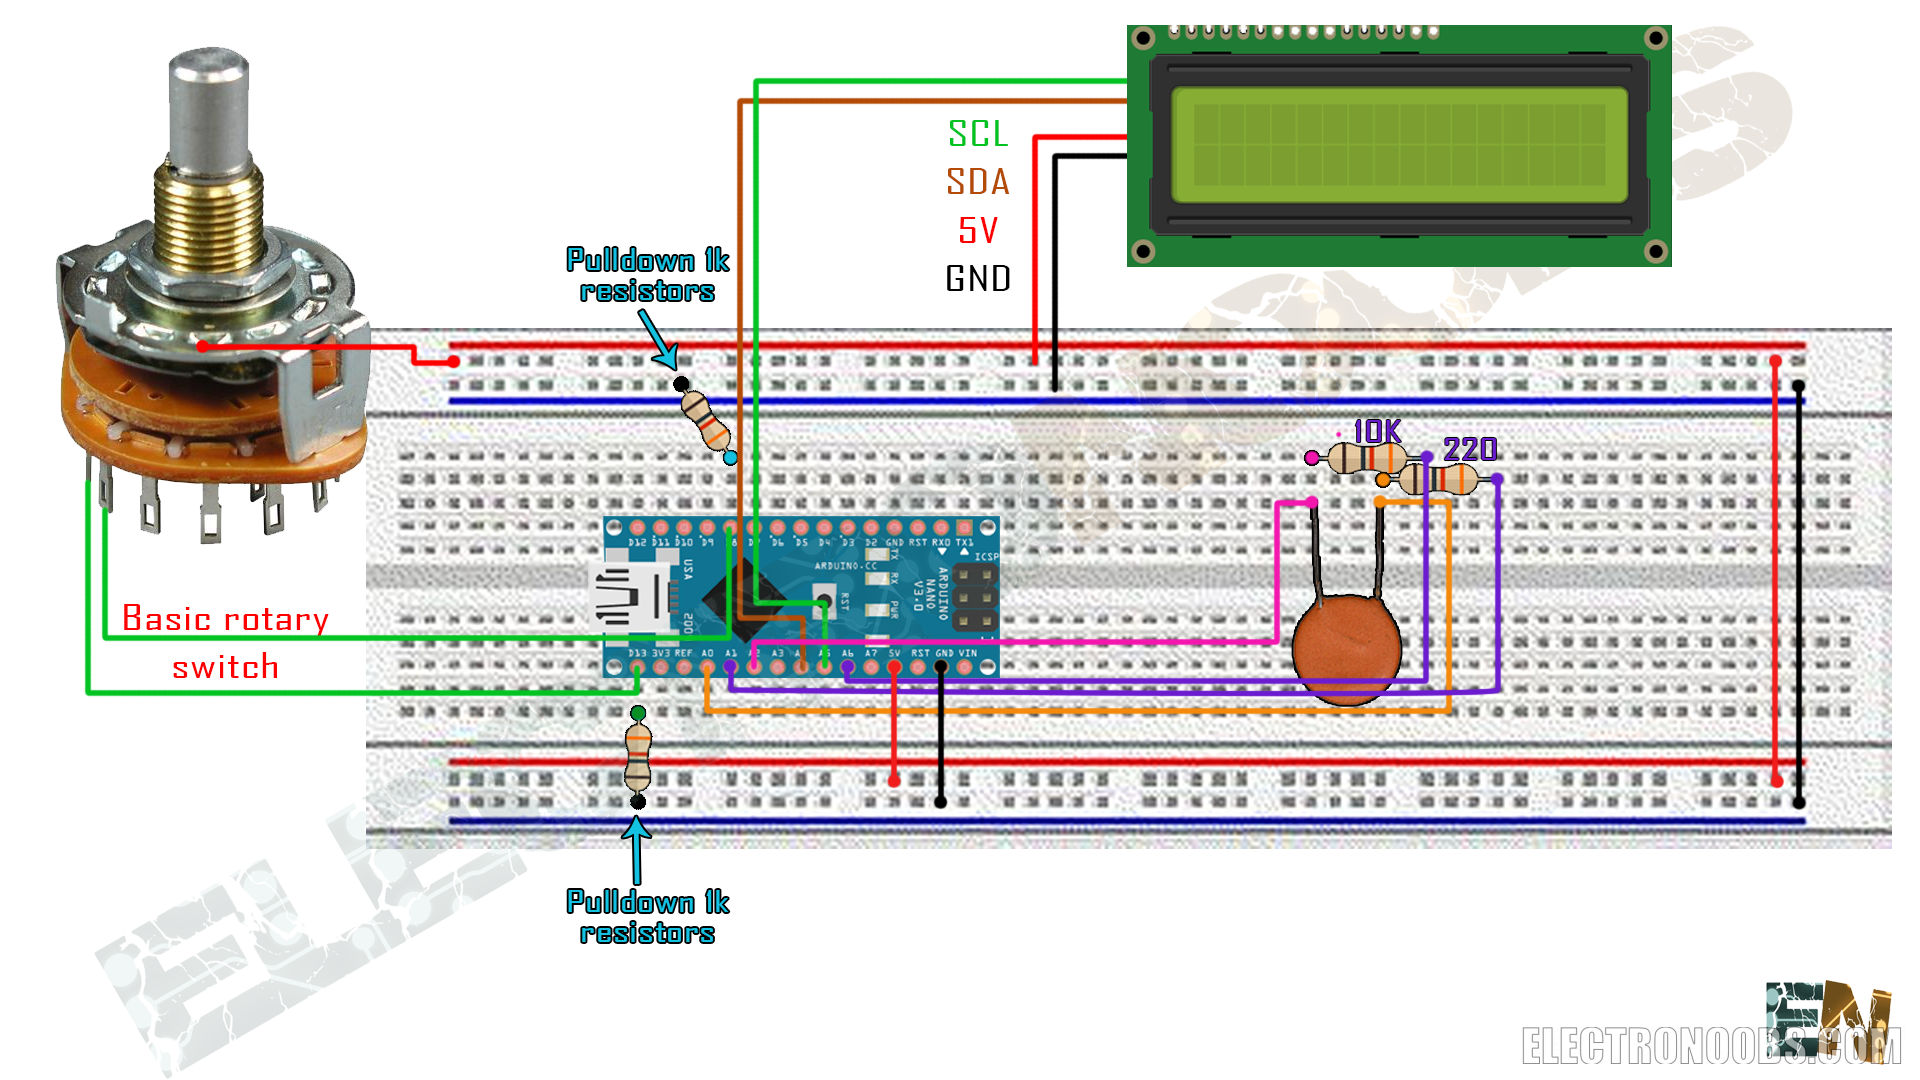
So for the high values range we will use pins A1 (violet) and A6(violet) to charge and discharge the capacitor and analog pin A0(orange) to measure the voltage. For the low values we will use A1(violet) and A0(orange) to charge and discharge the small capacitor. In the code when we switch the scale we will have to define as inputs the pins that we won't use in order to give them infinit impedance to be sure that no curent will flow through those pins.
/*Thanks. Remember to visit my Youtube channel
  I've used a i2c LCD screen module.
*/
//LCD config
#include <Wire.h>
#include <LiquidCrystal_I2C.h>
LiquidCrystal_I2C lcd(0x3f,20,4);  //sometimes the adress is not 0x3f. Change to 0x27 if it dosn't work.

int ScalepF=8;
int ScalenF=13;

//High values//
#define analogPin      A0
#define chargePin      5
#define dischargePin   6
#define resistorValue  10000.0F  //Remember, we've used a 10K resistor to charge the capacitor

unsigned long startTime;
unsigned long elapsedTime;
float microFarads;
float nanoFarads;

//Low values//
const int OUT_PIN = A2;
const int IN_PIN = A0;
const float IN_STRAY_CAP_TO_GND = 50.28; //We have to change te resistance in this configuration. The 10K and 220 resistors
                                         //are changeing the values
const float IN_CAP_TO_GND  = IN_STRAY_CAP_TO_GND;
const float R_PULLUP = 30.0;
const int MAX_ADC_VALUE = 1023;


void setup() {

  lcd.init();
  lcd.backlight();

  pinMode(ScalepF,INPUT);
  pinMode(ScalenF,INPUT);

  pinMode(OUT_PIN, OUTPUT);
  pinMode(IN_PIN, OUTPUT);
  pinMode(chargePin, OUTPUT);


}

void loop() {


//////////////////////////nF/////////////////////////////////////////

if(digitalRead(ScalenF))
{
  pinMode(OUT_PIN,OUTPUT);
  digitalWrite(OUT_PIN,LOW); //to make it GND
  pinMode(analogPin,INPUT); //This pin will read the voltage

  digitalWrite(chargePin, HIGH);
  startTime = micros();
  while(analogRead(analogPin) < 648){
  }

  elapsedTime= micros() - startTime;
  microFarads = ((float)elapsedTime / resistorValue) ;


  if (microFarads > 1){

    lcd.clear();
    lcd.setCursor(0,0);
    lcd.print("SCALE:  100nF-4F");
    lcd.setCursor(0,1);
    lcd.print(microFarads);
    lcd.setCursor(14,1);
    lcd.print("uF");
    delay(500);
  }

  else{
    nanoFarads = microFarads * 1000.0;
    lcd.clear();
    lcd.setCursor(0,0);
    lcd.print("SCALE:  100nF-4F");
    lcd.setCursor(0,1);
    lcd.print(nanoFarads);
    lcd.setCursor(14,1);
    lcd.print("nF");
    delay(500);
  }


  digitalWrite(chargePin, LOW);
  pinMode(dischargePin, OUTPUT);
  digitalWrite(dischargePin, LOW);     //discharging the capacitor
  while(analogRead(analogPin) > 0){
  }//This while waits till the capaccitor is discharged

  pinMode(dischargePin, INPUT);      //this sets the pin to high impedance

  lcd.setCursor(0,0);
  lcd.print("DISCHARGING.....");
  lcd.setCursor(0,1);

}

//////////////////////////pF/////////////////////////////////////////

if(digitalRead(ScalepF))
{

    pinMode(chargePin,INPUT);
    pinMode(dischargePin,INPUT);//We give high impedance to the two pins. We don't use this pins


    pinMode(IN_PIN, INPUT);
    digitalWrite(OUT_PIN, HIGH);
    int val = analogRead(IN_PIN);
    digitalWrite(OUT_PIN, LOW);

    if (val < 976)
    {

      pinMode(IN_PIN, OUTPUT);

      float capacitance = (float)val * IN_CAP_TO_GND / (float)(MAX_ADC_VALUE - val);
      lcd.clear();
      lcd.setCursor(0,0);
      lcd.print("Scale:   1pF-1nF");
      lcd.setCursor(0,1);
      lcd.print(capacitance,3);
      lcd.setCursor(14,1);
      lcd.print("pF");
      delay(200);
    }

    else
    {
      pinMode(IN_PIN, OUTPUT);
      delay(1);
      pinMode(OUT_PIN, INPUT_PULLUP);
      unsigned long u1 = micros();
      unsigned long t;
      int digVal;

      do
      {
        digVal = digitalRead(OUT_PIN);
        unsigned long u2 = micros();
        t = u2 > u1 ? u2 - u1 : u1 - u2;
      }

      while ((digVal < 1) && (t < 400000L));

      pinMode(OUT_PIN, INPUT);
      val = analogRead(OUT_PIN);
      digitalWrite(IN_PIN, HIGH);
      int dischargeTime = (int)(t / 1000L) * 5;
      delay(dischargeTime);
      pinMode(OUT_PIN, OUTPUT);
      digitalWrite(OUT_PIN, LOW);
      digitalWrite(IN_PIN, LOW);

      float capacitance = -(float)t / R_PULLUP / log(1.0 - (float)val / (float)MAX_ADC_VALUE);

      lcd.setCursor(0,0);
      lcd.print("Scale:   1pF-1nF");

      if (capacitance > 1000.0)
      {
        lcd.clear();
        lcd.setCursor(0,0);
        lcd.print("Scale:   1pF-1nF");
        lcd.setCursor(0,1);
        lcd.print(capacitance / 1000.0, 3);
        lcd.setCursor(14,1);
        lcd.print("uF ");
        delay(200);

      }

      else
      {
        lcd.clear();
        lcd.setCursor(0,0);
        lcd.print("Scale:   1pF-1nF");
        lcd.setCursor(0,1);
        lcd.print(capacitance,3);
        lcd.setCursor(14,1);
        lcd.print("nF");
        delay(200);

      }
  }
    while (micros() % 1000 != 0);
}
}Comments


Leave a comment
Please login in order to comment.