Hey guys. Today we are making yet another speaker project. But this time we have something different. These are portable speaker, wireless, with Bluetooth connection, but guess what, they are stereo. Sounds interesting? You get it? Sounds interesting, because it’s a speaker.
Anyway, the fact that the speakers are stereo is the interesting part. Why? Well, usually, when you receive music with a Bluetooth receiver, you do have the left and right channels but those are coming out from the same receiver. So, we need a wire between the left and right speakers. But we don’t want that, we want these to be wireless, portable and without any connection in between so that’s the interesting part. So let me show you how I’ve designed these speakers, all the parts we need and the steps you need to follow to make such project. Let’s get started.
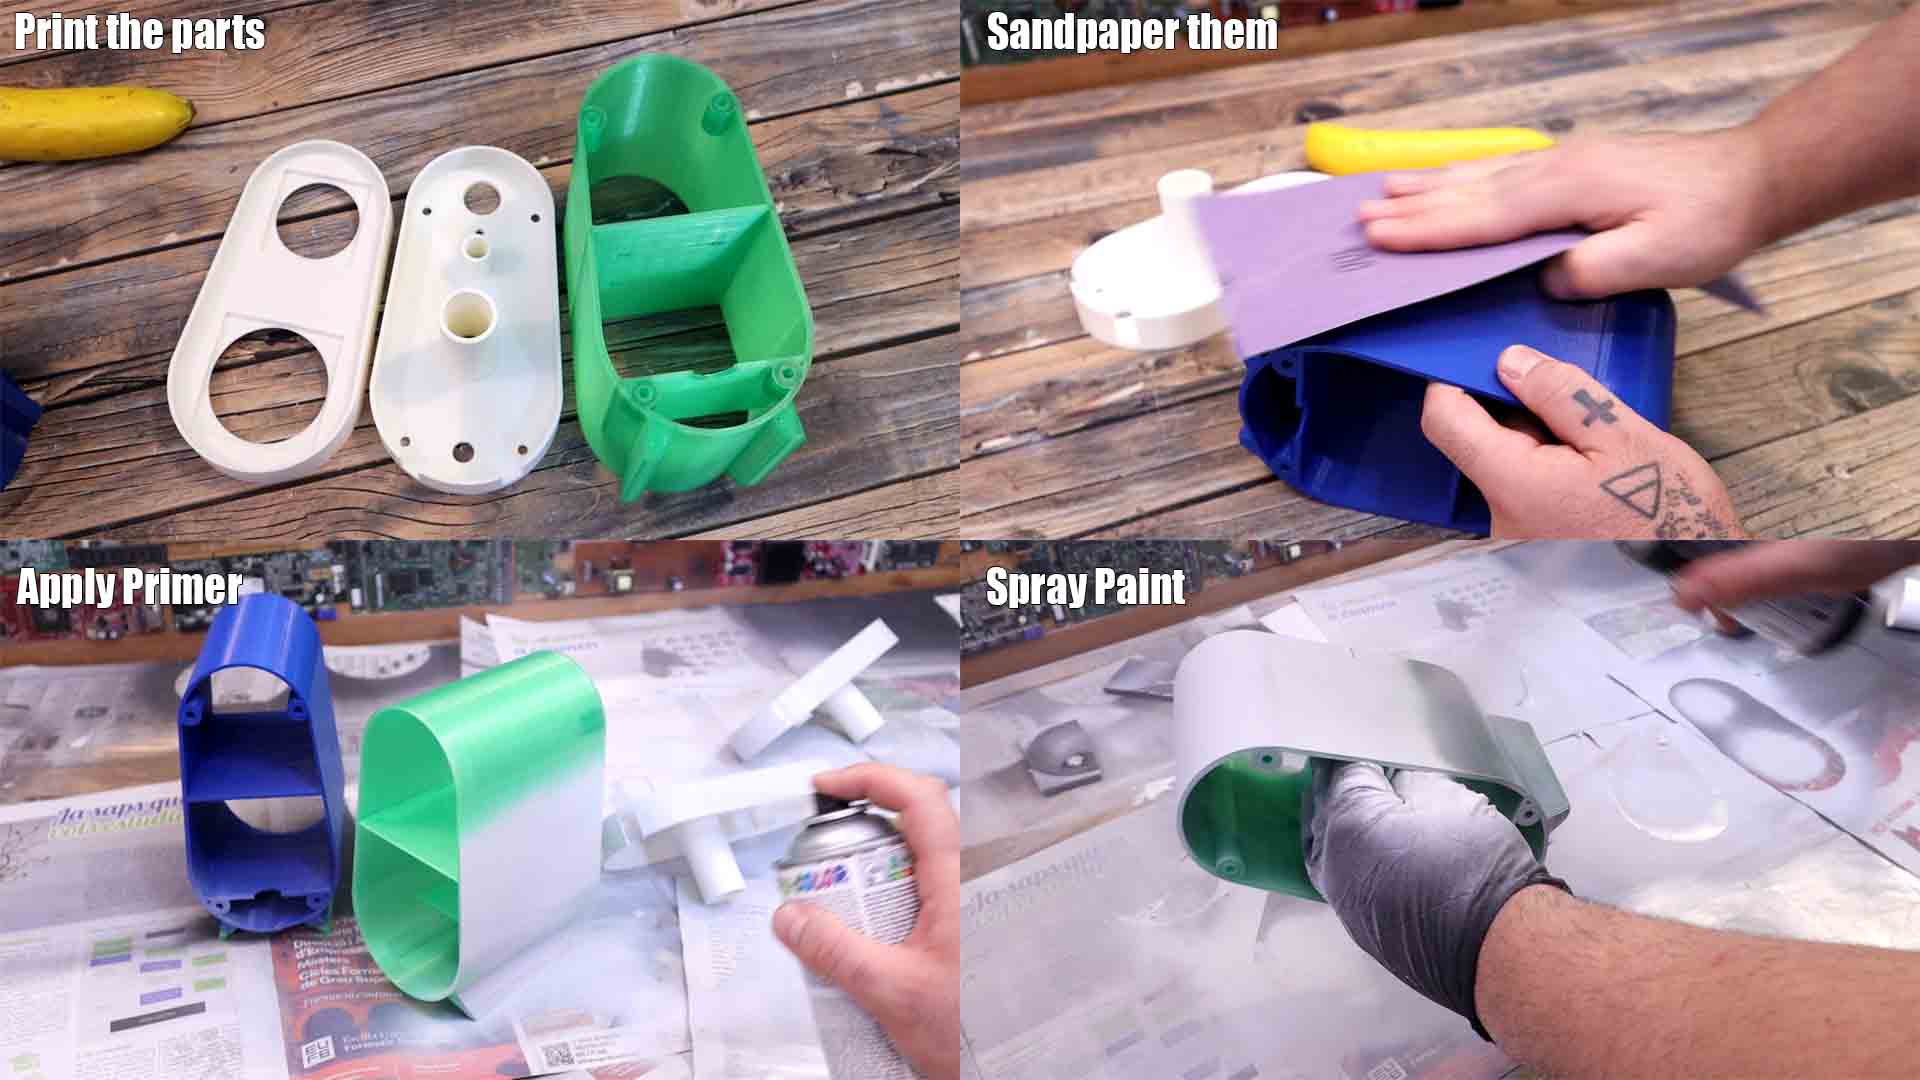
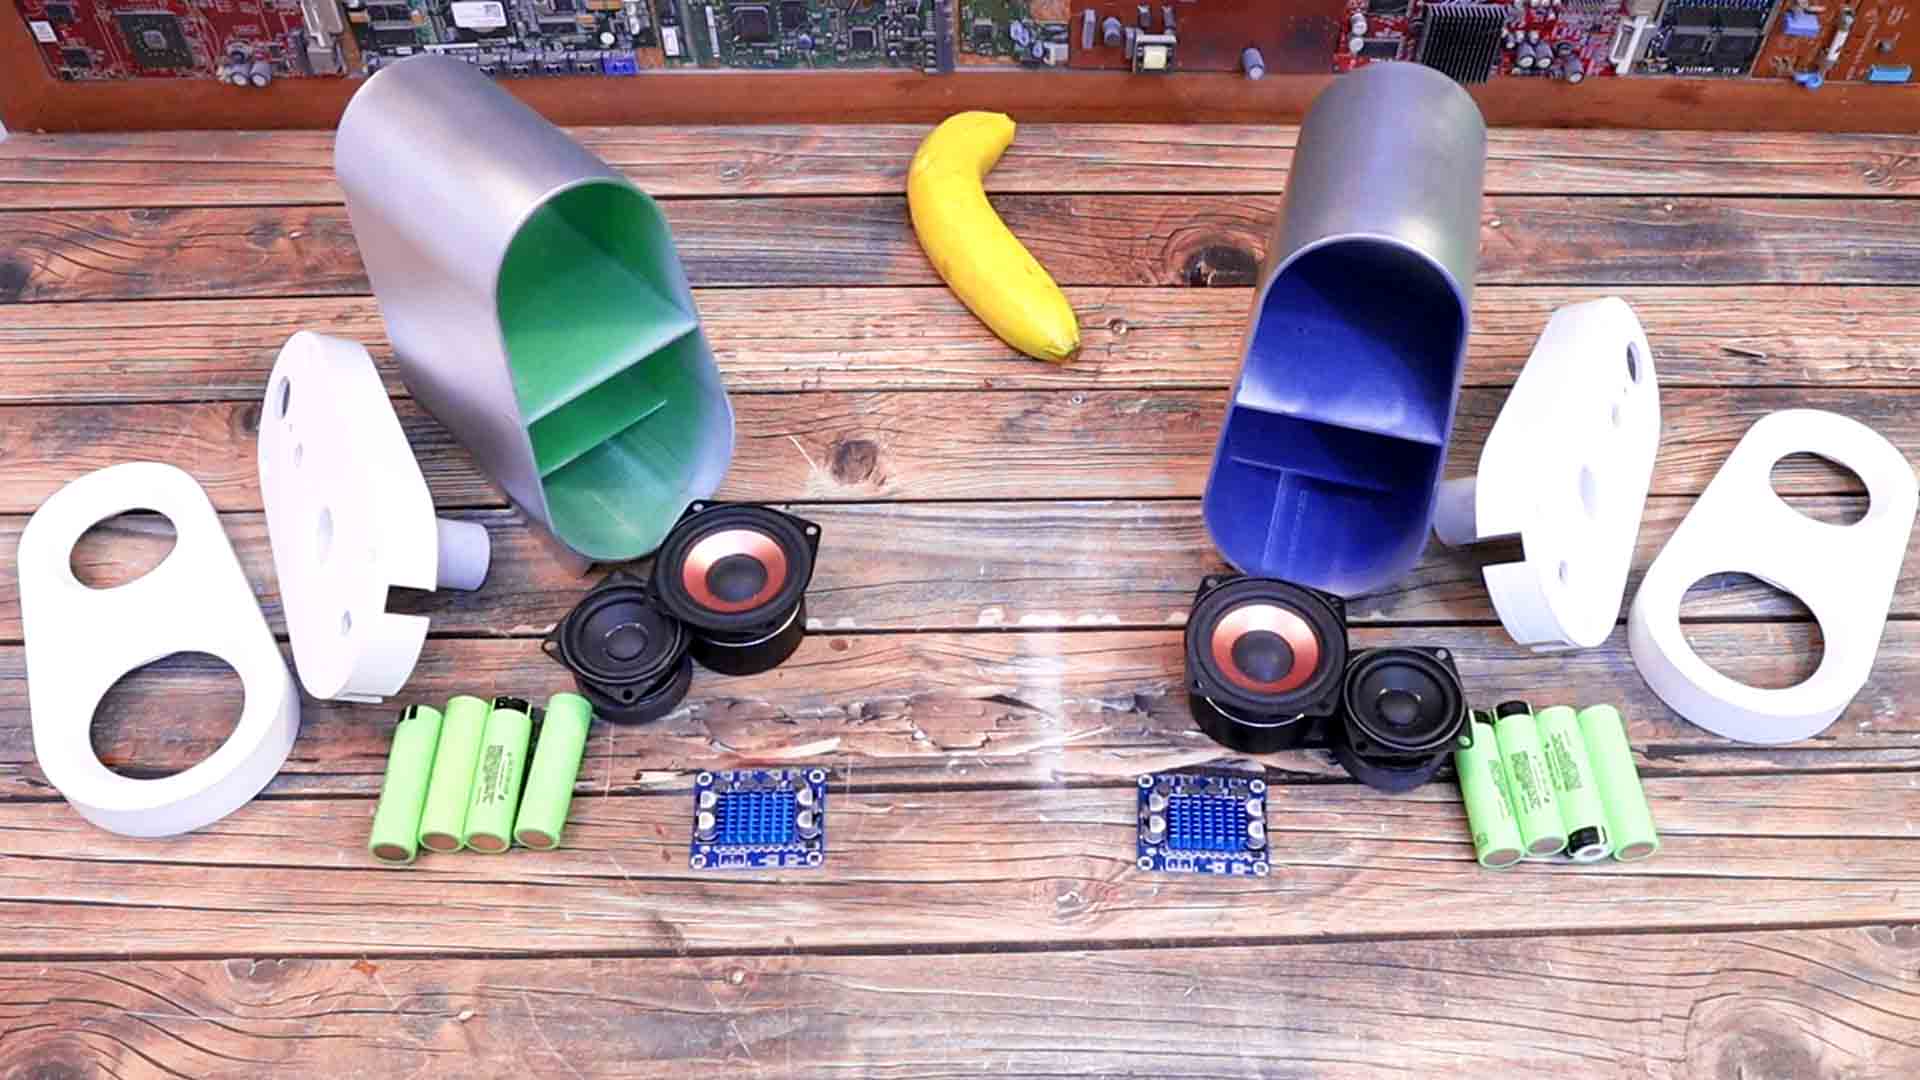
Let’s go and prepare the components for the speaker and the first components we need to select are some good speaker drivers. I recommend you to pay a little bit more and get some decent quality speakers. The idea is to use two different modules, one for the medium range and treble frequency and these other ones as subwoofers for the deep base sound. For the case I’ve made my own design and 3D print it. Print the parts with PLA, 0.2mm layer height and 2 perimeters. One of the main components is the amplifier since the power coming out from those tiny earbuds is very low. The module I've selected is using the TPA3110 amplifier and could have an output power of 30W for each channel and voltages from 8 up to 26V. As power source I want to use 4 Lithium-Ion batteries in series with a total voltage of 16.8V. Check the rest of the parts on the list below.
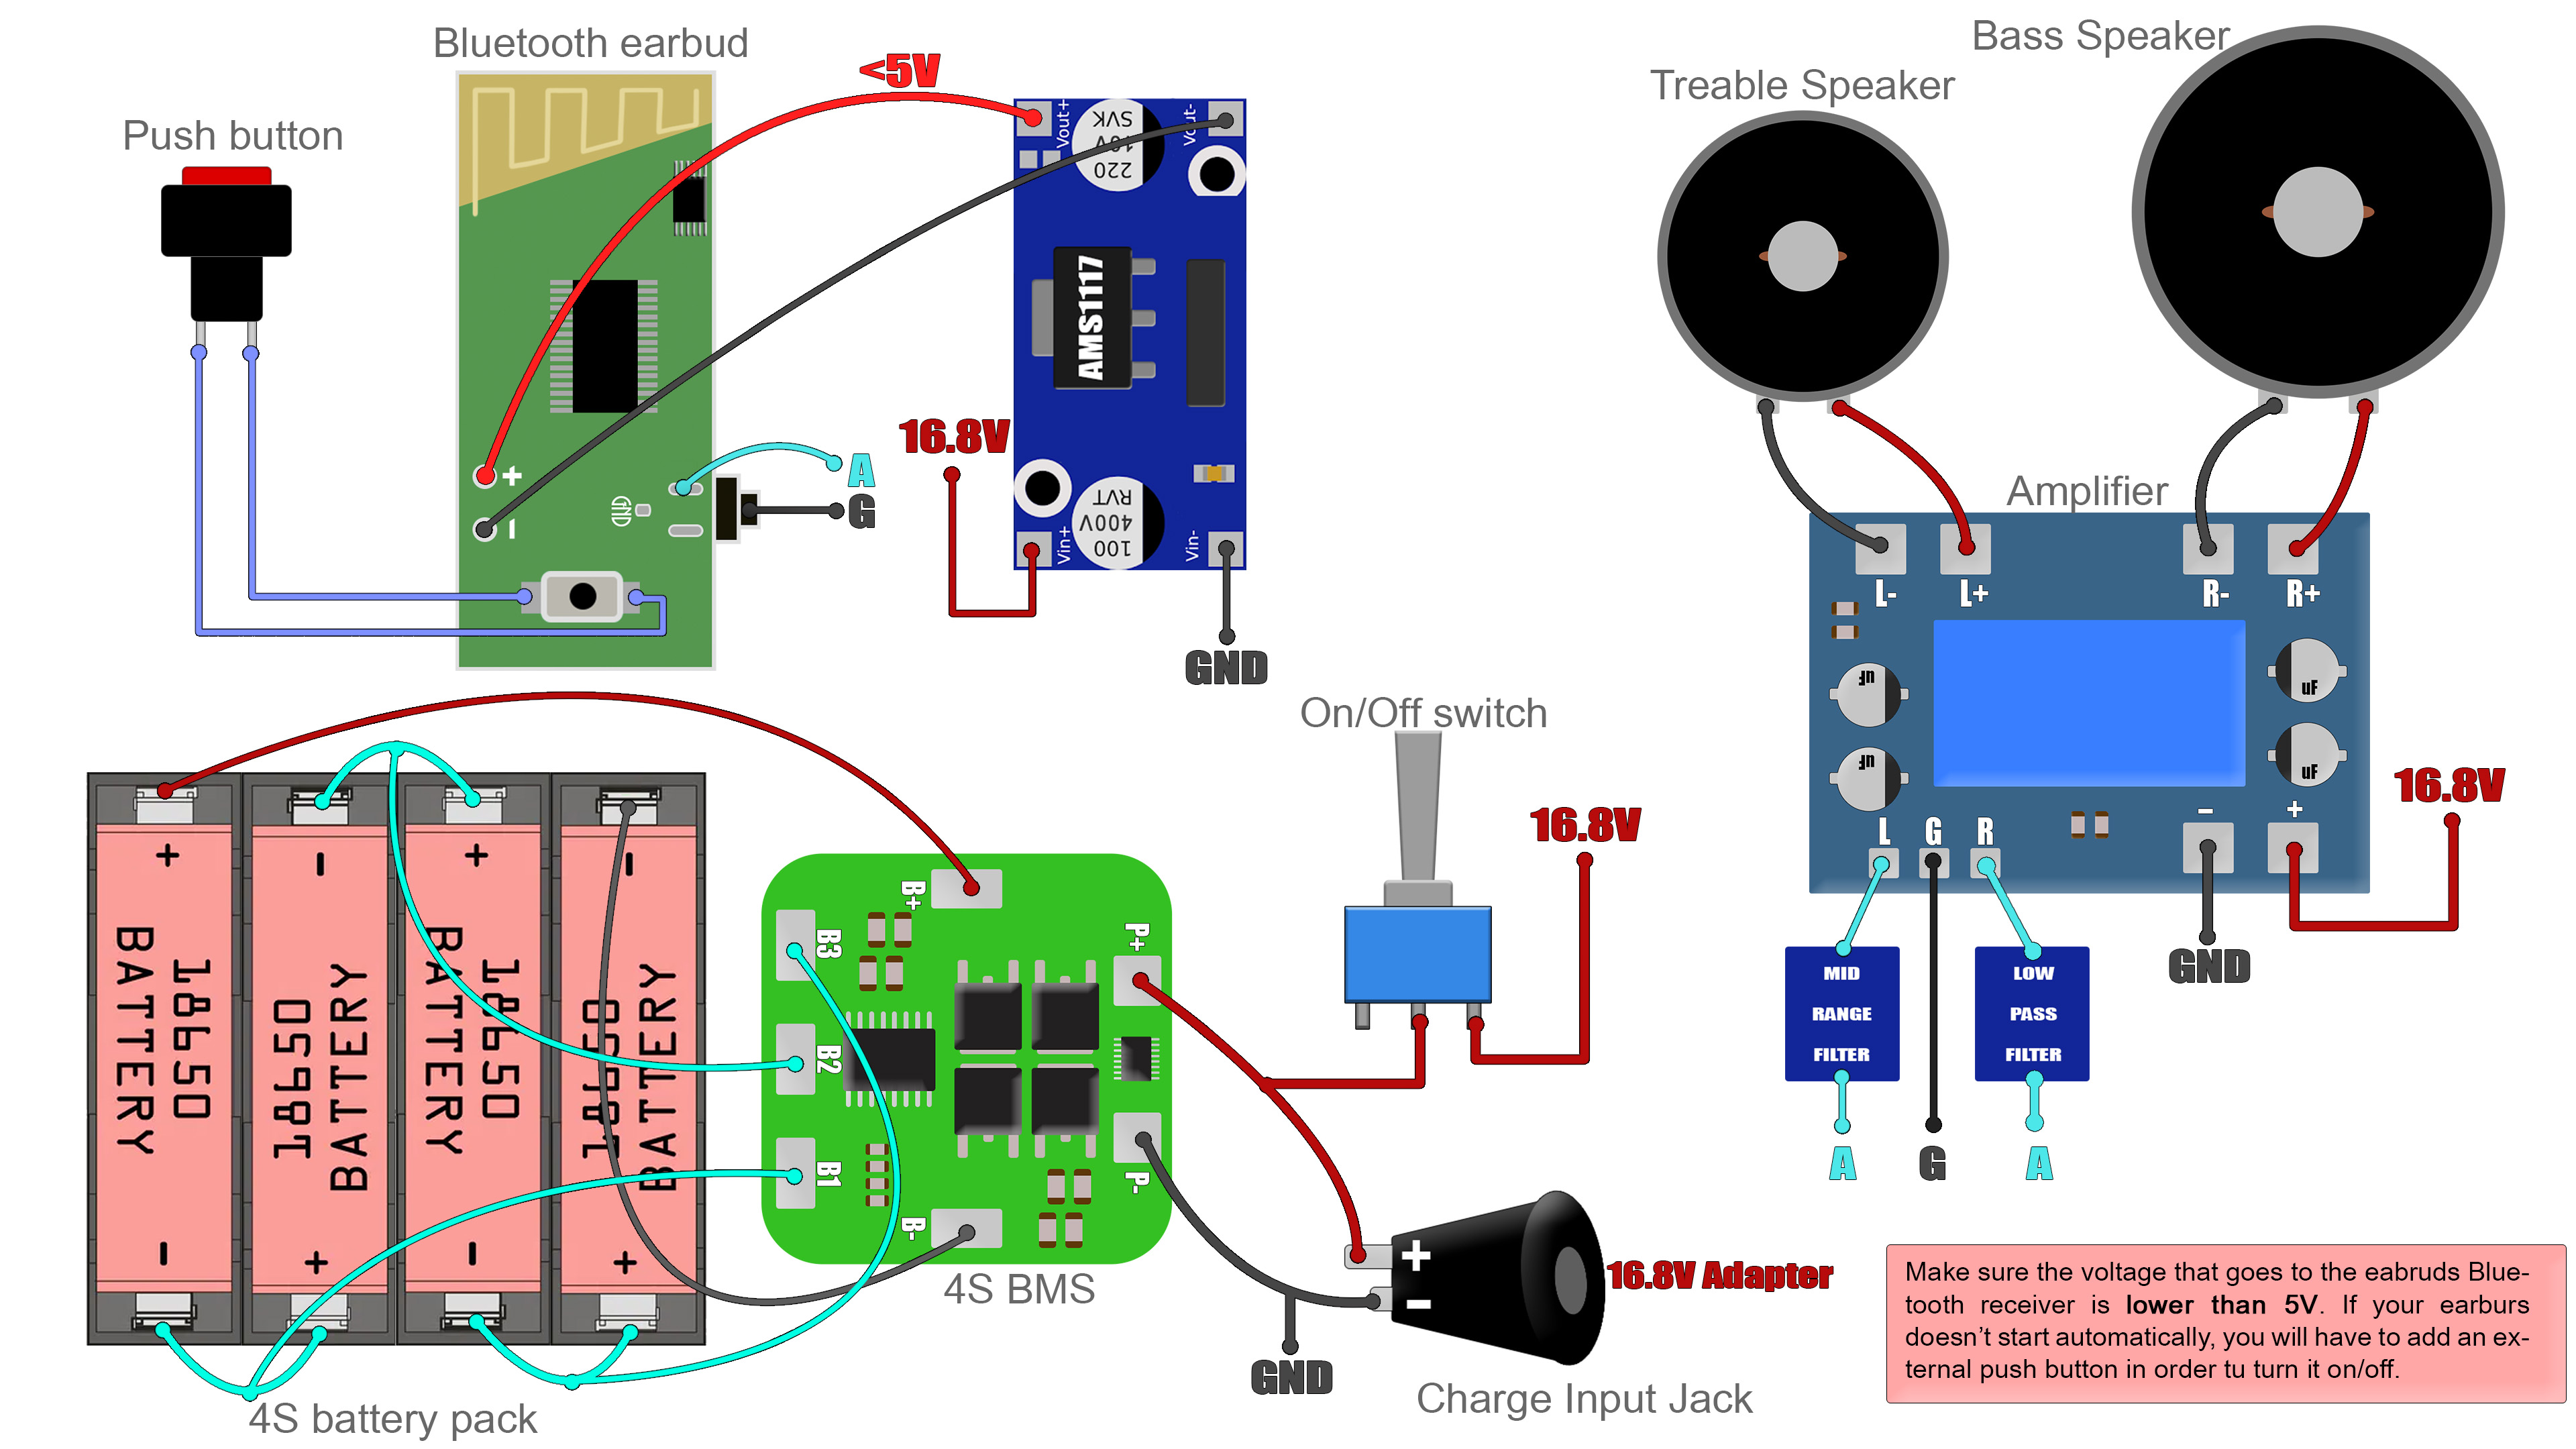
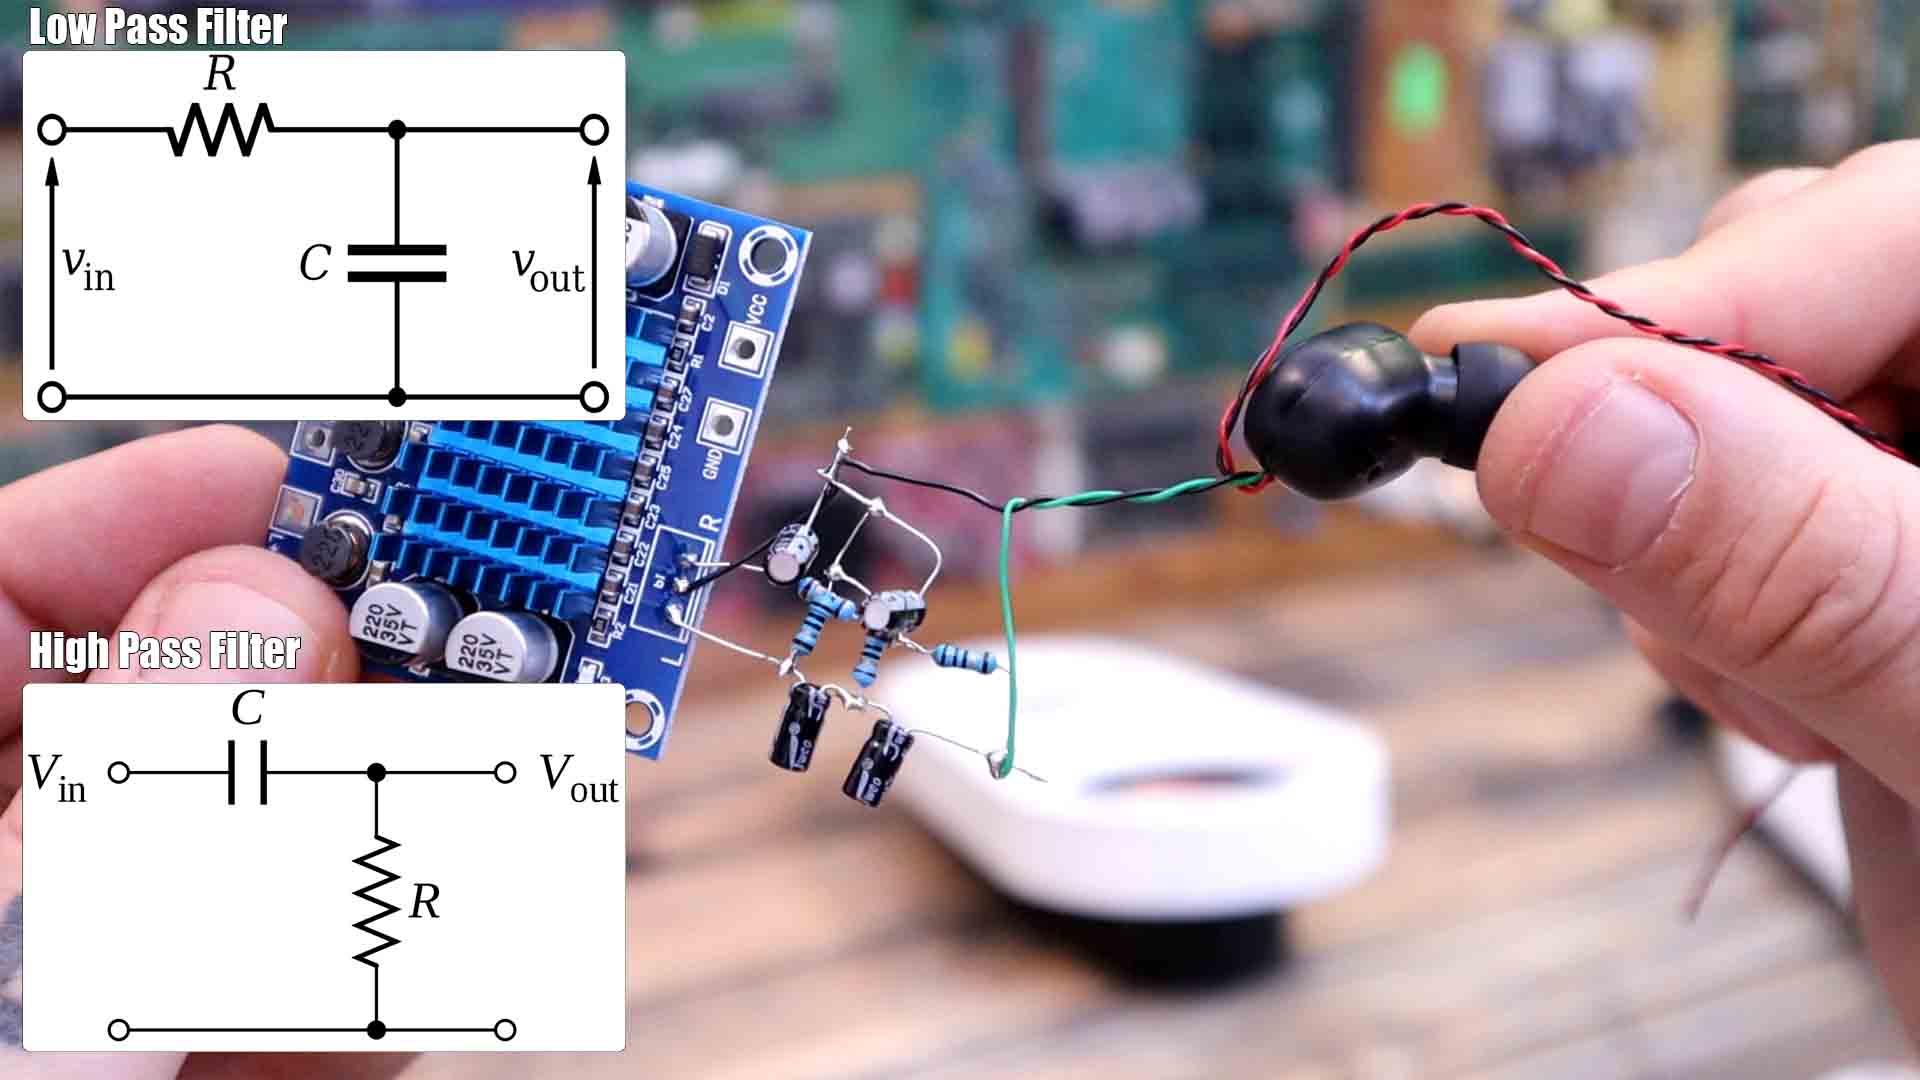
The circuit is quite simple. Once you open the earbuds, solder wites to the audio output that goes to the samll speakers and also remove that samll speaker. Also solder wires to the supply of the earbuds and to the push bhutton for turnning on/off the earbuds. Connect the BMS to the battery pack as below and the output from the BMS will go to the charging plug and to the ON/OFF main switch. From the switch we supply 16.8V to the amplifier and to the 5V regulator. Before you connect the regulator output to the earbuds, check with the multimeter if the output is below 5V, otherwise you will burn the earbuds BT receiver. Connect the speakers at the output of the amplifier and add the filters at the input. To these filters, connect the audio signal from the Bluetooth receiver. That's it.
Print the parts with PLA, 0.2mm layer height and 2 perimeters. Make sure you sandpaper the parts. Then I apply some primer paint and when is dry, I sandpaper the parts again. I want to get them as smooth as possible so apply how many layers of primer you think is enough. Once the parts are smoother, I can use some spray paint and give them a color. I will paint them white and some silver in order to give them an elegant and minimalistic look. You can use any other color you want.
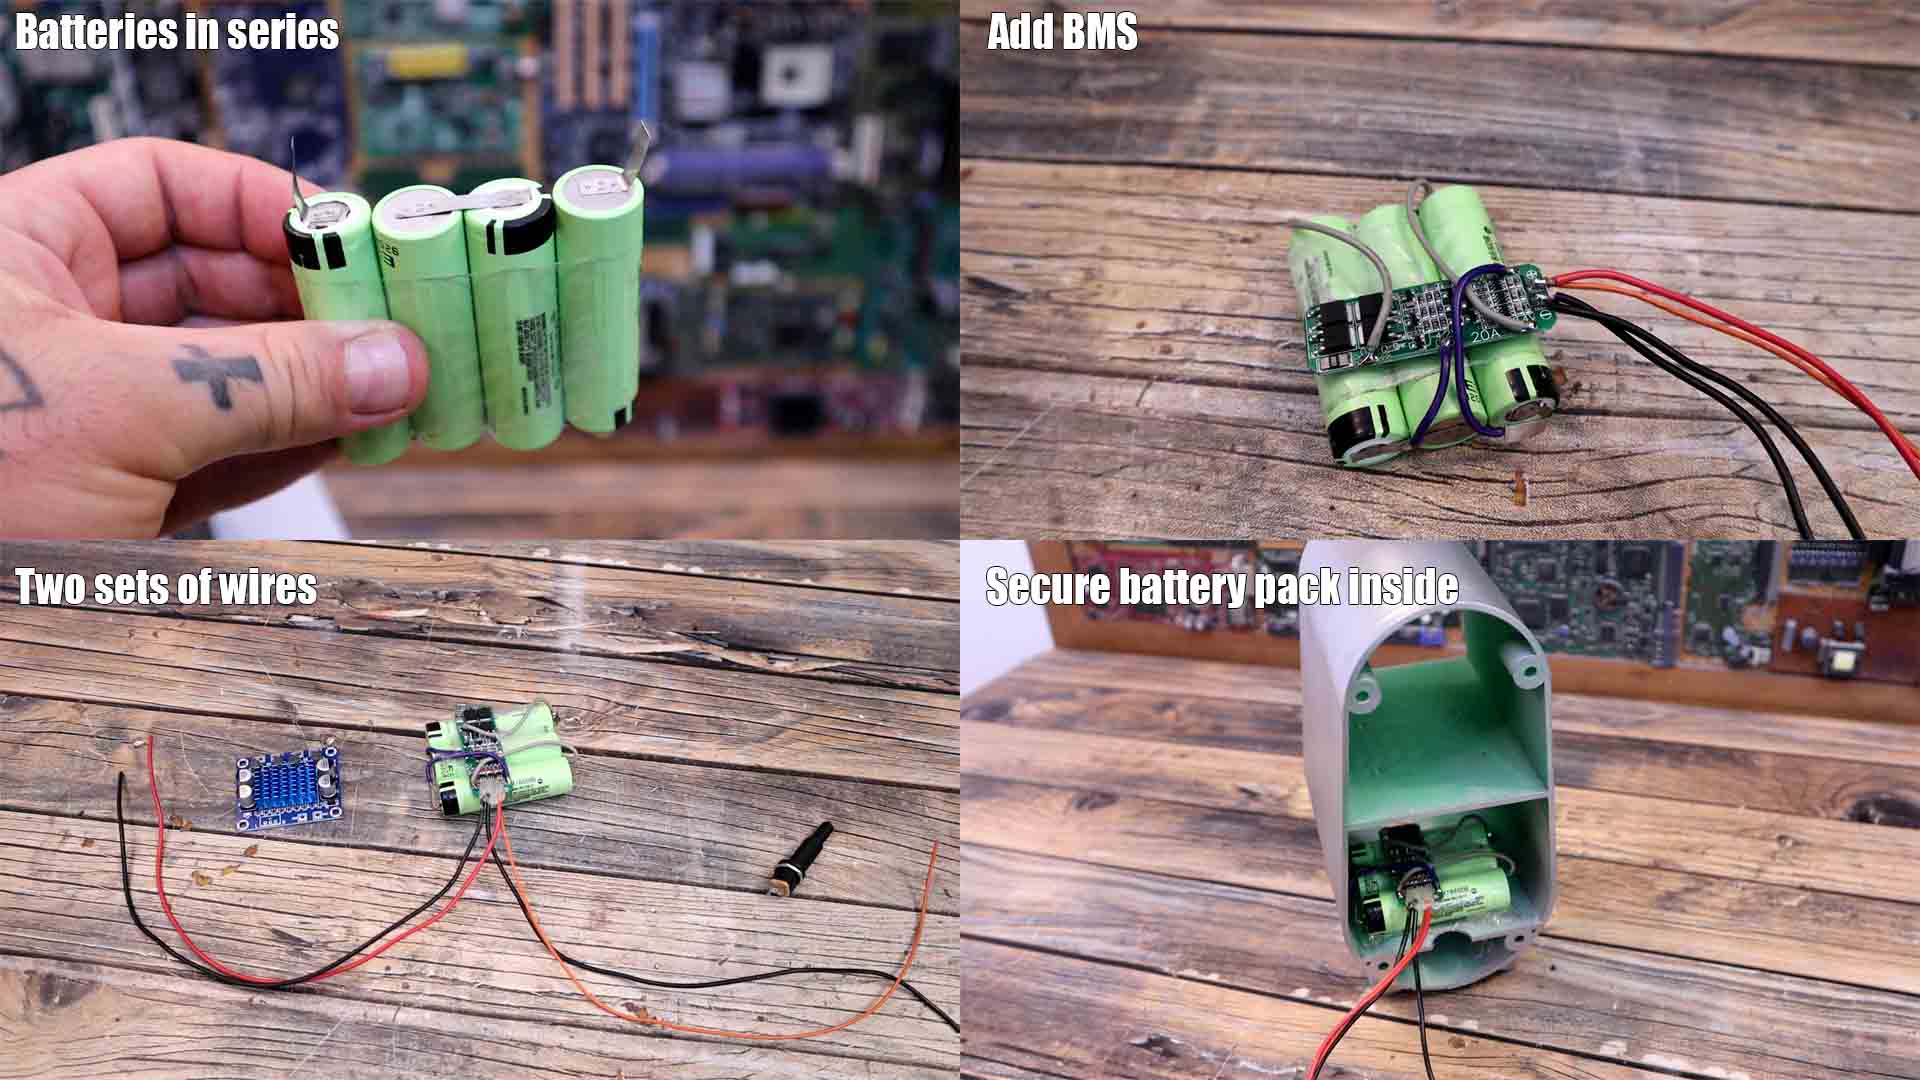
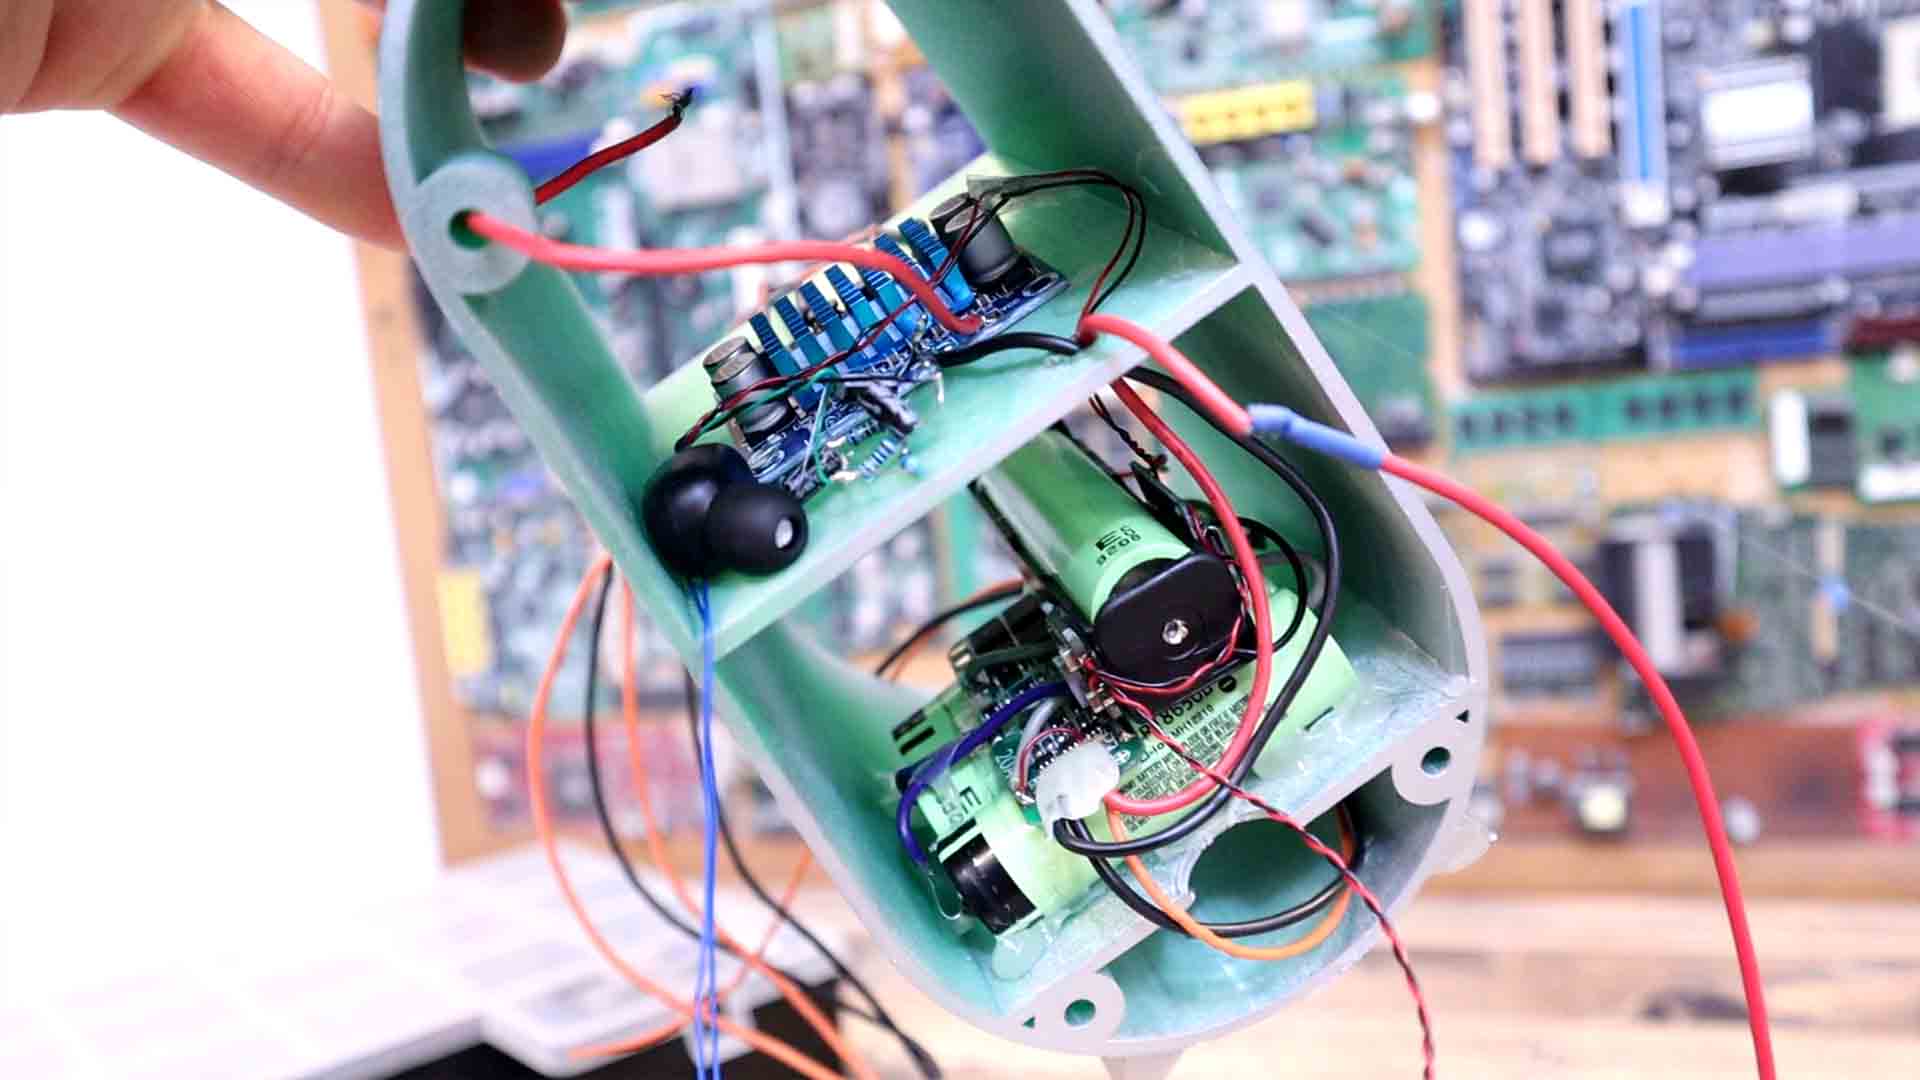
I get 4 batteries and using my spot welder I merge them in series. You could also use the plastic sockets you have on the part lsit above if you don’t have a spot welder. But fur sure, never solder the wires directly to the battery since the heat will damage them. We need to add the BMS in order to protect the batteries for undervotage or overfoltage and current limits. Using some wires, I connect each battery to the BMS module. Now the BMS needs two sets of wires at the output/input, one will go to the amplifier and the other set of wire will go to the charging plug. I fix the BMS in place on top of the batteries and now we can use some double side tape or some hot glue and fix the batteries inside the 3D printed case. They will go here on the bottom support.
Now let’s make those filters. We get the audio signal from the earbuds. Since we have two speakers, we will use the left and right channel of the amplifier. We want to add a low pass filter for the subwoofer and a high band filter for the treble speaker. In that way, the woofer will only receive the low frequency sound. We add a low pass filter in series and it will allow only the lower frequencies to pass. We solder this small filter circuit to the right channel for example. The other one is a high pass filer so only high frequencies will pass so the driver won’t waste power dealing with the lower frequencies. We solder this other filer to the left channel of the amplifier. Now we can solder the wires from the earbuds for the audio signal. I solder wires at the output of the amplifier and these will later be connected to the speakers.
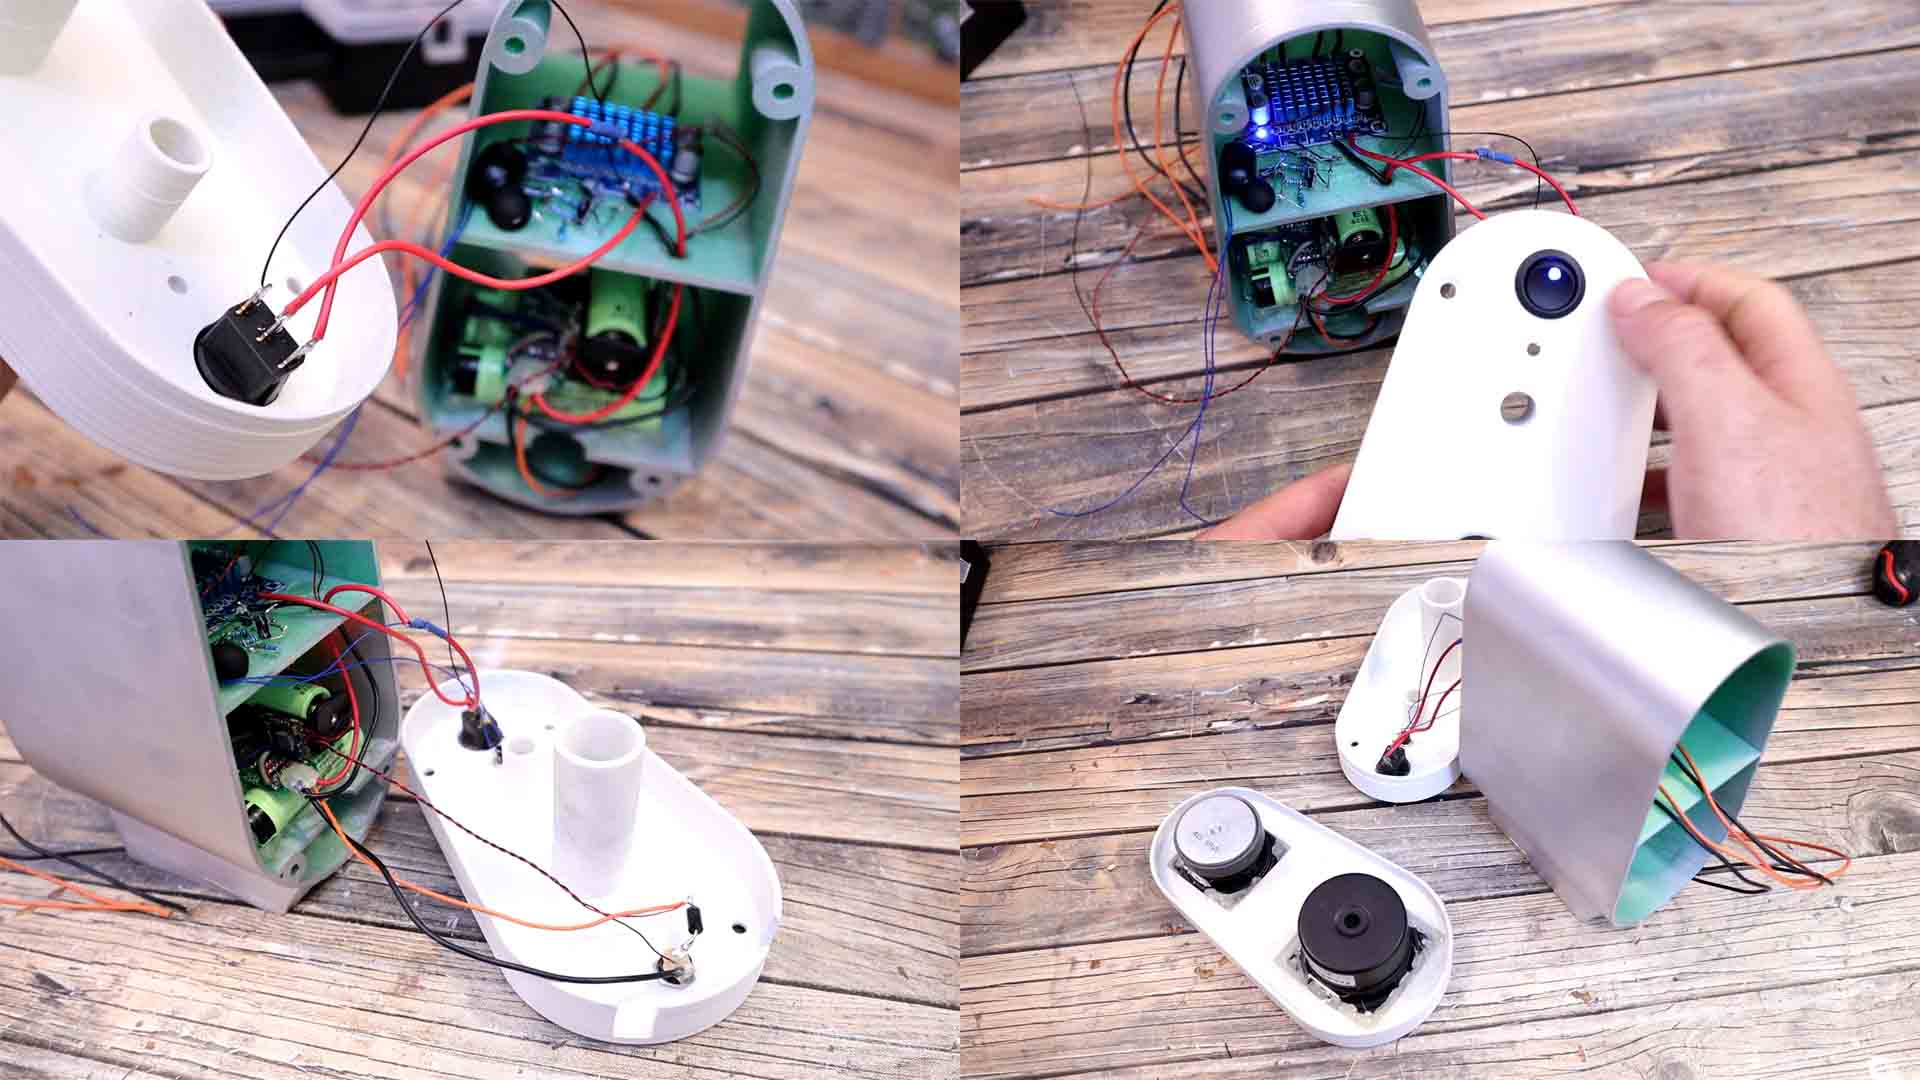
Remember taht the earbuds are without a battery now. I want to use the 16.8V battery pack to power the earbuds but that is too much and it will burn the circuit. That's why in bweteen we add the AMS1117 5V regulator module. Please, before you connect it to the earbud circuit, check if the voltage is below 5V. In the video I've tried to sue a buck converter for that but it was creating too much noise so it was a bad idea. Then, we can screw the amplifier board in place inside of the case and later we will connect all the wires.
I add the main switch on the back part of the speaker. I solder wires from the battery pack to this main switch and from the switch I add another wire connected to the amplifier input. My switch already has an LED integrated so when you turn it on, it will light up indicating that the speaker is ON. I also solder the push button for turning on the earbuds. I also add the charging plug ion place and tight the screw. I solder wires and connect these wires to the BMS of the battery pack. You could also add a 3.5mm audio jack connected to the audio input that goes to the amplifier just in case you want to use these speakers with wires as well.
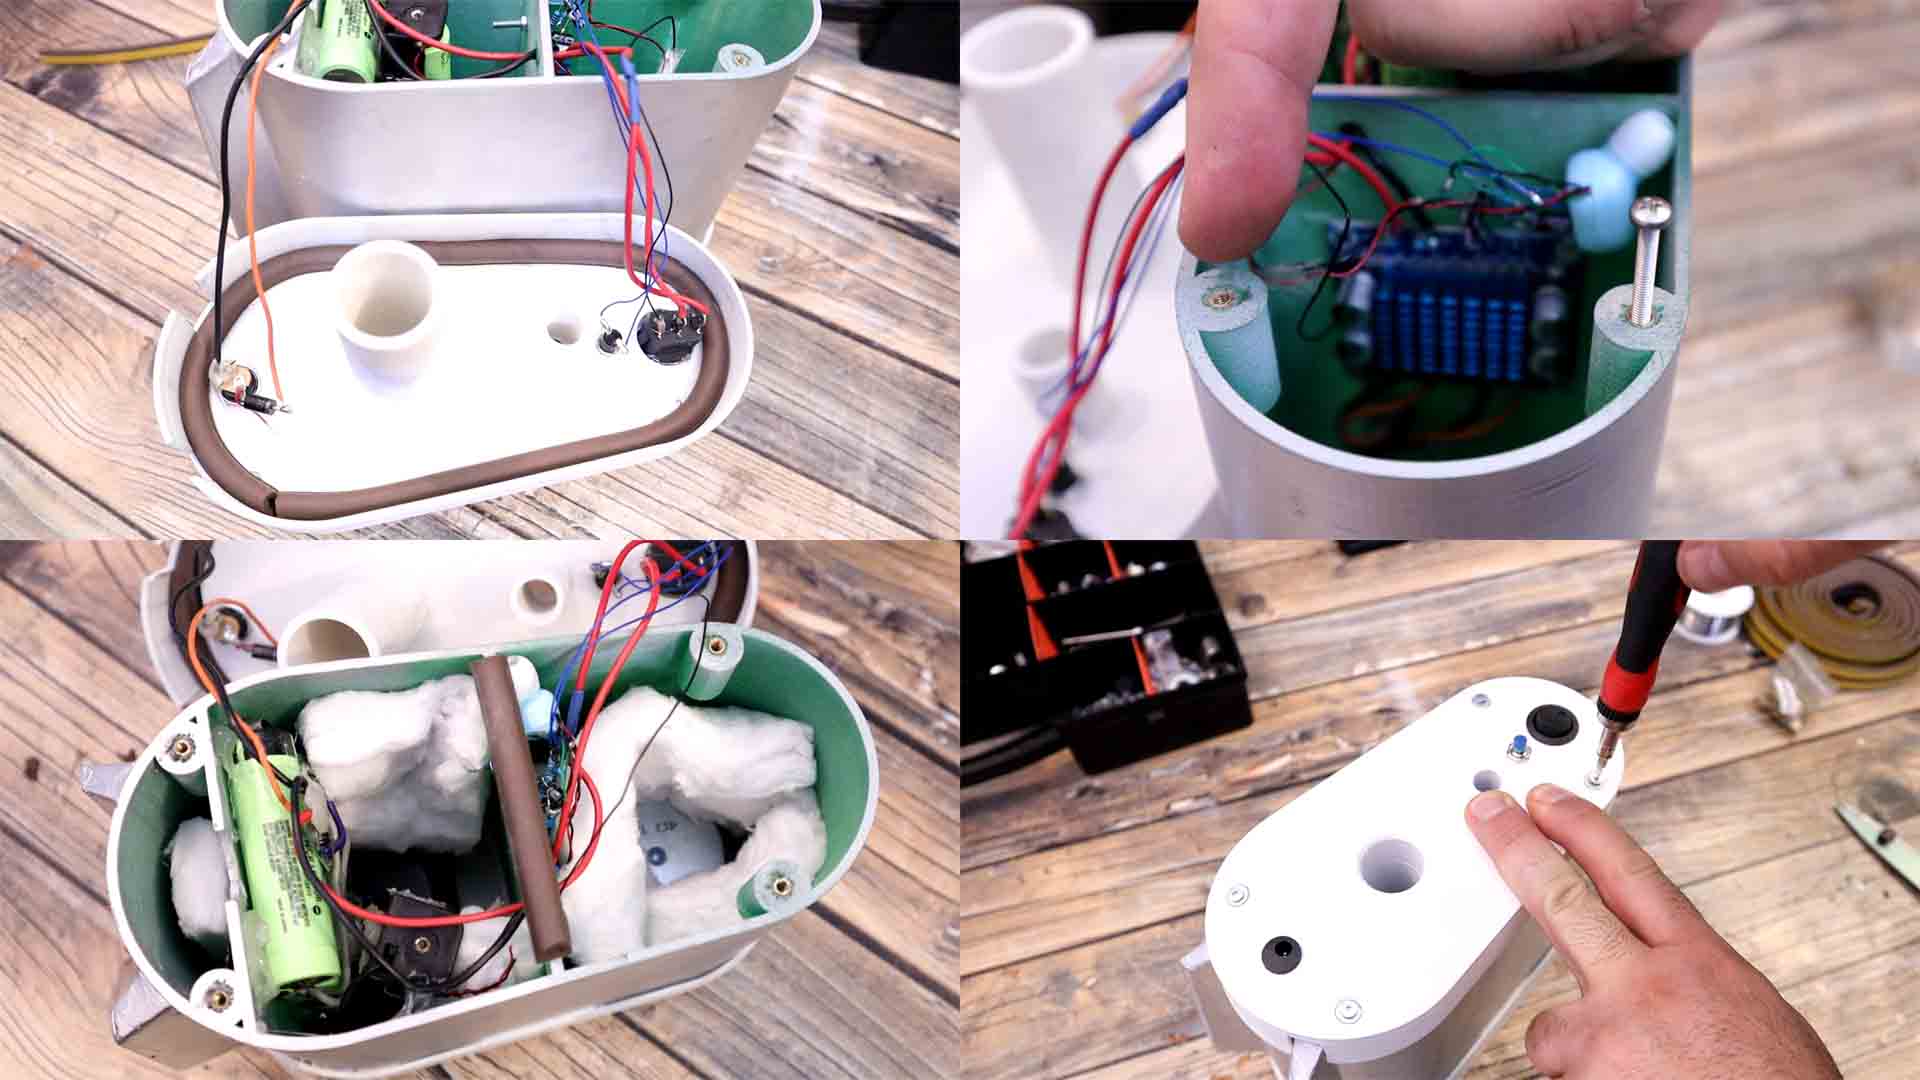
Is time to close the case. Solder the wires from the amplifier to the speakers and make sure which channel was for the low frequencies and which channel was for the high frequencies. Now we can glue the front part. I add some glue all around so we can seal it well. No air should flow through that area. I close the case and let the glue to dry. To close the back part, we use screws. First, we get some insertion threads. Using your soldering iron, heat up the thread and insert it into the holes of the main body of the case. Now we can close the back part with screws. But first, make sure that you add some sort of foam around it so it will have a perfect seal so no air could flow around it. The air will only go in and out through the holes which will improve sound. I also add some insulation foam between the high part and the low part so no air could flow in between. Now that everything is in place, is time to close it. You can also add some cotton inside in order to reduce educe vibrations and unwanted resonances from the cabinet. Put the back part and add some screws. Tight them and that’s it. Obviously do the same with the other one since we need stereo.
Flip the switch on bot speakers and long press the push button so the earbuds will turn on. Now open you Bluetooth settings on your smartphone for example. Connect to the Bluetooth of the headphones. Now play some music and I’ve got to say, the sound is pretty good.
So guys, what do you think? We now have stereo music but coming out from separate Bluetooth speakers, that’s quite interesting. You can place these on your desktop without any cable. The BMS module inside will automatically turn off the power when the battery is low so the batteries are protected. When is low, to charge it we need to supply 16.8V to the input-jack. You could buy a 16.8V adaptor for just a few dollars. Buy one with enough current output so we could then split its output and add two jacks. Like that, we can charge both speakers at the same time. I don’t know the on time for the batteries yet but it should last for a few hours.
I hope you like this tutorial and maybe you have learned something new. If my videos help you, consider supporting my work on my PATREON or a donation on my PayPal. Thanks again and see you later guys.