Remember that in this series we are going topic by topic into more depth of the Arduino programming. Arduino coding can be quite easy but when you get into timers, registers, internal hardware and C programming, that could get a bit difficult and that’s what we are learning in this series. Today topic is the EEPROM memory. What is it, how to use it, how to write large values on to multiple memory addresses and so on… So, guys, let’s get started.
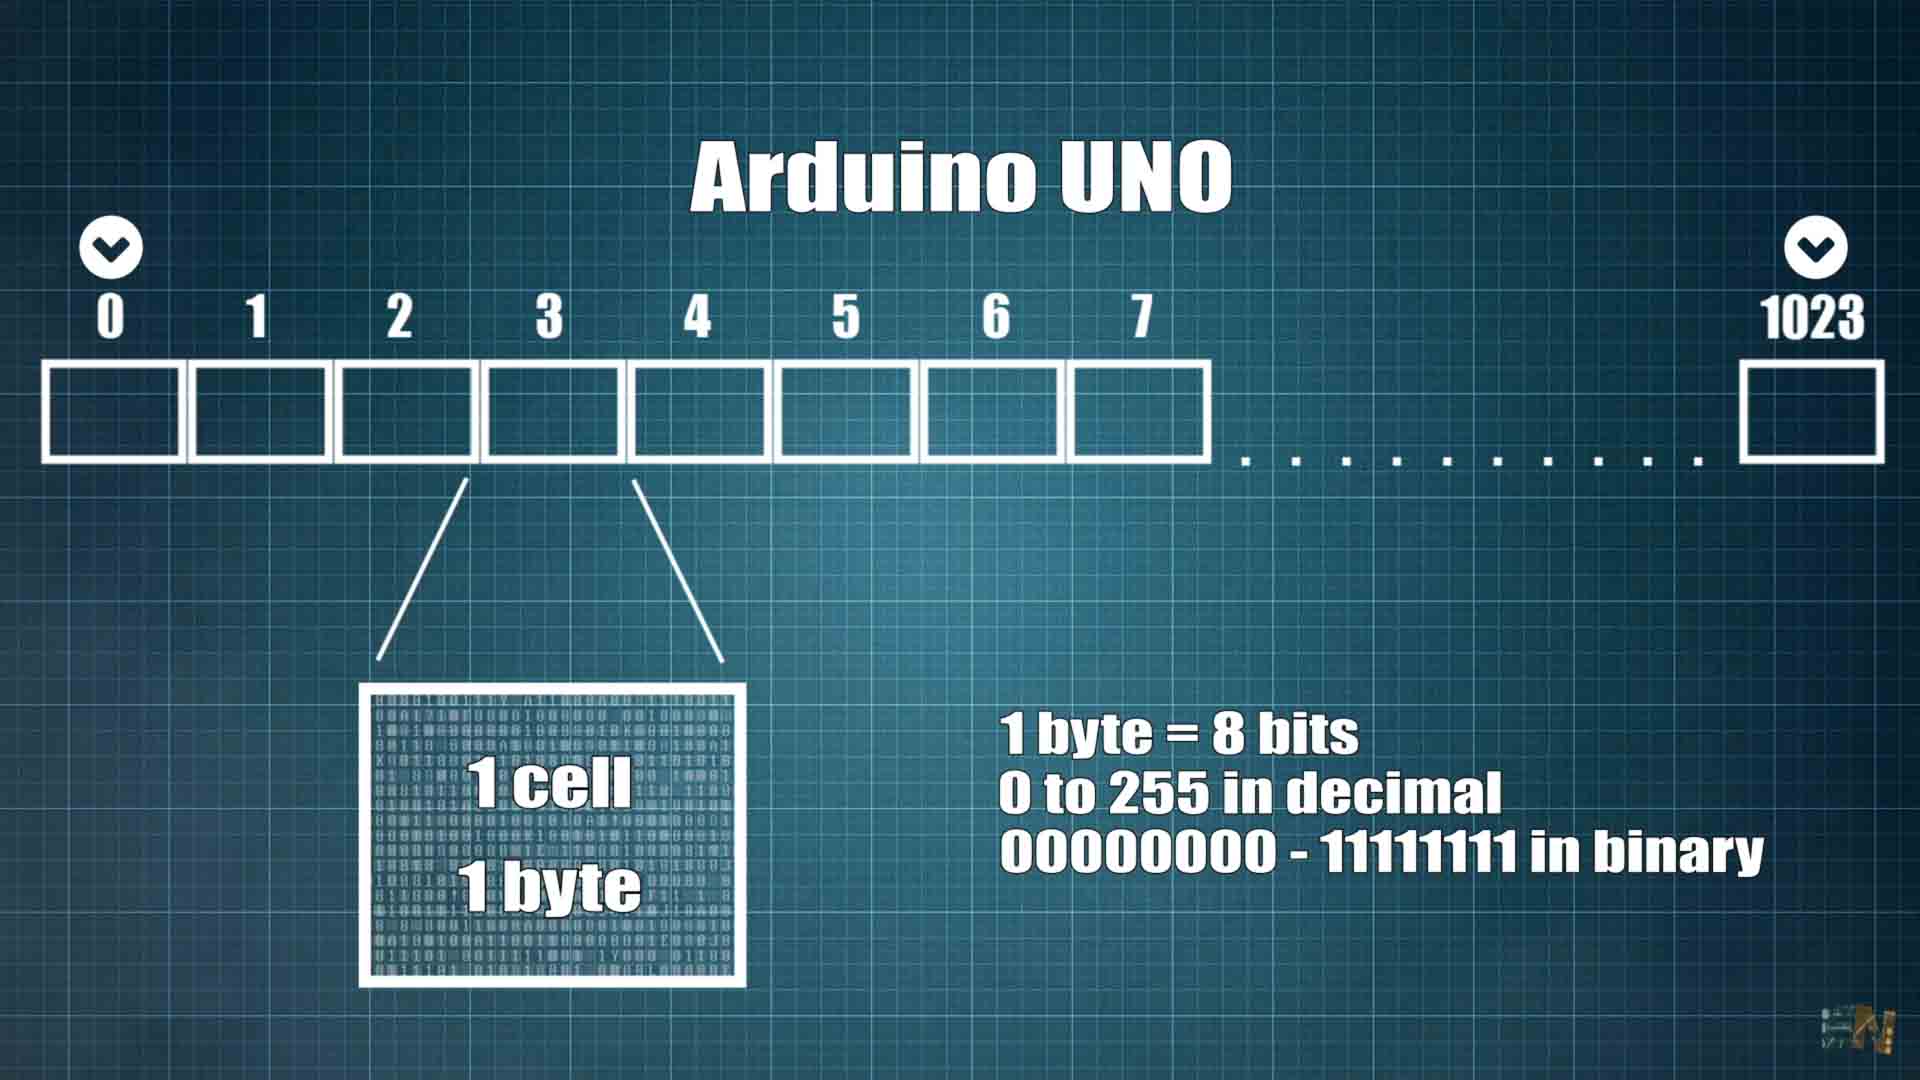
Arduino UNO is using the ATmega328 microcontroller. Inside, integrated, this IC has 1024 bytes of EEPROM memory. But the Arduino MEGA for example has 4096 bytes. One byte is 8 bits and the Arduino EEPROm memory can save cells of 1 byte each. So basically, the Arduino UNO has 1024 cells of 1 byte each where you can save data "forever". You can also erase or re-write over that memory if you want. One byte can store a numerical data from 0 to 255 in decimal. To store a number to this memory, you have to send the address of the cell and the value you want to send. And to read that value from the memory, you only have to send the address and it will give you the value. The datasheet of the ATmega328 microcontroller tells us that the lifespan of these memory cells could be of around 100.000 read writes, and it would take around 3.3ms to write data to a cell. I know that sounds fast but this is actually a very slow memory compared to others. Also, by default, the cell has a data of a full byte which is 255 in decimal, so when the memory is brand new, each cell has a 11111111.
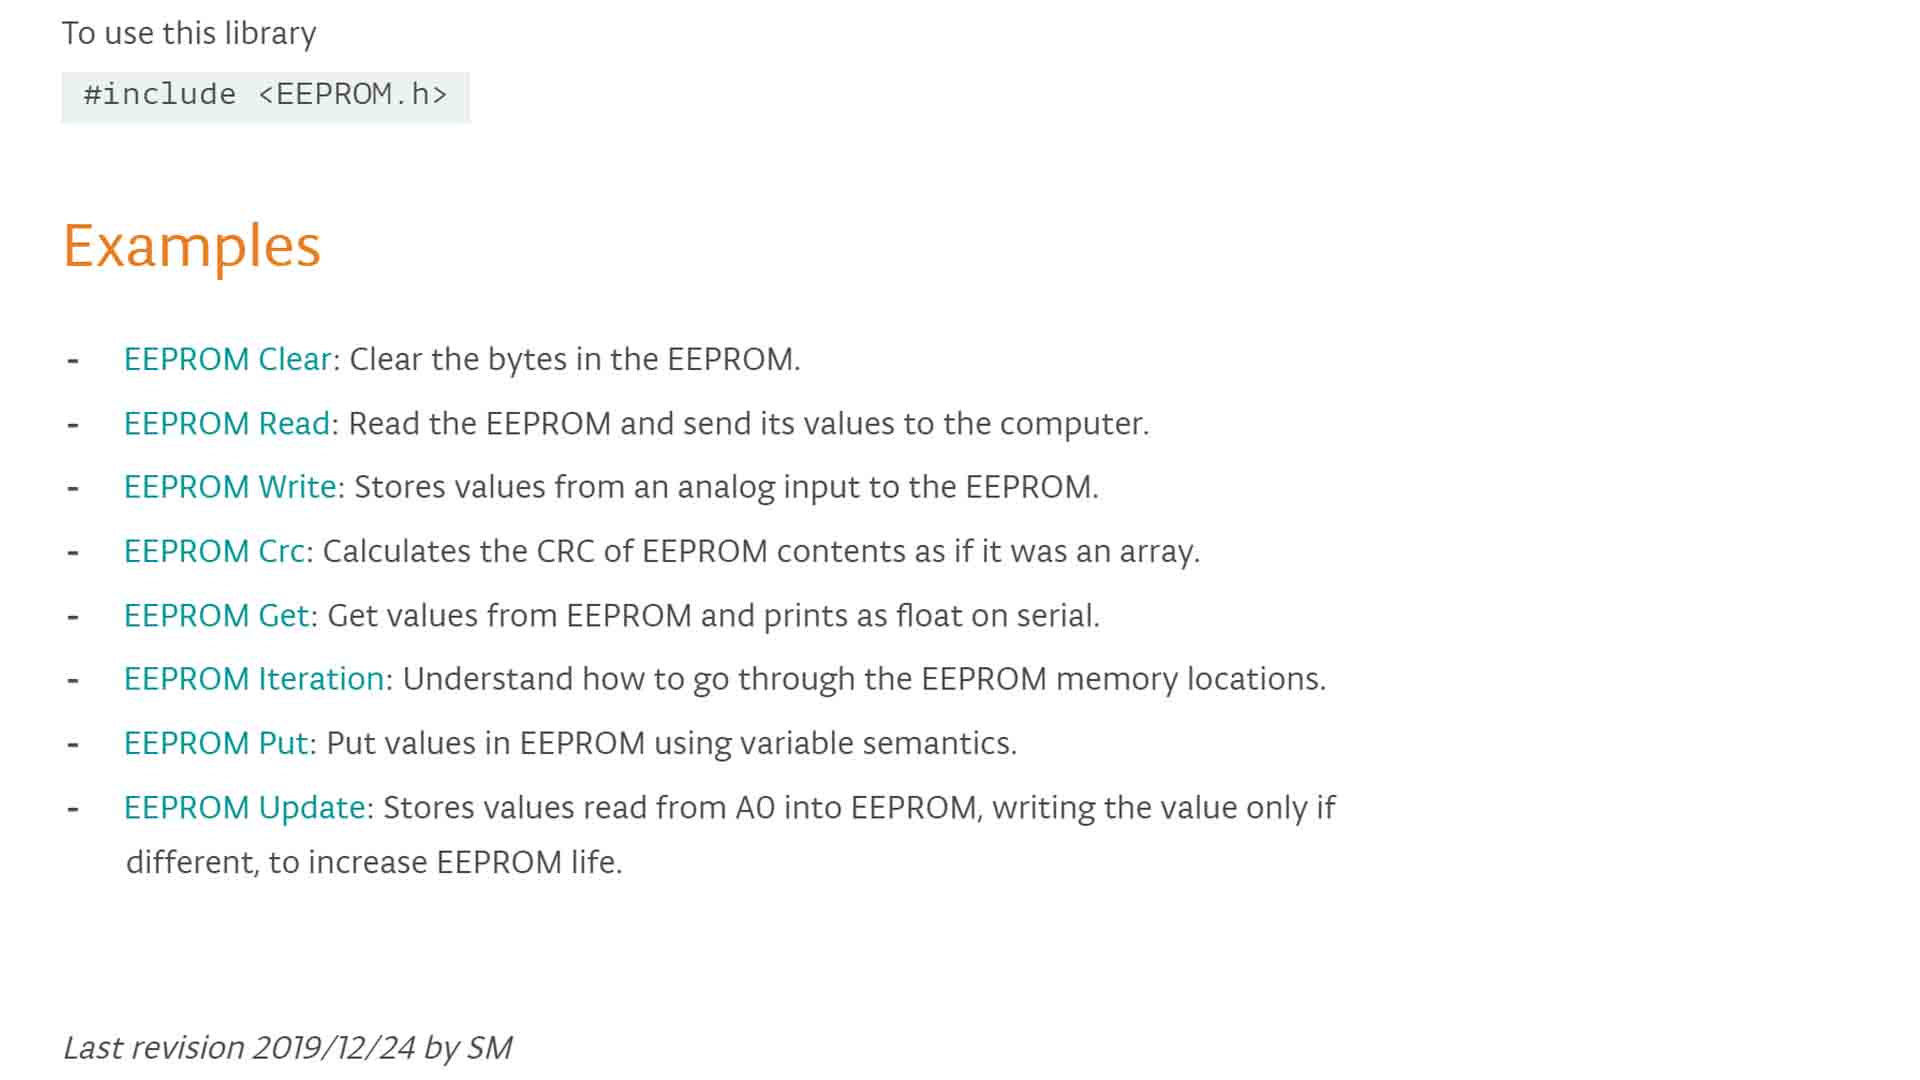
Connect your Arduino to your PC and let’s see how to use the EEPROM memory with the Arduino. For that we need to import the EEPROM library using this line in the #include <EEPROM.h>. This library has these functions below. Let’s start with the EEPROM.read. Inside the parenthesis we have to mention the address of the memory cell we want to read from 0 to 1023. For this example, I make these lines below and I equal the brightness variable to EEPROM.read of the address 0. I print that on the monitor. I connect my Arduino and upload the code. I run the monitor and you will see I read 255 because that’s the default value of a new memory. But once we write something to address 0, if I would run this code, I wold read the value I've previously palced on that address.
#include <EEPROM.h>

int brightness;         //Create an empty variable

void setup() {
  Serial.begin(9600);
  while (!Serial) {
    // wait for user to open serial monitor
  }
}

void loop() {
  // read a byte from the address "0" of the EEPROM
  brightness = EEPROM.read(0);
  Serial.println(brightness);
  delay(500);
}Now let’s use the EEPROM.write function to change the value on position 0 for example. This time, between the parenthesis we must add first the address and then the value. Remember, very important, the value must be between 0 and 255 because each address represents a cell of 8 bits so we can’t write higher values than that. If you try to write for example the value 300, it would have an overflow and it would actually write 300 – 255, so it will write 45 instead of 300. Anyway I type these lines in the code below and I place it inside the void Setup in order to only run it once. EEPROM.write, 0 for the address and let’s say 25 for the value. Then in the void loop I use again the EEPROM.read to get the value on position 0. Upload the code and I run the monitor and as you will see, this time we read 25 instead of 255 so we have successfully write something to the memory and also read it. But this is the interesting part. If I disconnect the Arduino from the USB so everything is powered off, when I connect it back and run the monitor again and the value is still there. That’s why we use this memory, in order to store values that we need every time the Arduino is unplugged. We can store a value basically forever.
#include <EEPROM.h> //include the library

int brightness;         //Create an empty integer variable

void setup() {
  Serial.begin(9600); 	//Start serial monitor
  EEPROM.write(0, 25);  // write value 25 on address 0
  //Value must be between 0 and 255
}

void loop() {
  // read a byte from the address "0" of the EEPROM
  brightness = EEPROM.read(0);
  Serial.println(brightness);	//Print it to the monitor
  delay(500);
}
You can also use the other functions from the previous list. For example, the EEPROM.clear will empty the entire memory. With EERPOM.update, we update a value only if that value is different and like that we increase the memory life. Ok, now we know the basics on how to write and read from the Arduino EEPROM. But is it possible to write an integer or a float value to this memory. Those variables would occupy 2 or 4 bytes but we can only write 1 at a time. For that let’s use these functions, EEPROM.put or EEPROM.get.
We start with EEPROM dot get. Inside the parentheses we must place the address where the data would start and the second part is the data variable where we want to store the received value. So, if this variable is an integer type, the function will automatically know to read 2 bytes instead of just 1 byte. If the variable is defined as float, it will read 4 bytes and so on so we don’t have to care about the data length. So I create an integer variable and name it brightness for example. Then lets imagine that previously, using the EEPROM.put function we have written the value 821 starting on address 0. So now I use the function EEPROM.get and for the address I add a 0 and for the data I write the brightness variable I’ve created before. The function will read 2 bytes starting from address 0 and store the received data inside the brightness variable. If I run the program and we get the 821 nuerical data which in this case is an integer and occupies 2 bytes.
#include <EEPROM.h>

int brightness;         //Create an empty variable, type: integer

void setup() {
  Serial.begin(9600);
}

void loop() {
  // read an integer starting on address "0" and store the value on "brightness"
  EEPROM.get(0, brightness);    //EEPROM.get(start address, variable);
  Serial.println(brightness);
  delay(500);
}#include <EEPROM.h>
float brightness; //Create an empty variable, type: float
void setup() {
Serial.begin(9600);
}
void loop() {
// read a float starting on address "0" and store the value on "brightness"
EEPROM.get(0, brightness); //EEPROM.get(start address, variable);
Serial.println(brightness);
delay(500);
}In the same way, to write data of more than 1 byte, we use EEPROM.put. Inside the parenthesis we first write the starting address and then the value to write. For example, I create a float value and name it sensor_read and equal it to 70000. Now I write that value on address 0 using the EEPROM.put. Now once again I use the EEPROM.get function and add the address 0 and a float type variable named brightness. I run the code and now I read 70000 which is a float type and occupies 4 bytes.
#include <EEPROM.h>

float brightness;                   //Create an empty variable, type: float

void setup() {
  Serial.begin(9600);
  float sensor_read = 70000;     //Define a variable as float
  EEPROM.put(0, sensor_read);    //Write that value starting on address 0
}

void loop() {
  // read a float starting on address "0" and store the value on "brightness"
  EEPROM.get(0, brightness);
  Serial.println(brightness);
  delay(500);
}#include <EEPROM.h>
float brightness; //Create an empty variable, type: float
void setup() {
Serial.begin(9600);
float sensor_read = 56.7; //Define a variable as float
EEPROM.put(0, sensor_read ); //Write that value starting on address 0
}
void loop() {
// read a float starting on address "0" and store the value on "brightness"
EEPROM.get(0, brightness);
Serial.println(brightness);
delay(500);
}Also, if you don’t want to use the EERPOM dot put or get functions, you can create your own functions, something like this below. I found this example online and the functions are called EEPROM write anything and read anything. Basically, it will first measure the length of the data you want to write or read and then It uses the normal EEPROM dot read or write function to get or write a longer data than just 1 byte. Get the code from below and test it out.
#include <EEPROM.h>   // We need this library
#include   // for type definitions

//We create two fucntions for writing and reading data from the EEPROM
template <class T> int EEPROM_writeAnything(int ee, const T& value)
{
  const byte* p = (const byte*)(const void*)&value;
  unsigned int i;
  for (i = 0; i < sizeof(value); i++)
    EEPROM.write(ee++, *p++);
    return i;
}
template <class T> int EEPROM_readAnything(int ee, T& value)
{
    byte* p = (byte*)(void*)&value;
    unsigned int i;
    for (i = 0; i < sizeof(value); i++)
          *p++ = EEPROM.read(ee++);
    return i;
}
void setup() {
  Serial.begin(9600);               //Use serial to check the data
  /*The next line, will store the 1200 number on positions 0, 1, 2, 3 and 4 of the EEPROM automatically
  since 1200 divided by 254 = 4,7 so it will fit in 5 bytes. */
  EEPROM_writeAnything(0, 1200);
  /*We know that bytes 0 to 5 are already ocupied by previous line so we write the second number starting
  from position 5. The function will automatically fill bytes 5, 6, 7 and so on...*/
  EEPROM_writeAnything(5, 2000);
}


void loop() {
  int my_value_1, my_value_2;
  /*With the next line we read the number starting on position "0" and store into the my_value_1 variable.
  So, with the next line, my_value_1 will be equal to 1200, which is the value we haev stored before */
  EEPROM_readAnything(0, my_value_1);
  /*With the next line we read the number starting on position "5" and store into the my_value_2 variable.
  So, with the next line, my_value_1 will be equal to 2000, which is the value we haev stored before */
  EEPROM_readAnything(5, my_value_2);
  Serial.print("Value 1: ");
  Serial.print(my_value_1);           //Check the value
  Serial.print("    Value 2: ");
  Serial.println(my_value_2);         //Check the value
} Also, remember that you can always buy a EEPROM memory IC in order to have more external memory since 1024 bytes is not that much. But this memory is very useful and I use it in pretty much all my projects. I hope that you now know what is the EEPROM memory and how to use it with Arduino. I hope that you have learned something new. If my videos help you, consider supporting my work on my PATREON or a donation on my PayPal. Thanks again and see you later guys.