Remember the WATCHX development board from a previous video? This board is great for learning how top program and create great projects since it has its own battery, display to show values, a real time clock, the IMU unit, pressure and temperature sensors and other sensors and is programable in Arduino or scratch. Today I want to show you the new format they’ve prepared for the WATCHX, a new kit with a mold injected case and better design. I’ll assemble a project they provide to control a drone using the inertial unit we have on the PCB and explain you the code step by step. WE'll make a Bluetooth connections between the WATCHX and a raspberry pi and a WIFI connection with the drone and control it usoing movement from the watch board,. So, guys let’s get started.
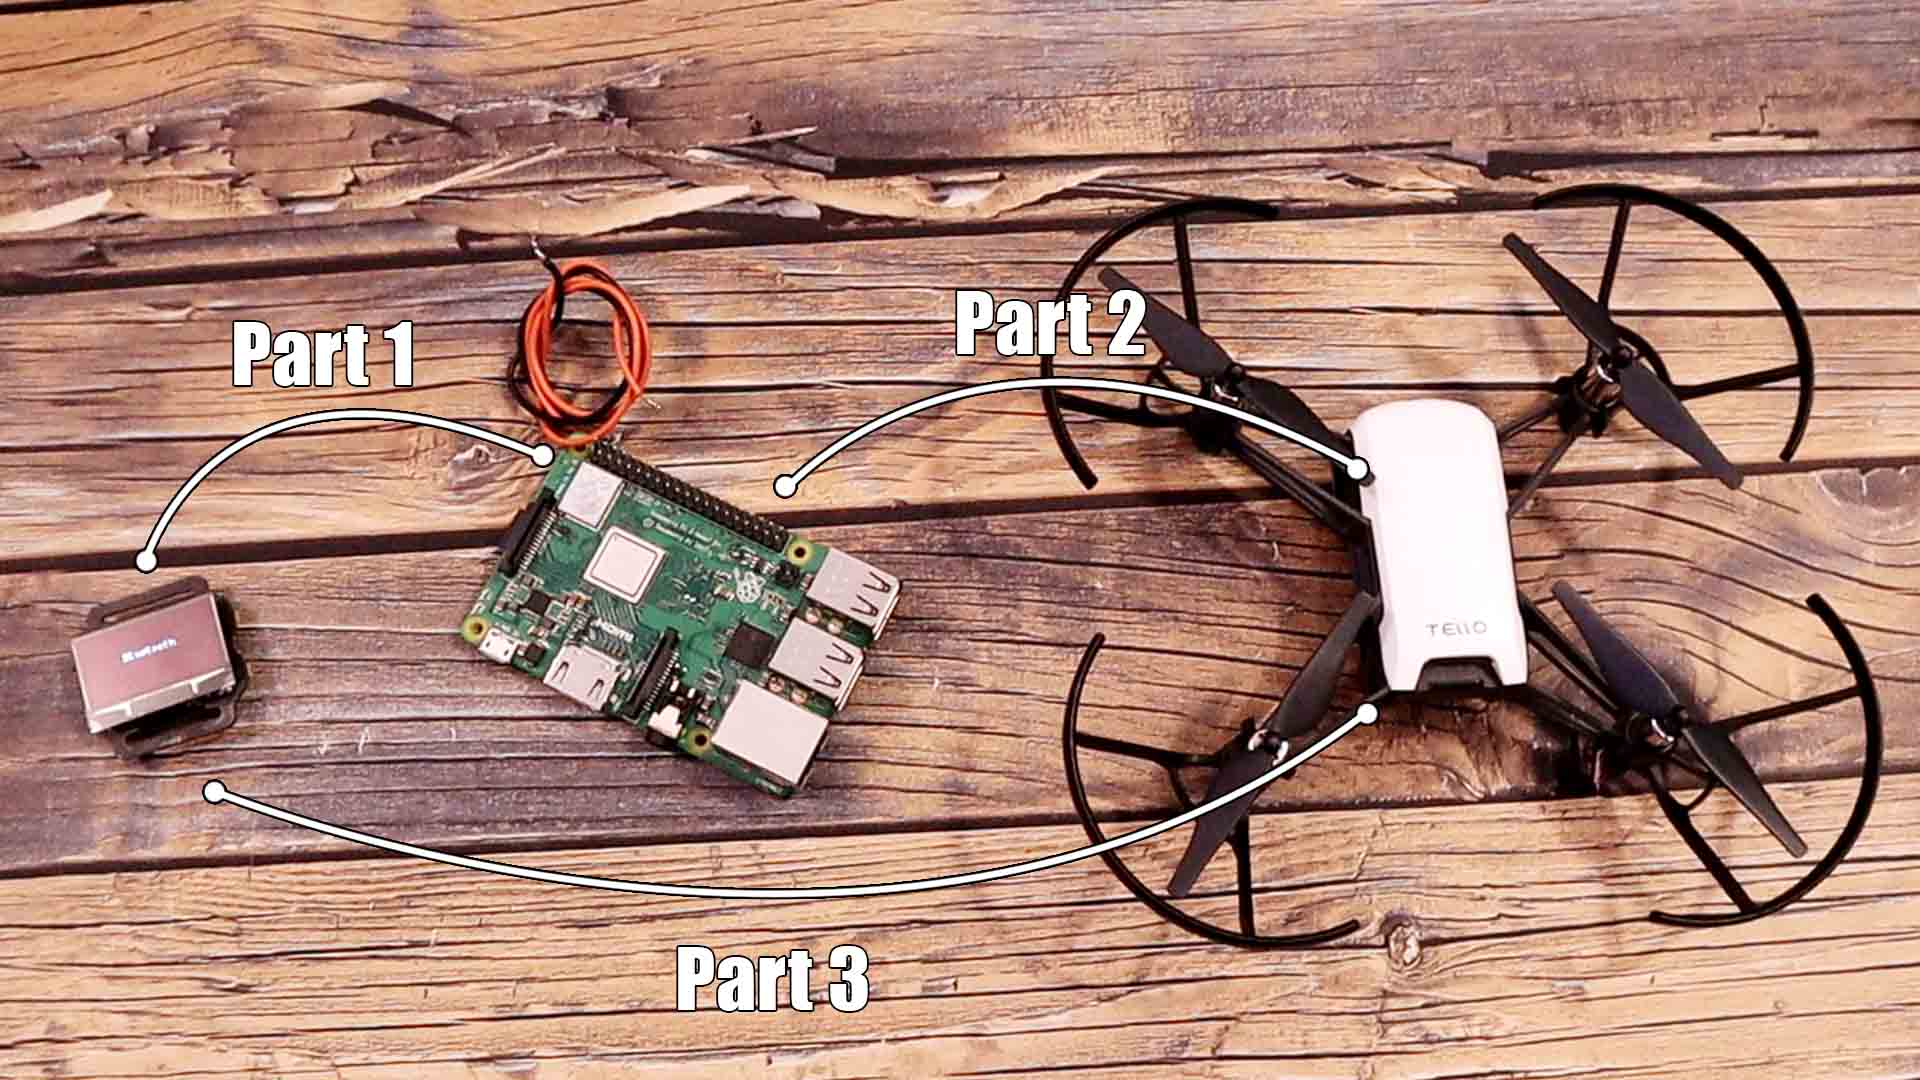
As you remember the WatchX board has the MPU6050 IMU, and with this we can read accelerations and gyro data and calculate the angle. I’ll show you an example on how we do that in mBlocks and print the angle on the OLED display and also send the information with Bluetooth. What I want is to control the tello drone using the WATCHX, and I have to say, this was a super fun project. The Tello drone dosen't have a controller and that’s because is designed in such a way so you could program it and learn at the same time. Sending commands such as takeoff, land, rotate right, move left and so on, you could control the drone. So all we have to do is tos end those commands to the drone. But one problem! The drone is using WiFi and the WatchX has only Bluetooth. So what we will do is to send the commands using Bluetooth to a Raspberry Pi first and then, from the Pi to the drone using WiFi. That's why this project has 3 parts.
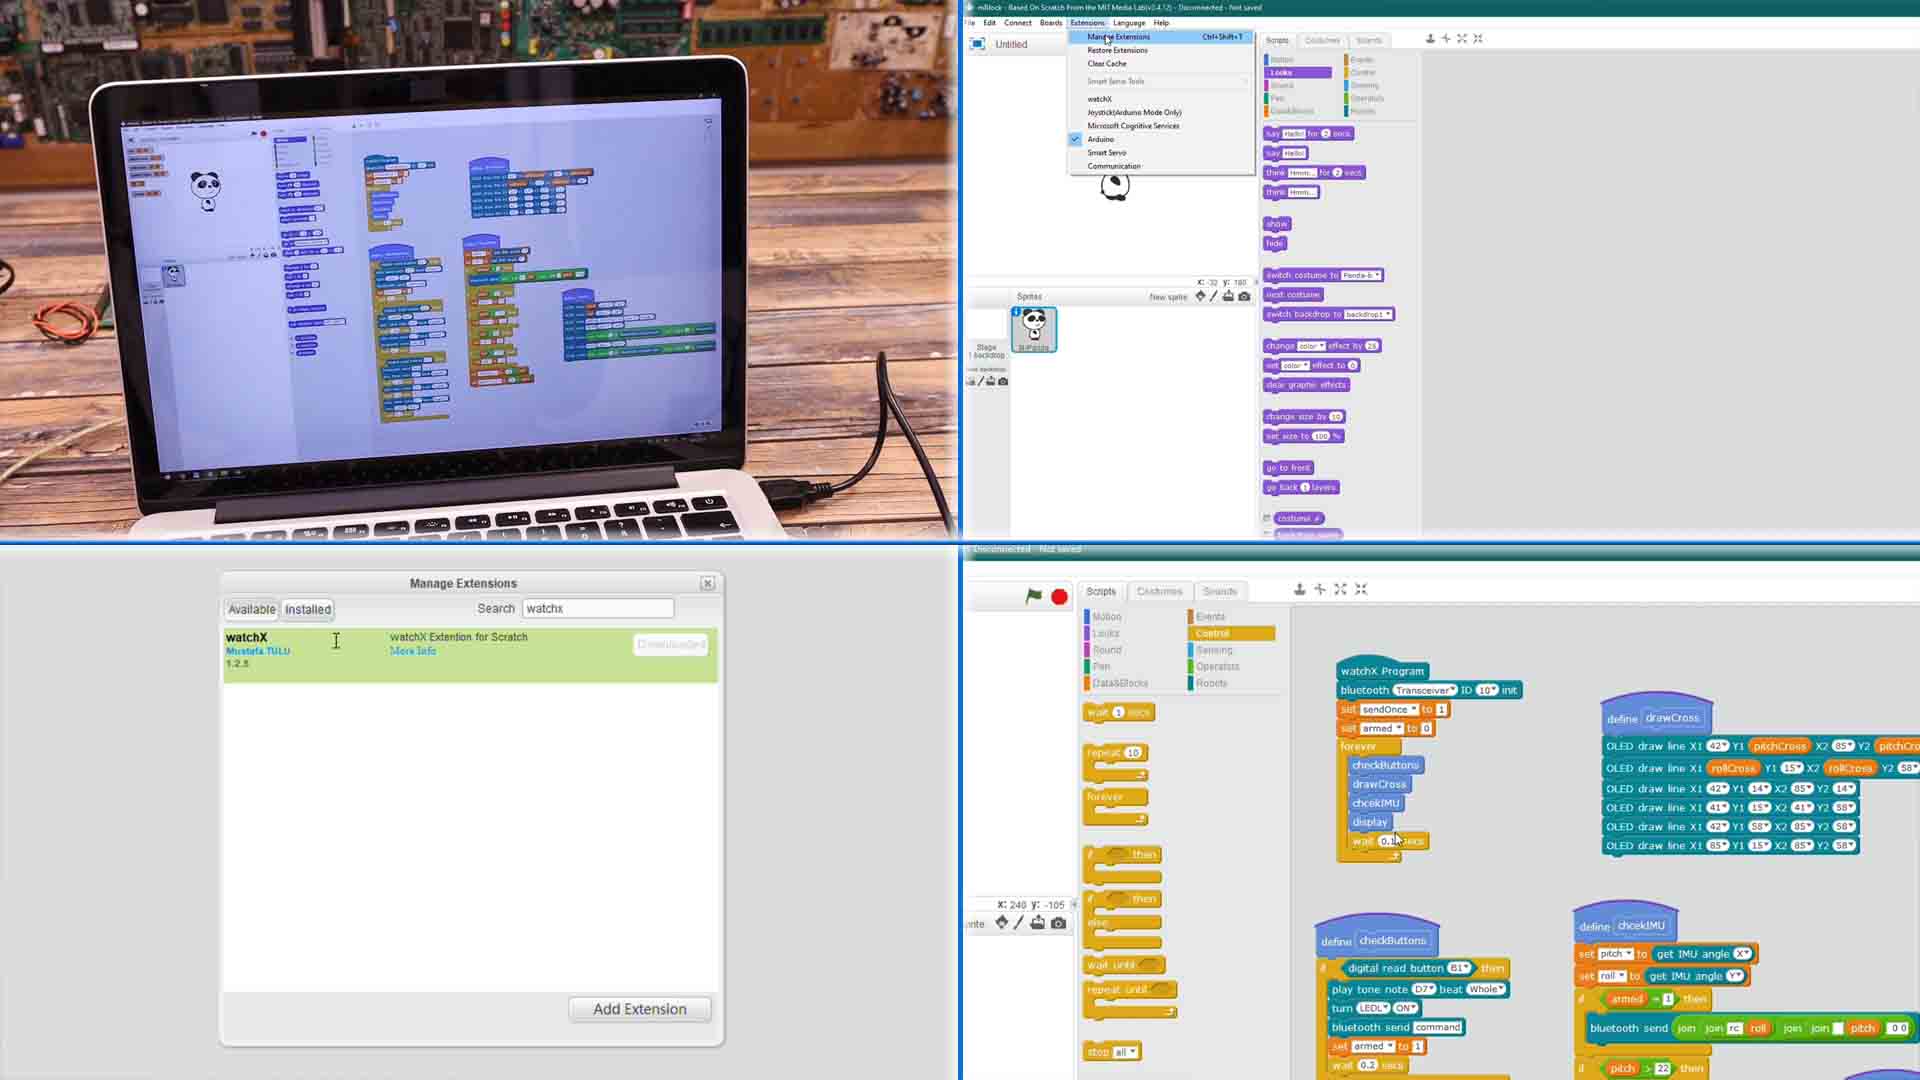
Connect the WATCHX to your PC and run mBlocks 3. If you don’t have this software, you can find the link to download it here. You can also find the code for Arduino below, but it is a lot more visual to make this in mBlocks. Fist step in mBlocks is to add the extension for WATCHX. So go to extensions and here search for WatchX and install this extension by Mustafa which is actually one of the creators of WATCHX. Now go below and download the WATCHX minoroller code and open that in mBlocks.
We go to edit and select Arduino mode. Now we can see the final code in Arduino format if you want, so in boards select Arduino Leonardo, in connect select the com of the WATCHX and click upload to Arduino. Now we have the code that will send the data using the Bluetooth module. And as you can see below, when I move the WATCHX the angle and lines on the display are changing according to the angle value.

Now, let’s see part 2 of this project. Get the drone and the Raspberry pi 3 or 4. If your PI doesn’t have WiFi, you might want to use a USB WiFi antenna. My model has on board WIFI so I’m good to go. I connect my Raspberry pi to a screen using HDMI connection so we can see the code and the rest. The pi will have to run some python codes so the best and most visual way to do that is to install RASPBERRIAN on the pi. So go to raspberrypi.org and downlaod the Raspberry Pi Os Imager. Run this software on your PC and make sure you insert the SD card we will later use with the PI. In the software select the Raspberry pi OS and then select the inserted SD card and click write. This process will flash the Raspberry pi OS on the SD card. When finish remove the SD card from the PC and insert it into the PI. After that we can power up the PI which in my case I will use a 5V power supply since a normal USB adaptor sometimes doesn’t have enough power. You will also need a USB mouse and keyboard so connect those as well to the PI.
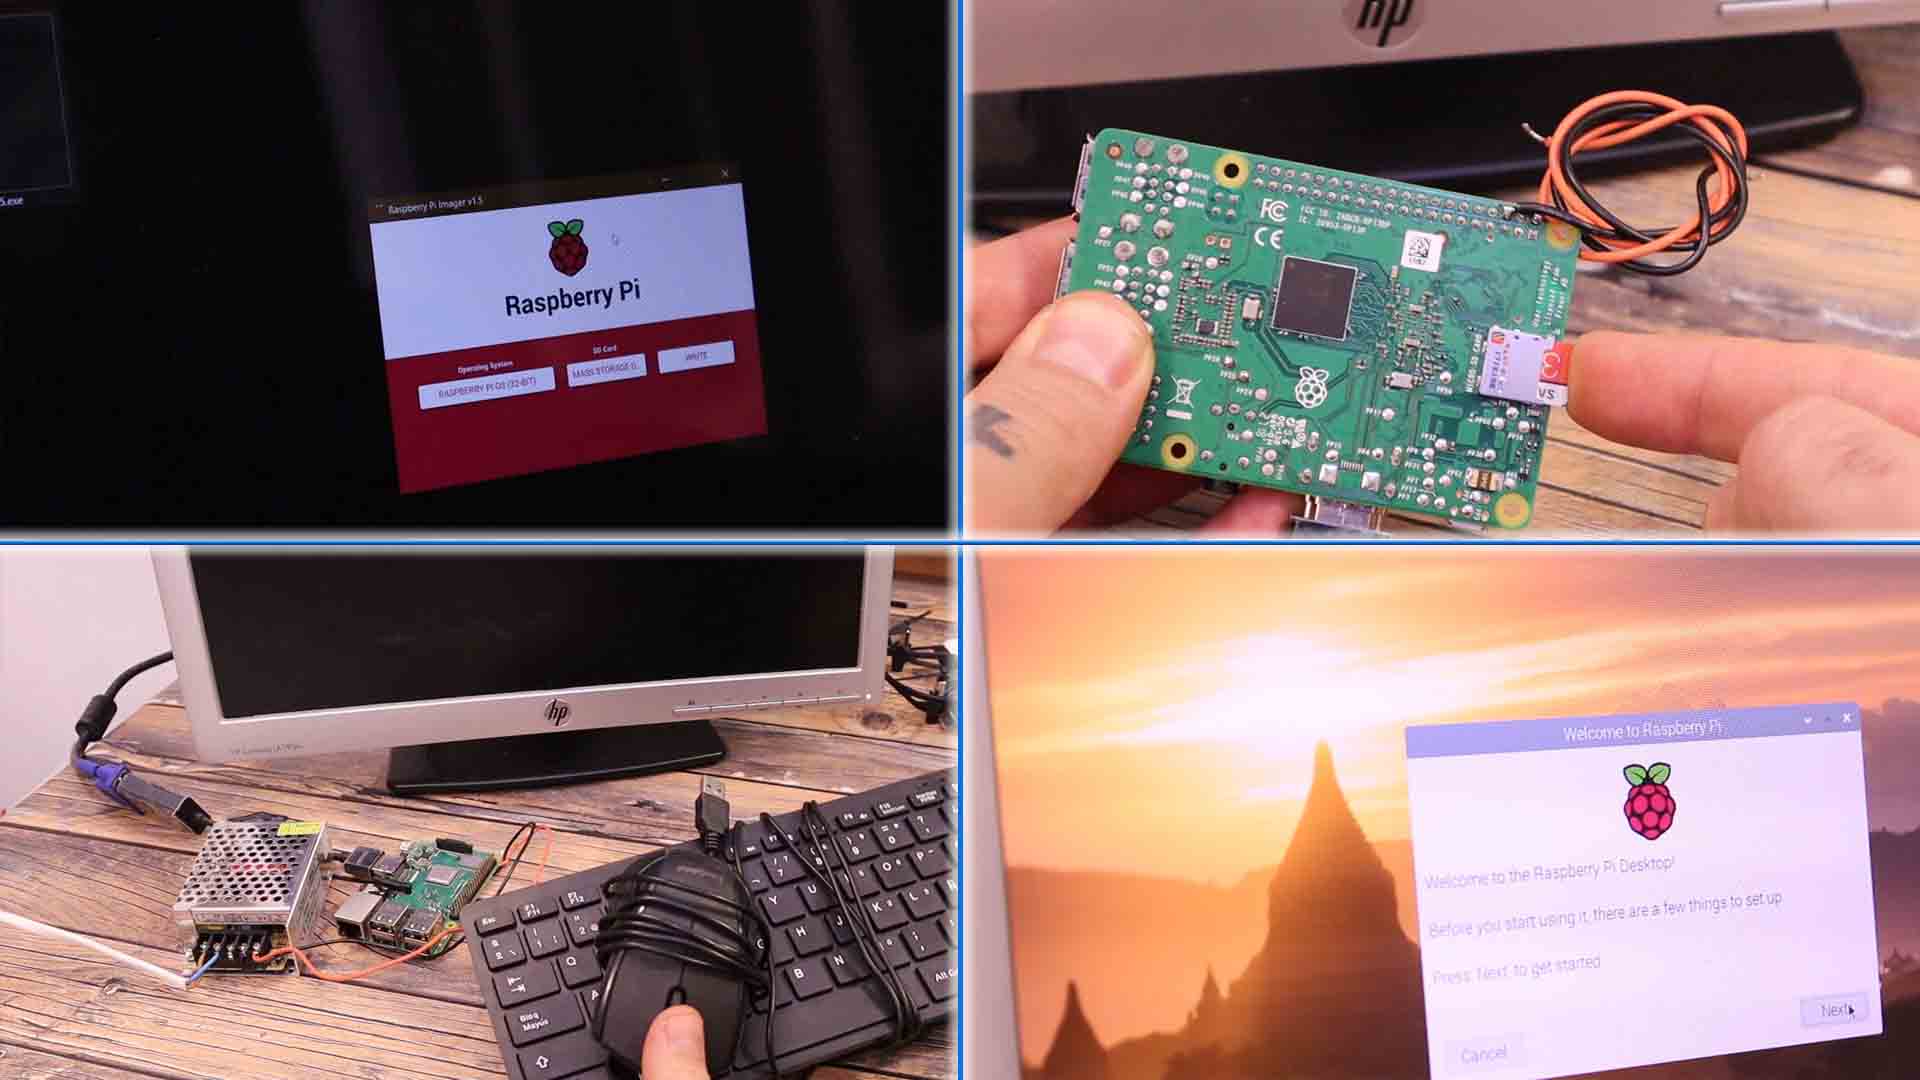
When you first run the Raspberry OS, you will need to set the time, language and so on so we do that fast. Then we are ready to program. First step is to run the terminal. Go to this link which you could find below and download the needed library for the Bluetooth control. Once you’ve downloaded the files we need to unzip that and then go to that folder in the terminal. To open a folder, we type cd in the terminal and the name of the folder. Once we are in that folder, we type the terminal line from below, and press enter to run the setup.py, and that will install the needed library for the BLE control.
BLE Library
Terminal line
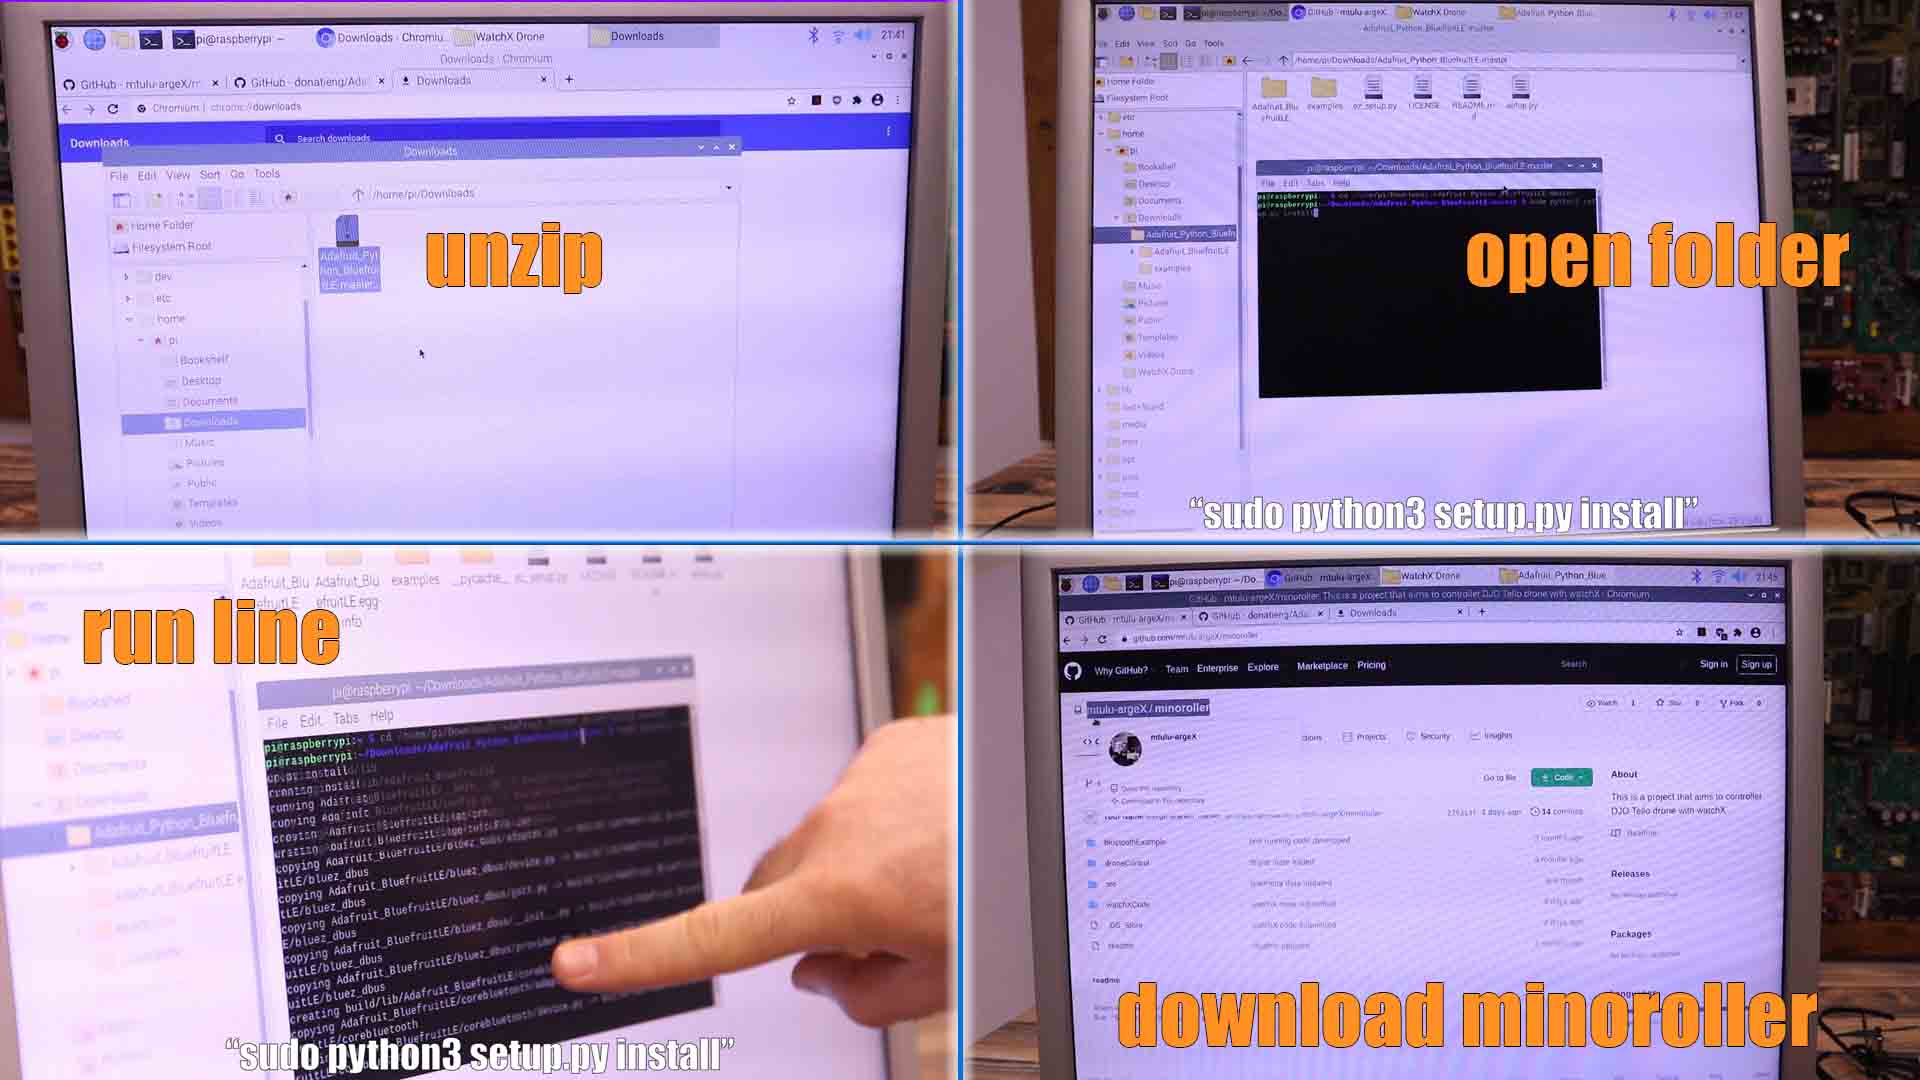
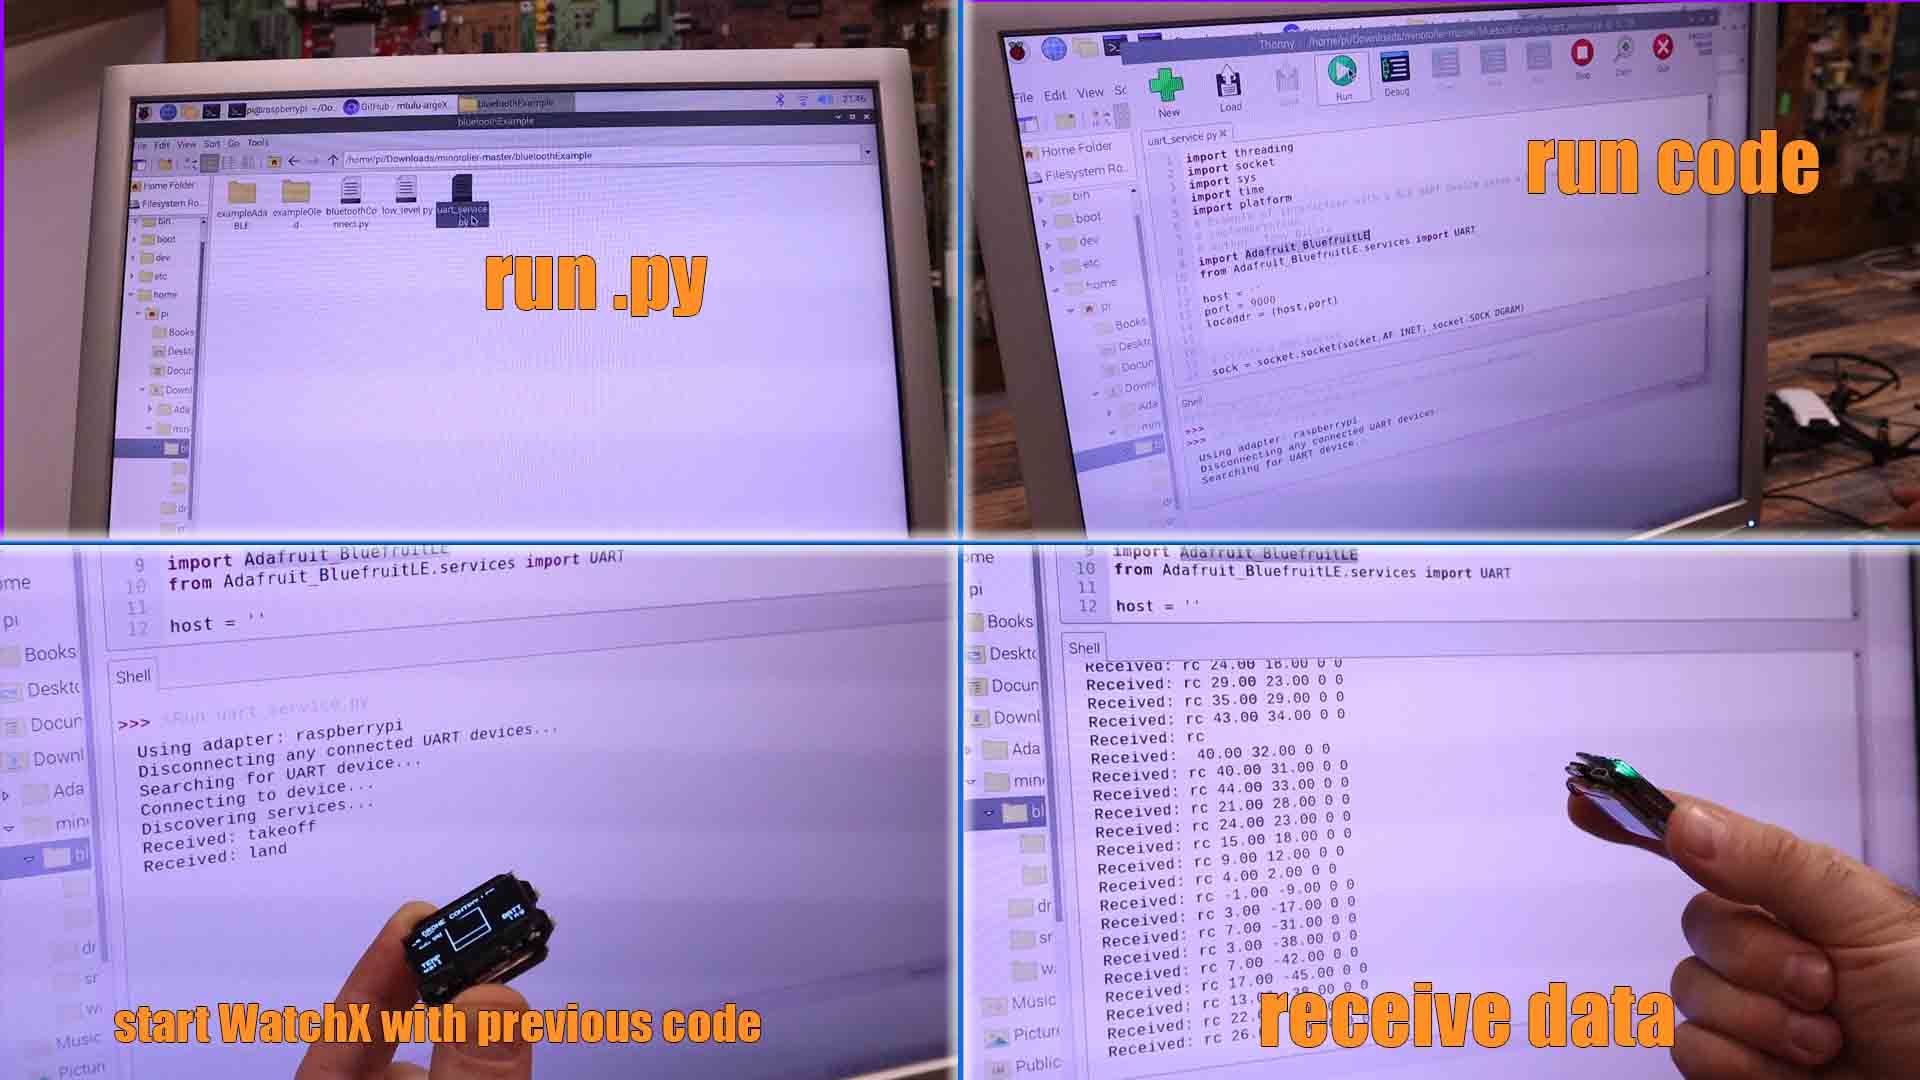
Once the library is installed go to this link and download the pi files for this project called minoroller, from GitHub. In the Bluetooth example folder, you will have some examples so let’s run the UART_service.py Double click and open that in THONNY. This code uses the BLE library to connect to the WACTHX Bluetooth. If you run this code and power up the WATCHX with the previous code, we should see the data coming from the board. Run it and as you can see on the shell, when I press the buttons, we receive the commands we’ve defined previously in the Arduino code for takeoff, land and arm the drone. Once is armed, we start receiving the roll and pitch data, so the Bluetooth connection between the PI and the WATCHX is working.
Minoroller code
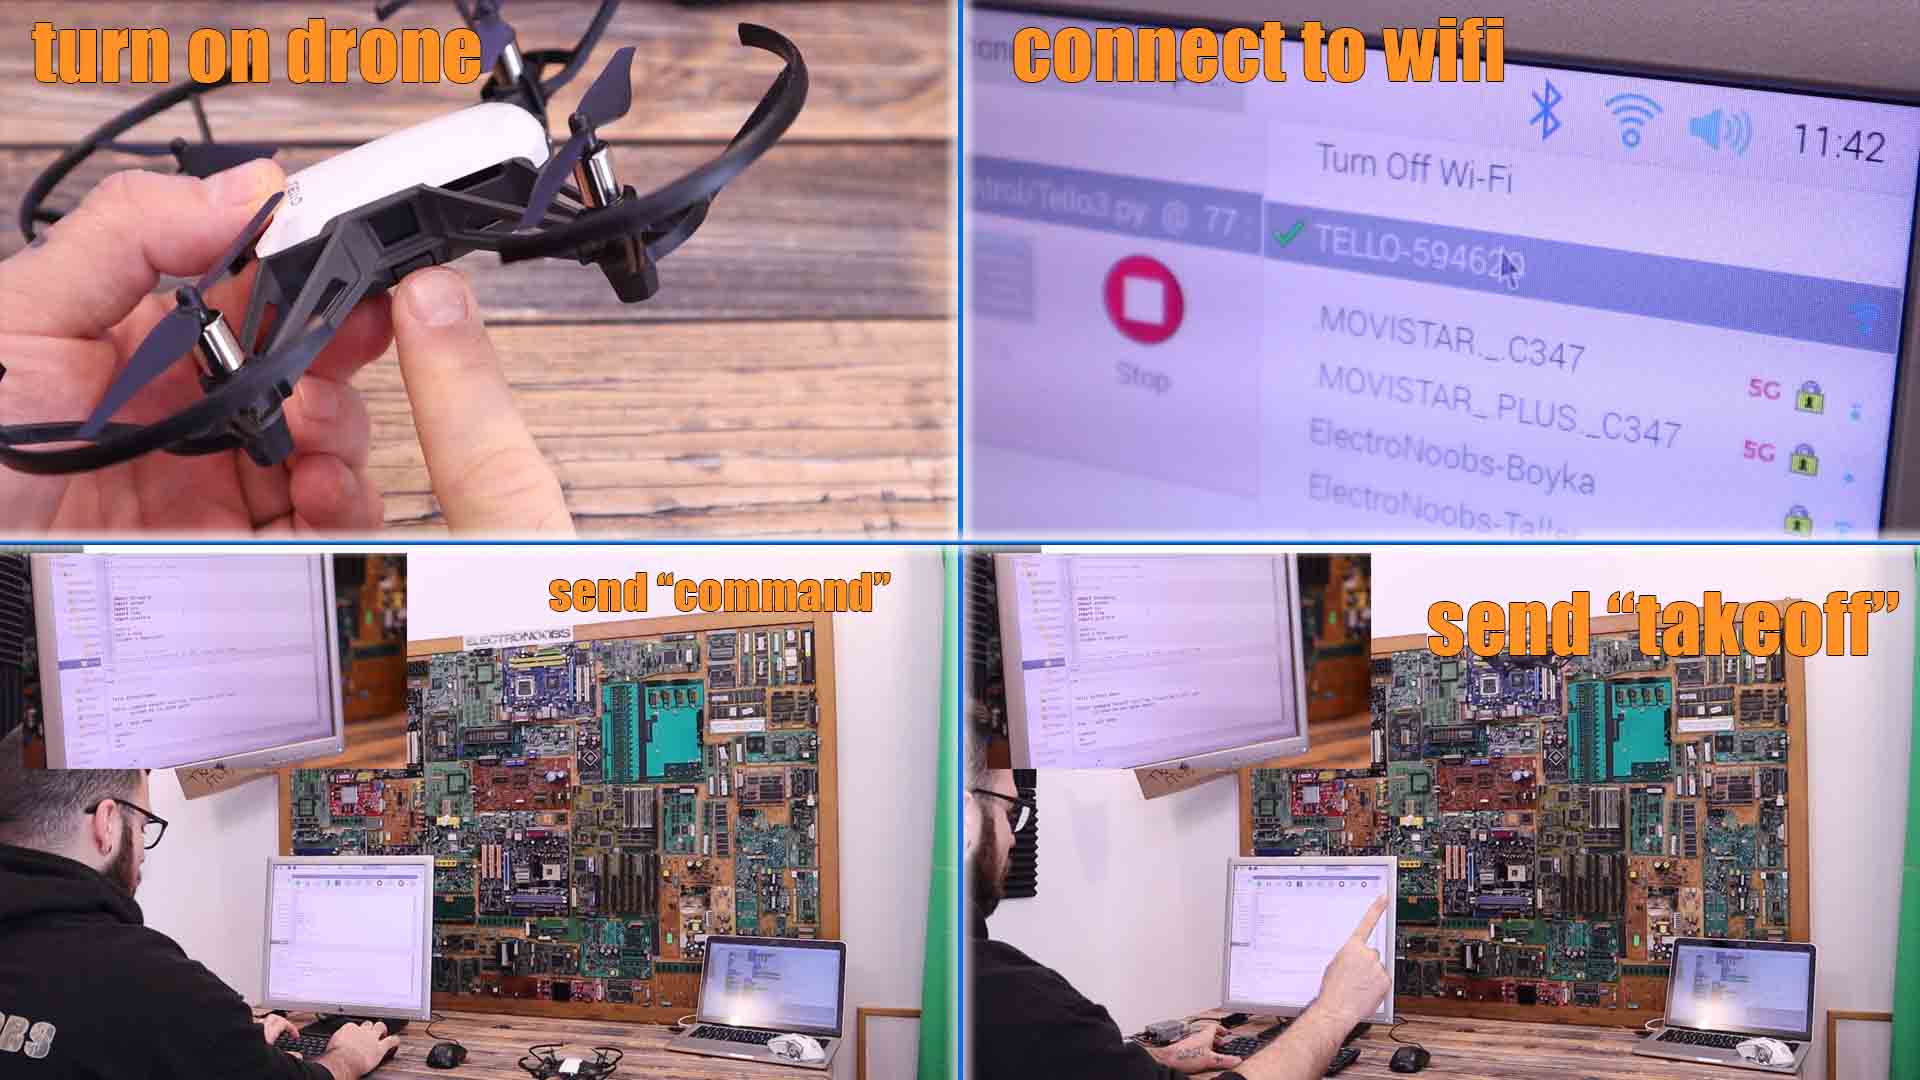
We can start the final step which is to control the drone with the pi. This is how this drone works: When we press the button on the side the WIFI will start. We can connect to that WIFI and send commands such as take off, land, rotate, etc. So, in the example codes you have downloaded before (minoroller) now open the drone control folder. Open the Tello 3 code in THONNY as before. Before you run the code, make sure you power on the Tello drone. Then go in the WIFI list of the Raspberry pi and connect to the Tello drone signal. Once connected run the code and make sure the drone is in a place it could fly without obstacles. Go in the shell and write "command" and press enter. If you receive OK, that means the drone is waiting for a command. Type "takeoff" and the drone will now start and hover in place. To "land" type command and press enter and then type land and enter again. The drone will land so we can successfully control the drone.
So final step is to merge the Bluetooth code with this last code so each time we receive a command for takeoff, land angle values from the WATCHX, we send those commands to the drone and control it. Go to the downloaded files (minoroller) and open the "src" folder and run the controller code. This code will receive the commands using Bluetooth and send them to the drone using WIFI as before. Make sure the drone is on and we are connected to its WIFI. Run the code and also have the WATCHX powered on with the code. To arm the drone press the left button. The drone is armed. To take off press the top right button and to land press the bottom right button. And there you go we are controlling the drone with the WATCHX board. Change the angle of the watch and move the drone around.
We can only move it in the roll and pitch direction but if you want to improve the code, feel free to add YAW control as well by changing the mBlocks code. So guys, that’s another cool example you could make with this tiny development board and best of all, you can learn a lot with this project. And I will say it again, controlling the drone with the watch is quite fun, especially when you know how the code running on the watch was made. You can find all the codes and examples on github, so get your WATCHX now and make this or any other cool project. Remember that with this board you have buttons, LEDs, OLED display, many sensors for movement, temperature and pressure, you have an on boar real time clock, battery and USB charger so you can make many projects.
I hope you like this tutorial and maybe you have learned something new. If my videos help you, consider supporting my work on my PATREON or a donation on my PayPal. Thanks again and see you later guys.