


This is a very short example. How to wire up an 16x2 LCD to the arduino using i2c communication and then display text, numbers, some special cahracters but also some unique made icons byte by byte. Below you have the schematic you need and an example code. Remember to install the i2c lyquid crystal library. Read the comments in the code for more or leave a question below.
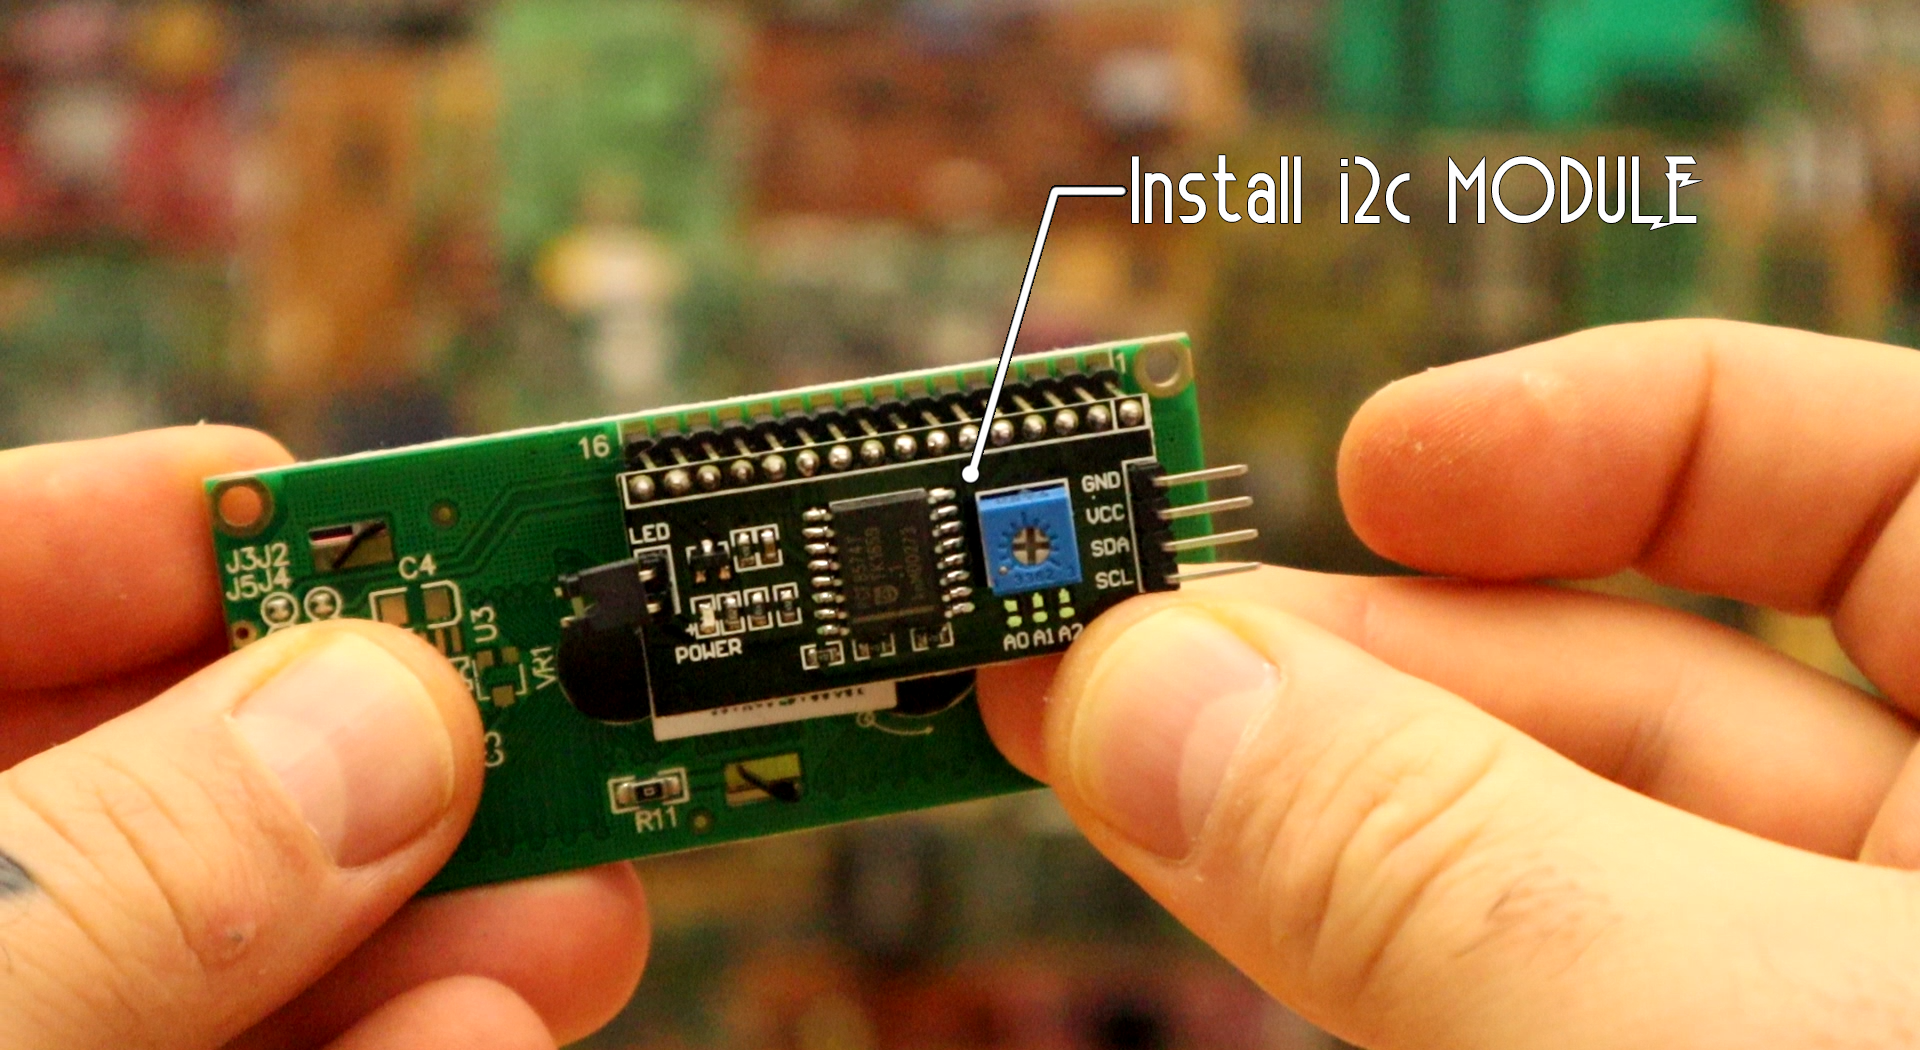
First, make sure you solder a i2c module like this one on this link, to the pins of the LCD. This module could control the 16x2 LCD but also the 20x4 one and costs only 1 dollar.
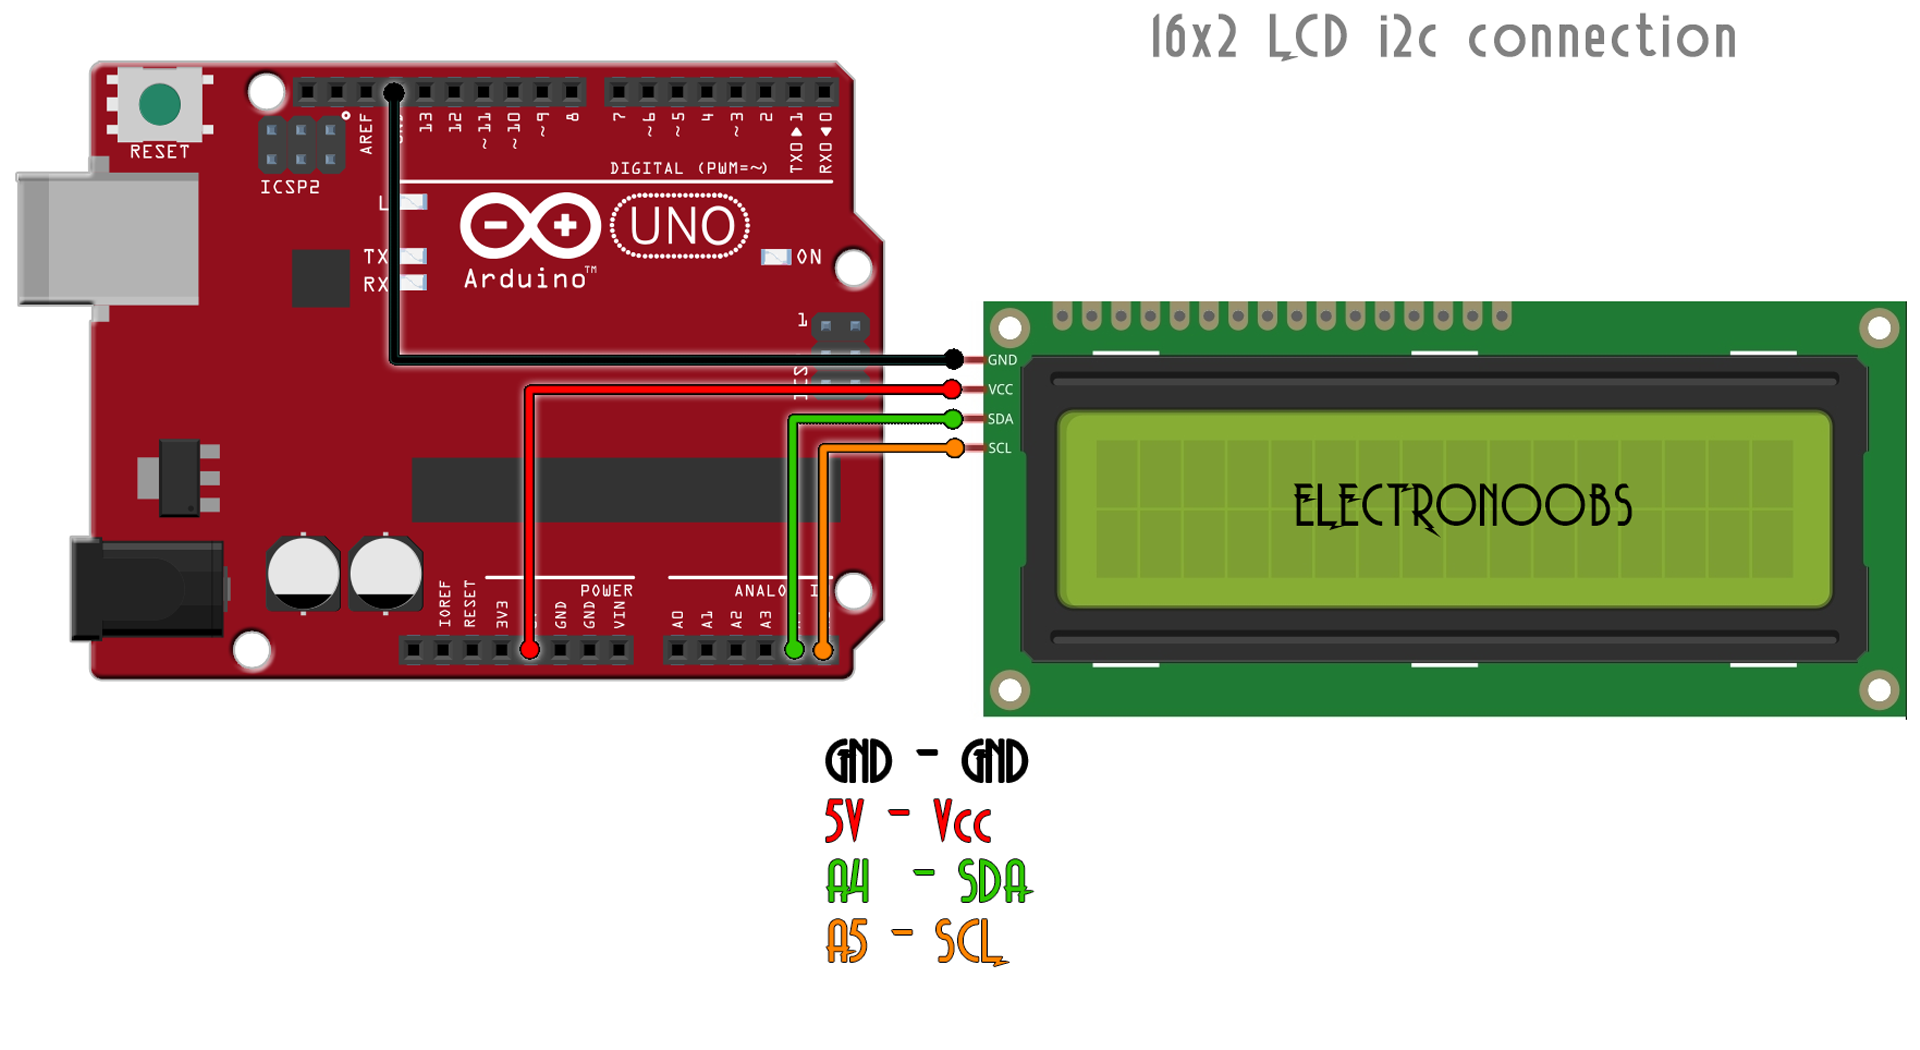
Ok, make the i2c connections from the Arduino to the LCD module as below. Add a 10k potentiometer in order to be able to set the contrast of the LCD: Also a small 220 resistor to limit the current fot the backlight LED. The rest of the pins are the parallel data and the wr/re pins.
First of all, you need the i2c liquid crystral library in order to work. For that, go below and downlaod that library. It will be a .zip file. Open Arduino IDE and go to sketch, include library, add .zip library and select the downlaoded file. Now the library is installed. You could downlaod the example code or just copy/paste it from below.
/* i2c LCD control for 16x2.
 * Tutorial: http://www.electronoobs.com/eng_arduino_tut51.php
 * Tutorial: http://www.electronoobs.com/eng_arduino_tut51_sch1.php
 */


//LCD config
#include <Wire.h>
#include <LiquidCrystal_I2C.h>
LiquidCrystal_I2C lcd(0x3f,20,4);  //sometimes the LCD adress is not 0x3f. Change to 0x27 if it dosn't work.
int i = 0;

uint8_t bell[8]  = {0x4, 0xe, 0xe, 0xe, 0x1f, 0x0, 0x4};
uint8_t note[8]  = {0x2, 0x3, 0x2, 0xe, 0x1e, 0xc, 0x0};
uint8_t Clock[8] = {0x0, 0xe, 0x15, 0x17, 0x11, 0xe, 0x0};
uint8_t heart[8] = {0x0, 0xa, 0x1f, 0x1f, 0xe, 0x4, 0x0};
uint8_t duck[8]  = {0x0, 0xc, 0x1d, 0xf, 0xf, 0x6, 0x0};
uint8_t check[8] = {0x0, 0x1 ,0x3, 0x16, 0x1c, 0x8, 0x0};
uint8_t cross[8] = {0x0, 0x1b, 0xe, 0x4, 0xe, 0x1b, 0x0};
uint8_t retarrow[8] = {  0x1, 0x1, 0x5, 0x9, 0x1f, 0x8, 0x4};


void setup() {
  lcd.init();                 //Init the LCD
  lcd.backlight();            //Activate backlight

  lcd.createChar(0, bell);
  lcd.createChar(1, note);
  lcd.createChar(2, Clock);
  lcd.createChar(3, heart);
  lcd.createChar(4, duck);
  lcd.createChar(5, check);
  lcd.createChar(6, cross);
  lcd.createChar(7, retarrow);
  lcd.home();
}

void loop() {
  // Turn off the display:
  lcd.clear();
  lcd.print("  ELECTRONOOBS  ");

  lcd.clear();
  lcd.setCursor(0,0);
  lcd.write(1);
  lcd.write(2);
  lcd.write(3);
  lcd.write(4);
  lcd.write(5);
  lcd.write(6);
  lcd.write(7);
  delay(3000);

  lcd.noDisplay();
  delay(500);
  // Turn on the display:
  lcd.display();
  delay(500);

  lcd.noDisplay();
  delay(500);
  // Turn on the display:
  lcd.display();
  delay(500);


  lcd.clear();
  while(i<16)
  {
    lcd.setCursor(i,0);
    lcd.print("X");
    i = i + 1;
    delay(100);
  }
  i = 0;

  while(i<16)
  {
    lcd.setCursor(i,1);
    lcd.print("X");
    i = i + 1;
    delay(100);
  }
  i = 0;

  lcd.setCursor(0,0);
  lcd.print("   1234567890   ");
  lcd.setCursor(0,1);
  lcd.print("   0987654321   ");
  delay(2000);

  lcd.setCursor(0,0);
  lcd.print("   !$%&/()=?!   ");
  lcd.setCursor(0,1);
  lcd.print("   |@#~!$%&/%   ");
  delay(2000);

  lcd.clear();
  lcd.setCursor(0,1);
  lcd.print("  This is LCD 2  ");


  delay(3000);
}
First of all, you need the i2c liquid crystral library in order to work. For that, go below and downlaod that library. It will be a .zip file. Open Arduino IDE and go to sketch, include library, add .zip library and select the downlaoded file. Now the library is installed. You could downlaod the example code or just copy/paste it from below.
/* i2c LCD control for 16x2.
 * Tutorial: http://www.electronoobs.com/eng_arduino_tut51.php
 * Tutorial: http://www.electronoobs.com/eng_arduino_tut51_sch1.php
 */


//LCD config
#include <Wire.h>
#include <LiquidCrystal_I2C.h>
LiquidCrystal_I2C lcd(0x3f,20,4);  //sometimes the LCD adress is not 0x3f. Change to 0x27 if it dosn't work.
LiquidCrystal_I2C lcd2(0x27,20,4);  //sometimes the LCD adress is not 0x3f. Change to 0x27 if it dosn't work.
int i = 0;

uint8_t bell[8]  = {0x4, 0xe, 0xe, 0xe, 0x1f, 0x0, 0x4};
uint8_t note[8]  = {0x2, 0x3, 0x2, 0xe, 0x1e, 0xc, 0x0};
uint8_t Clock[8] = {0x0, 0xe, 0x15, 0x17, 0x11, 0xe, 0x0};
uint8_t heart[8] = {0x0, 0xa, 0x1f, 0x1f, 0xe, 0x4, 0x0};
uint8_t duck[8]  = {0x0, 0xc, 0x1d, 0xf, 0xf, 0x6, 0x0};
uint8_t check[8] = {0x0, 0x1 ,0x3, 0x16, 0x1c, 0x8, 0x0};
uint8_t cross[8] = {0x0, 0x1b, 0xe, 0x4, 0xe, 0x1b, 0x0};
uint8_t retarrow[8] = {  0x1, 0x1, 0x5, 0x9, 0x1f, 0x8, 0x4};


void setup() {
  lcd.init();                 //Init the LCD
  lcd.backlight();            //Activate backlight

  lcd2.init();                 //Init the LCD
  lcd2.backlight();            //Activate backlight

  lcd.createChar(0, bell);
  lcd.createChar(1, note);
  lcd.createChar(2, Clock);
  lcd.createChar(3, heart);
  lcd.createChar(4, duck);
  lcd.createChar(5, check);
  lcd.createChar(6, cross);
  lcd.createChar(7, retarrow);
  lcd.home();

  lcd2.createChar(0, bell);
  lcd2.createChar(1, note);
  lcd2.createChar(2, Clock);
  lcd2.createChar(3, heart);
  lcd2.createChar(4, duck);
  lcd2.createChar(5, check);
  lcd2.createChar(6, cross);
  lcd2.createChar(7, retarrow);
  lcd2.home();
}

void loop() {
  // Turn off the display:
  lcd.clear();
  lcd.print("  ELECTRONOOBS  ");
  lcd2.clear();
  lcd2.print("  ELECTRONOOBS  ");

  lcd.clear();
  lcd.setCursor(0,0);
  lcd.write(1);
  lcd.write(2);
  lcd.write(3);
  lcd.write(4);
  lcd.write(5);
  lcd.write(6);
  lcd.write(7);
  delay(3000);

  lcd2.clear();
  lcd2.setCursor(0,0);
  lcd2.write(1);
  lcd2.write(2);
  lcd2.write(3);
  lcd2.write(4);
  lcd2.write(5);
  lcd2.write(6);
  lcd2.write(7);
  delay(3000);

  lcd.noDisplay();
  lcd2.noDisplay();
  delay(500);
  // Turn on the display:
  lcd.display();
  lcd2.display();
  delay(500);

  lcd.noDisplay();
  lcd2.noDisplay();
  delay(500);
  // Turn on the display:
  lcd.display();
  lcd2.display();
  delay(500);


  lcd.clear();
  lcd2.clear();
  while(i<16)
  {
    lcd.setCursor(i,0);
    lcd.print("X");
    lcd2.setCursor(i,0);
    lcd2.print("X");
    i = i + 1;
    delay(100);
  }
  i = 0;

  while(i<16)
  {
    lcd.setCursor(i,1);
    lcd.print("X");
    lcd2.setCursor(i,1);
    lcd2.print("X");
    i = i + 1;
    delay(100);
  }
  i = 0;

  lcd.setCursor(0,0);
  lcd.print("   1234567890   ");
  lcd2.setCursor(0,0);
  lcd2.print("   1234567890   ");

  lcd.setCursor(0,1);
  lcd.print("   0987654321   ");
  lcd2.setCursor(0,1);
  lcd2.print("   0987654321   ");
  delay(2000);

  lcd.setCursor(0,0);
  lcd.print("   !$%&/()=?!   ");
  lcd2.setCursor(0,0);
  lcd2.print("   !$%&/()=?!   ");

  lcd.setCursor(0,1);
  lcd.print("   |@#~!$%&/%   ");
  lcd2.setCursor(0,1);
  lcd2.print("   |@#~!$%&/%   ");
  delay(2000);

  lcd.clear();
  lcd.setCursor(0,1);
  lcd.print("  This is LCD 2  ");

  lcd2.clear();
  lcd2.setCursor(0,0);
  lcd2.print("  This is LCD 1  ");
  delay(3000);

}
First of all, you need the i2c liquid crystral library in order to work. For that, go below and downlaod that library. It will be a .zip file. Open Arduino IDE and go to sketch, include library, add .zip library and select the downlaoded file. Now the library is installed. You could downlaod the example code or just copy/paste it from below.
/* i2c LCD control for 20x4.
 * Tutorial: http://www.electronoobs.com/eng_arduino_tut51.php
 * Tutorial: http://www.electronoobs.com/eng_arduino_tut51_sch1.php
 */


//LCD config
#include <Wire.h>
#include <LiquidCrystal_I2C.h>
LiquidCrystal_I2C lcd(0x27,20,4);  //sometimes the LCD adress is not 0x3f. Change to 0x27 if it dosn't work.
int i = 0;

uint8_t bell[8]  = {0x4, 0xe, 0xe, 0xe, 0x1f, 0x0, 0x4};
uint8_t note[8]  = {0x2, 0x3, 0x2, 0xe, 0x1e, 0xc, 0x0};
uint8_t Clock[8] = {0x0, 0xe, 0x15, 0x17, 0x11, 0xe, 0x0};
uint8_t heart[8] = {0x0, 0xa, 0x1f, 0x1f, 0xe, 0x4, 0x0};
uint8_t duck[8]  = {0x0, 0xc, 0x1d, 0xf, 0xf, 0x6, 0x0};
uint8_t check[8] = {0x0, 0x1 ,0x3, 0x16, 0x1c, 0x8, 0x0};
uint8_t cross[8] = {0x0, 0x1b, 0xe, 0x4, 0xe, 0x1b, 0x0};
uint8_t retarrow[8] = {  0x1, 0x1, 0x5, 0x9, 0x1f, 0x8, 0x4};


void setup() {
  lcd.init();                 //Init the LCD
  lcd.backlight();            //Activate backlight

  lcd.createChar(0, bell);
  lcd.createChar(1, note);
  lcd.createChar(2, Clock);
  lcd.createChar(3, heart);
  lcd.createChar(4, duck);
  lcd.createChar(5, check);
  lcd.createChar(6, cross);
  lcd.createChar(7, retarrow);
  lcd.home();
}

void loop() {
  // Turn off the display:
  lcd.clear();
  lcd.print("    ELECTRONOOBS    ");
  delay(2000);

  lcd.clear();
  lcd.setCursor(0,0);
  lcd.write(1);
  lcd.write(2);
  lcd.write(3);
  lcd.write(4);
  lcd.write(5);
  lcd.write(6);
  lcd.write(7);
  delay(3000);


  lcd.noDisplay();
  delay(500);
  // Turn on the display:
  lcd.display();
  delay(500);

  lcd.noDisplay();
  delay(500);
  // Turn on the display:
  lcd.display();
  delay(500);


  lcd.clear();
  while(i<20)
  {
    lcd.setCursor(i,0);
    lcd.print("X");
    i = i + 1;
    delay(50);
  }
  i = 0;

  while(i<20)
  {
    lcd.setCursor(i,1);
    lcd.print("X");
    i = i + 1;
    delay(50);
  }
  i = 0;

  while(i<20)
  {
    lcd.setCursor(i,2);
    lcd.print("X");
    i = i + 1;
    delay(50);
  }
  i = 0;

  while(i<20)
  {
    lcd.setCursor(i,3);
    lcd.print("X");
    i = i + 1;
    delay(50);
  }
  i = 0;

  lcd.clear();
  lcd.setCursor(0,0);
  lcd.print("     1234567890     ");
  lcd.setCursor(0,1);
  lcd.print("     0987654321     ");
  lcd.setCursor(0,2);
  lcd.print("     1234567890     ");
  lcd.setCursor(0,3);
  lcd.print("     0987654321     ");
  delay(2000);

  lcd.setCursor(0,0);
  lcd.print("     !$%&/()=?!     ");
  lcd.setCursor(0,1);
  lcd.print("     |@#~!$%&/%     ");
  lcd.setCursor(0,2);
  lcd.print("     !$%&/()=?!     ");
  lcd.setCursor(0,3);
  lcd.print("     |@#~!$%&/%     ");
  delay(2000);

  lcd.clear();
  lcd.setCursor(0,1);
  lcd.print("    This is LCD 1    ");
  delay(3000);

}


