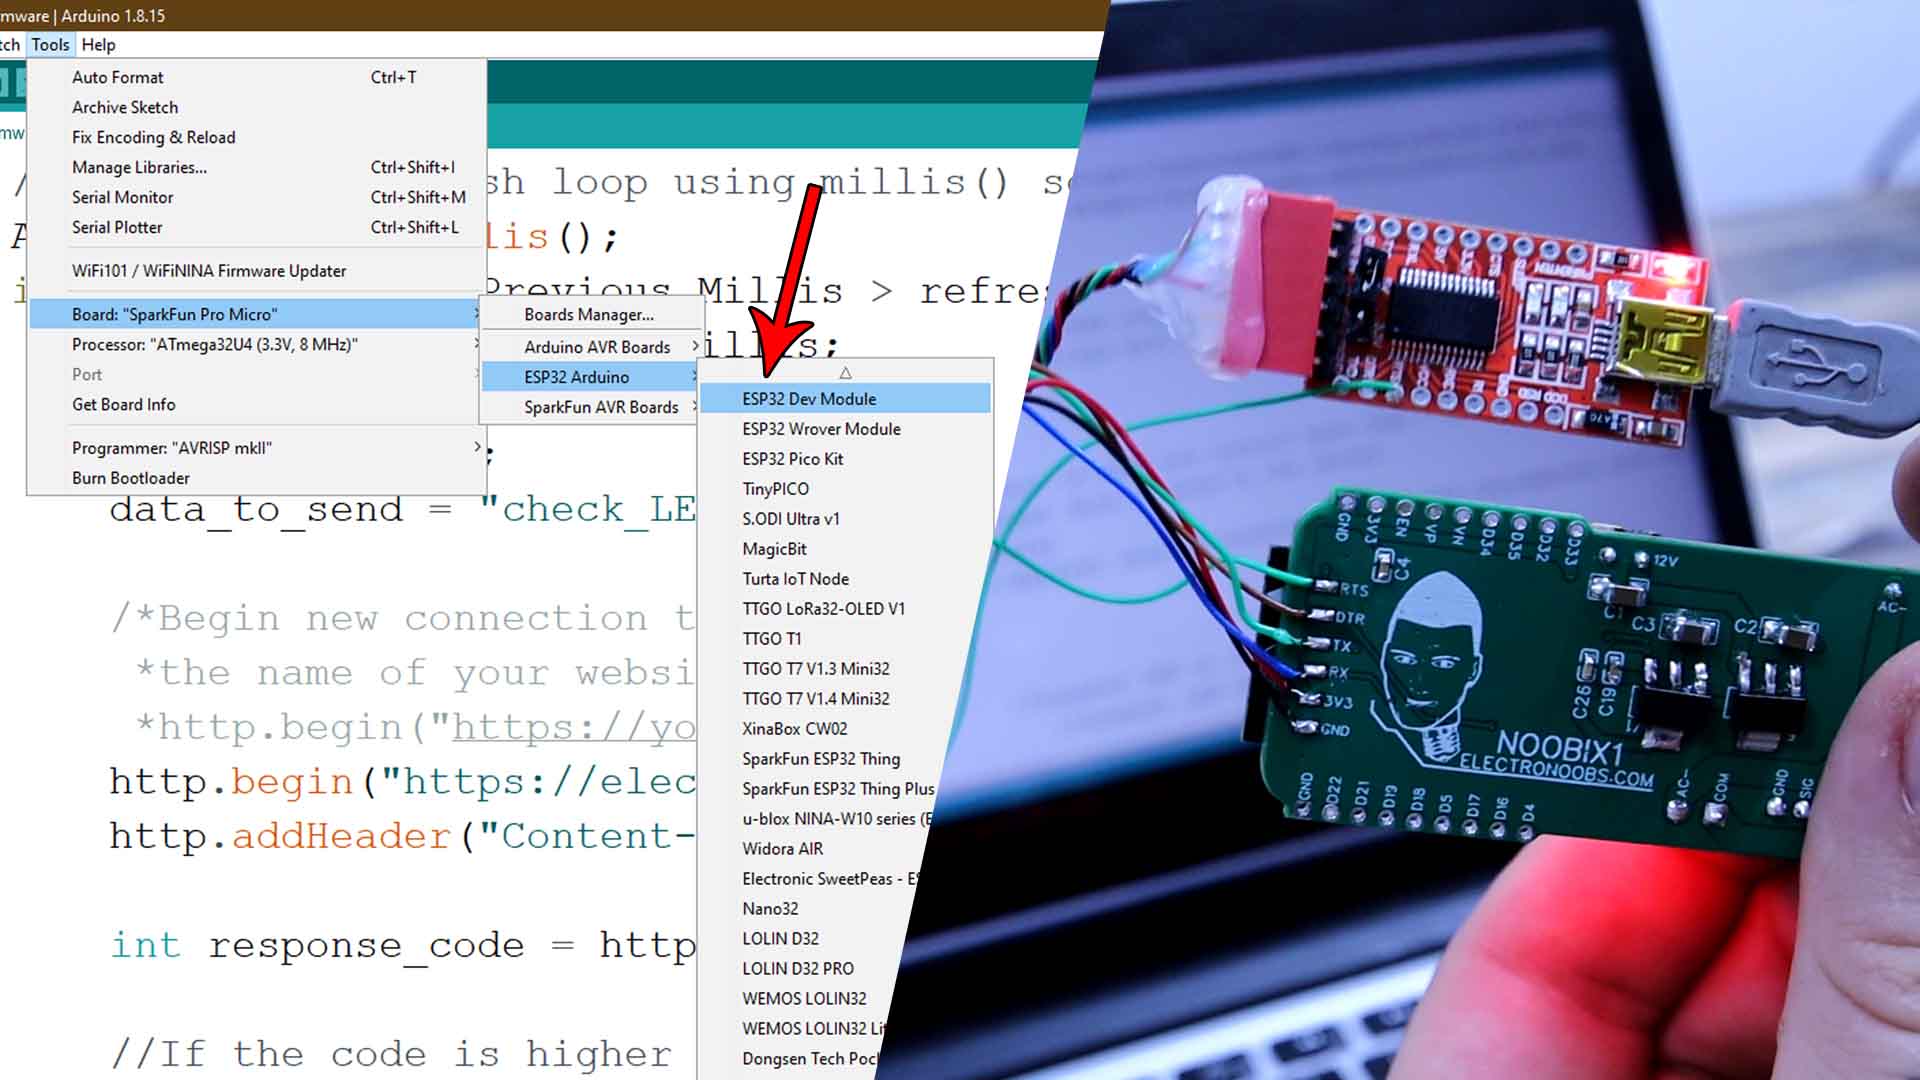
Now download the Arduino Code from below. Read the instructions in the code line by line. First, you have to change your wifi name and password. Then scroll down and in the http.begin function change the website from "electronoobs.com" to the name of your website. See in the previous video how to install the ESP32 boards. Once you do that, go to tools, board and select the ESP DEV MODULE board. Connect wires from an FTDI module like this one to the PCB. RX to TX, TX top RX and DTR to DTR together with RTS to RTS. Share ground and 5V. Then in Arduino, select the COM and upload the code. That's it.
//Include libraries
#include <HTTPClient.h>                       //Download: https://electronoobs.com/eng_arduino_httpclient.php
#include <WiFi.h>                             //Download: https://electronoobs.com/eng_arduino_wifi.php

//Add WIFI data
const char* ssid = "ElectroNoobs-Taller";     //Add your WIFI network name
const char* password =  "12345678";           //Add WIFI password

//Variables used in the code
String LED_id = "1";                          //Just in case you control more than 1 LED
String data_to_send = "";                     //Text data to send to the server
unsigned int Actual_Millis, Previous_Millis;
int refresh_time = 200;                       //Refresh rate of connection to website (recommended more than 1s)


//Inputs/outputs
int LED = 2;                                  //LED connected on IO2
int Relay = 12;                               //Pin for SSR control is IO12

void setup() {
  delay(10);
  Serial.begin(115200);                       //Start monitor
  pinMode(LED, OUTPUT);                       //Set pin 2 as OUTPUT
  pinMode(Relay, OUTPUT);                     //Set pin 12 as OUTPUT
  digitalWrite(LED, LOW);                     //Start with LED turned OFF
  digitalWrite(Relay, LOW);                   //Start with SSR turned OFF

  WiFi.begin(ssid, password);                 //Start wifi connection
  Serial.print("Connecting...");
  while (WiFi.status() != WL_CONNECTED) {     //Check for the connection
    delay(500);
    Serial.print(".");
  }

  Serial.print("Connected, my IP: ");
  Serial.println(WiFi.localIP());
  Actual_Millis = millis();                   //Save time for refresh loop
  Previous_Millis = Actual_Millis;
}


void loop() {
  //We make the refresh loop using millis() so we don't have to use delay();
  Actual_Millis = millis();
  if(Actual_Millis - Previous_Millis > refresh_time){
    Previous_Millis = Actual_Millis;
    if(WiFi.status()== WL_CONNECTED){                         //Check WiFi connection status
      HTTPClient http;                                        //Create new client
      data_to_send = "check_LED_status=" + LED_id;            //Create the data to send

      /*Begin new connection to website. Make sure you change "https://electronoobs.com/" to
       *the name of your website. So the next line should be:
       *http.begin("https://yourwebsite.com/NOOBIX_V2/esp32_update.php");*/
      http.begin("https://electronoobs.com/NOOBIX_V2/esp32_update.php");          //Indicate the destination webpage
      http.addHeader("Content-Type", "application/x-www-form-urlencoded");        //Prepare the header

      int response_code = http.POST(data_to_send);                                //Send the POST. This will giveg us a response code

      //If the code is higher than 0, it means we received a response
      if(response_code > 0){
        Serial.println("HTTP code " + String(response_code));                     //Print return code

        if(response_code == 200){                                                 //If code is 200, we received a good response and we can read the echo data
          String response_body = http.getString();                                //Save the data comming from the website
          Serial.print("Server reply: ");                                         //Print data to the monitor for debug
          Serial.println(response_body);

          //If the received data is LED_is_off, we turn OFF the SSR and LED
          if(response_body == "LED_is_off"){
            digitalWrite(LED, LOW);
            digitalWrite(Relay, LOW);
          }
          //If the received data is LED_is_on, we turn ON the SSR and LED
          else if(response_body == "LED_is_on"){
            digitalWrite(LED, HIGH);
            digitalWrite(Relay, HIGH);
          }
        }//End of response_code = 200
      }//END of response_code > 0

      else{
       Serial.print("Error sending POST, code: ");
       Serial.println(response_code);
      }
      http.end();                                                                 //End the connection
    }//END of WIFI connected
    else{
      Serial.println("WIFI connection error");
    }
  }
}