I work with PCBs all the time. Most of these PCB have SMD components and to solder those I some time use my soldering iron and solder wire but most of the time, I use solder paste and my hot air gun. I usually apply solder paste directly from the syringe and to push it out I’ve bought a metal handle. You fit this inside the syringe and it will help you push the paste out, but sometimes you have to apply force or is uncomfortable. That’s why I’ve made my own electric paste dispenser tool that can select the amount of paste to push out, and with just a push of a button, you can make small paste dots on the PCB. This paste dispenser could help use when we need to solder lots of small components. Let me show you how it works, what you need to make one and build it step by step. So, let’s get started.
Ok, below you will find the basic configuration of this microcontroller. So in order for it to work, at least we need these components. It needs a pullup on the reset pin and we need the 8MHz crystal and 32KHz resonator each with two 20pF capacitors connected. To get 3.3V I’ve used the AMS1117 regulator and supplied the output to the VDD pins. For the boot1 and boot 2 connections I’ve placed 6 pins so I could also use jumpers to make the switch.
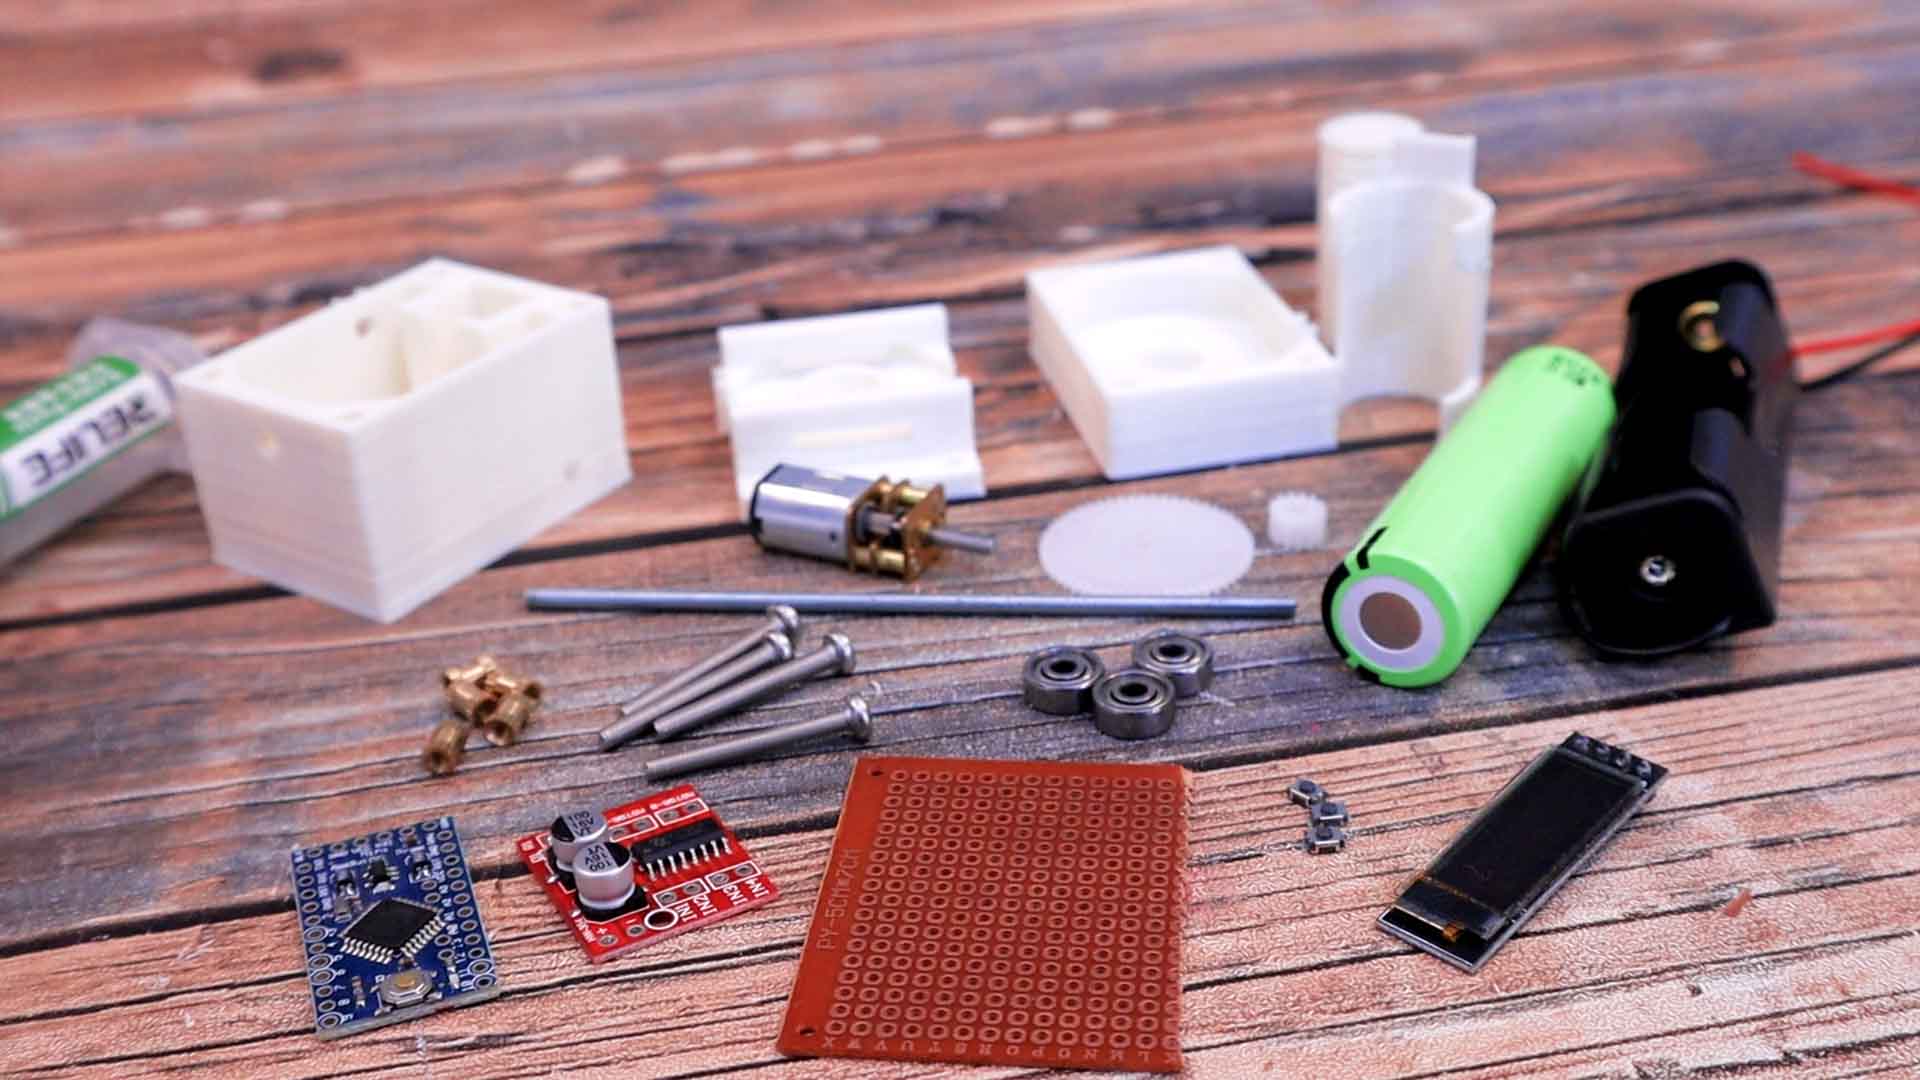
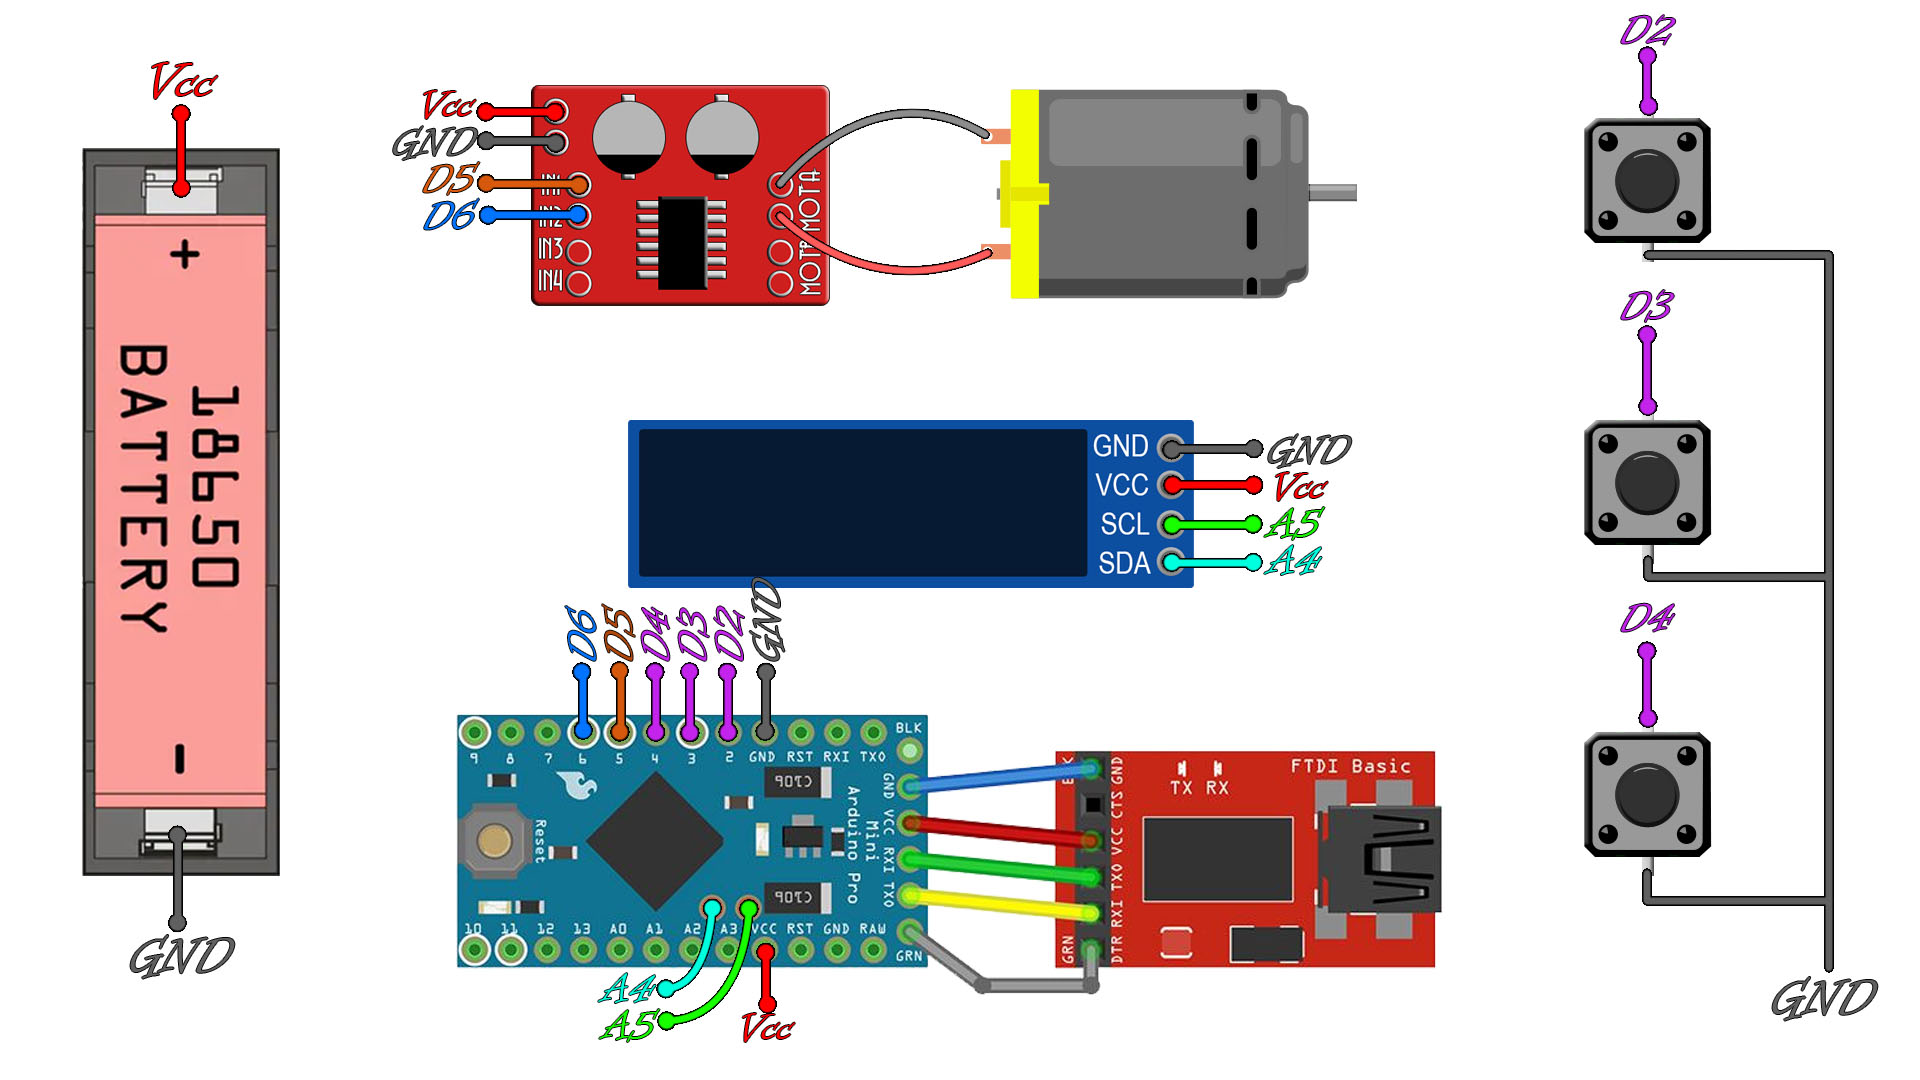
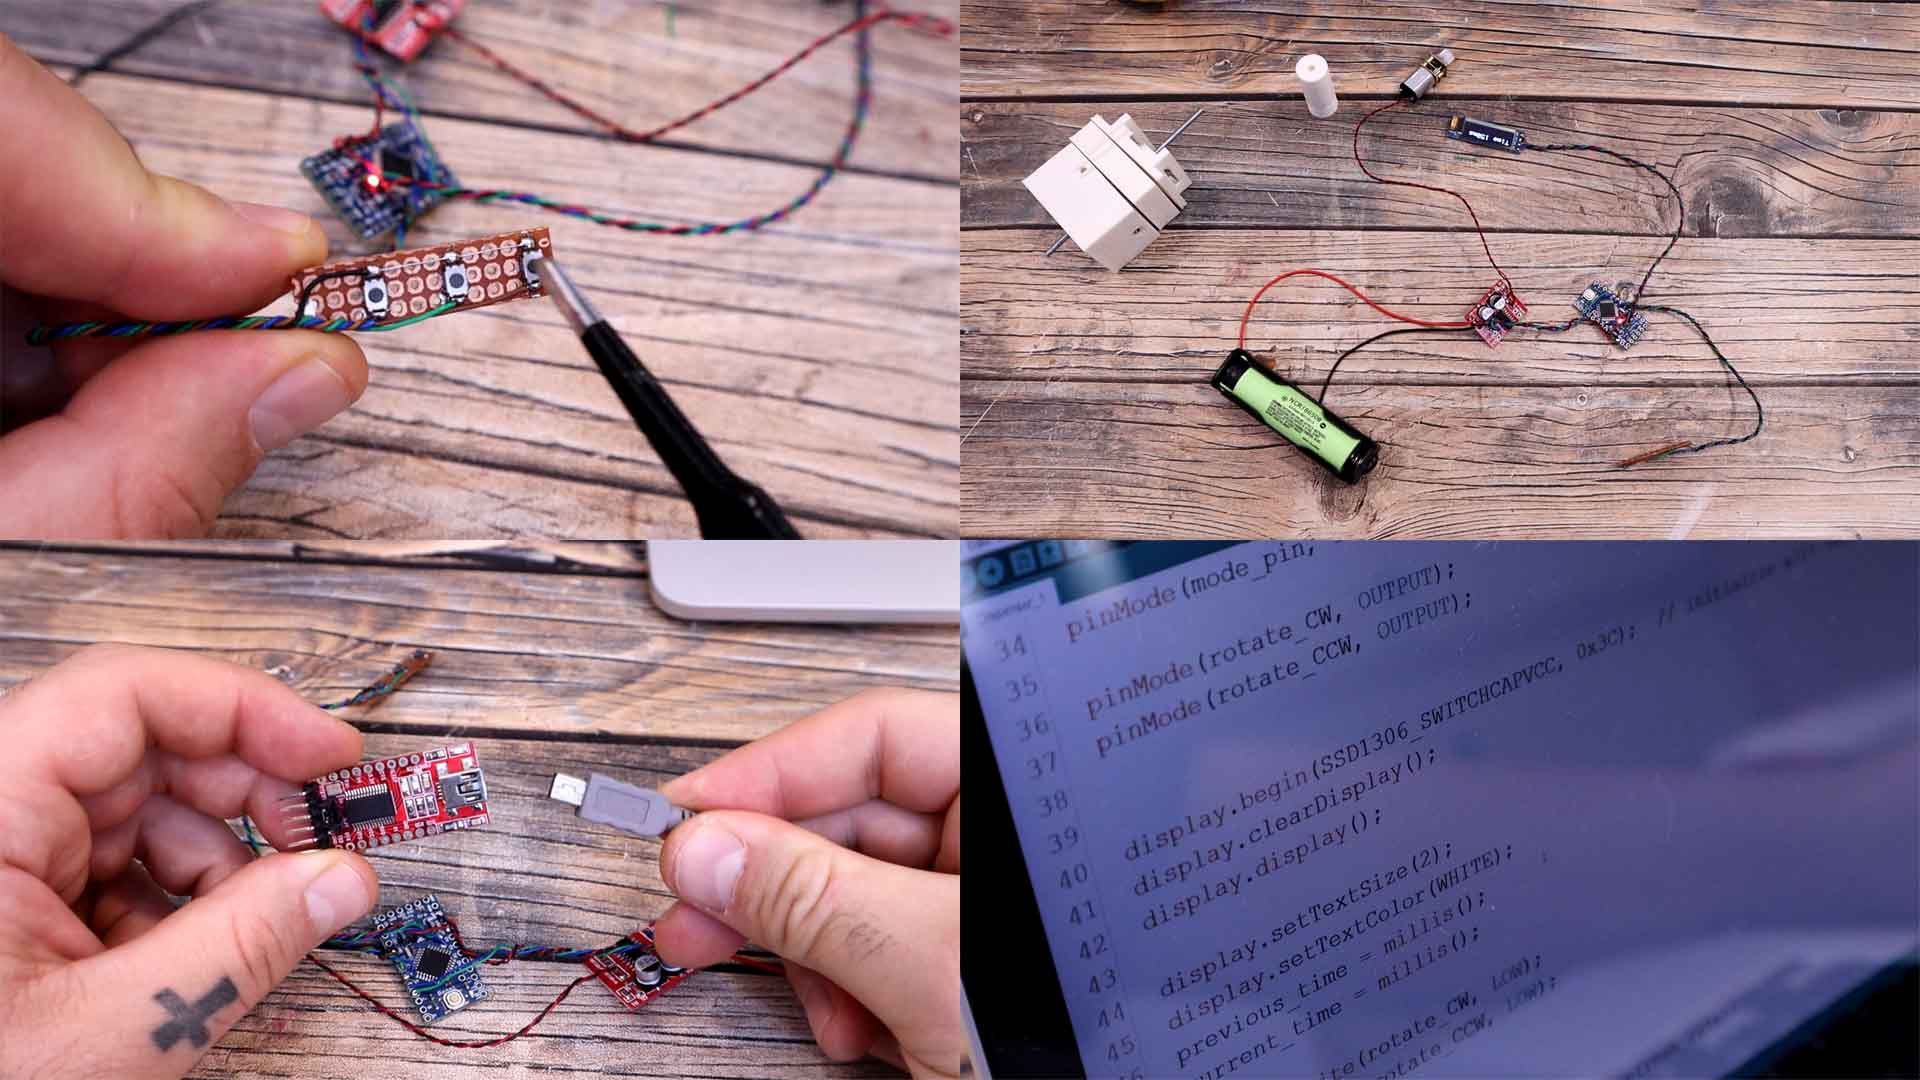
To make the electronics part, I’ve used these connections below. The DC motor connected to the H bridge driver and the driver is connected to 4V from the battery and signal from the Arduino Pro mini. I know an Arduino is overkill for this project, but I want to add more features in the future and we also use the OLED screen to print the rotating time. I solder 3 push buttons to a prototyping PCB. I connect the Arduino to the driver and the battery and so on. With thin wires I connect the buttons to the Arduino and the OLED display as well.
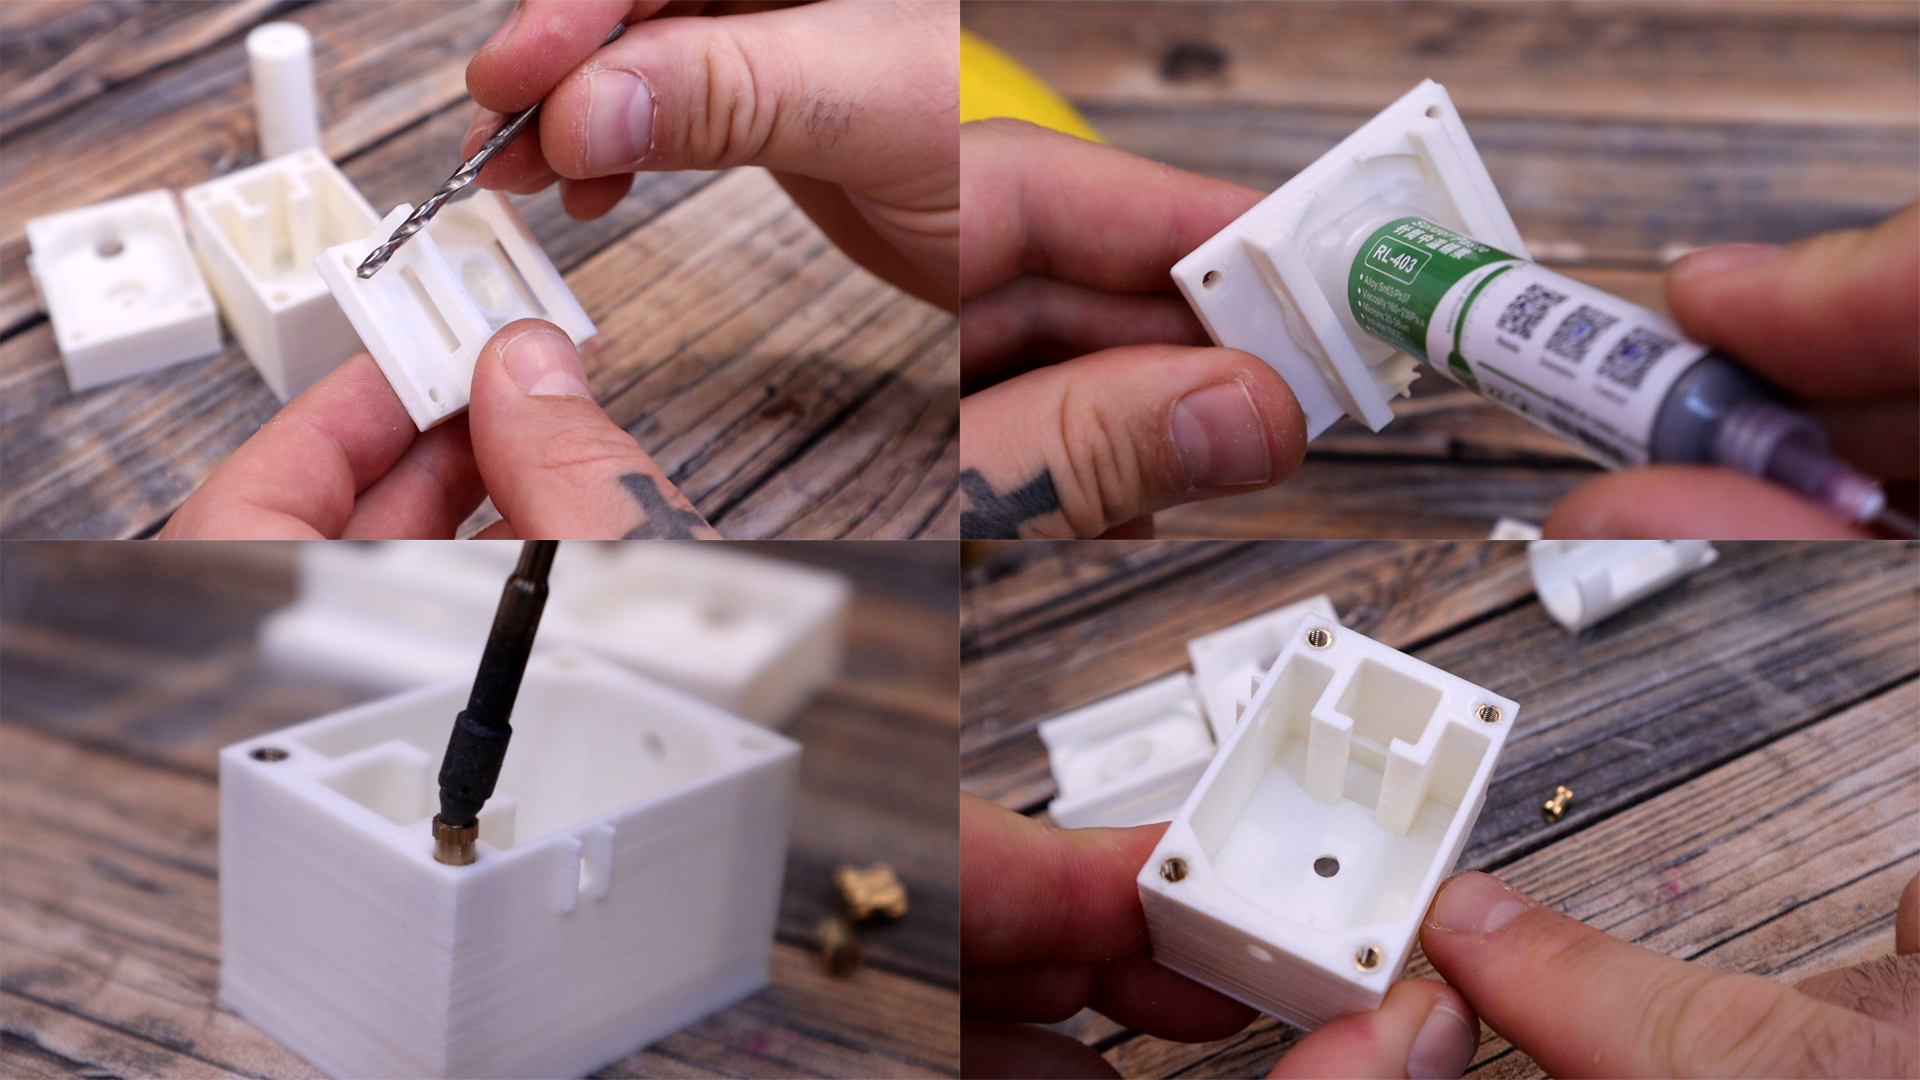
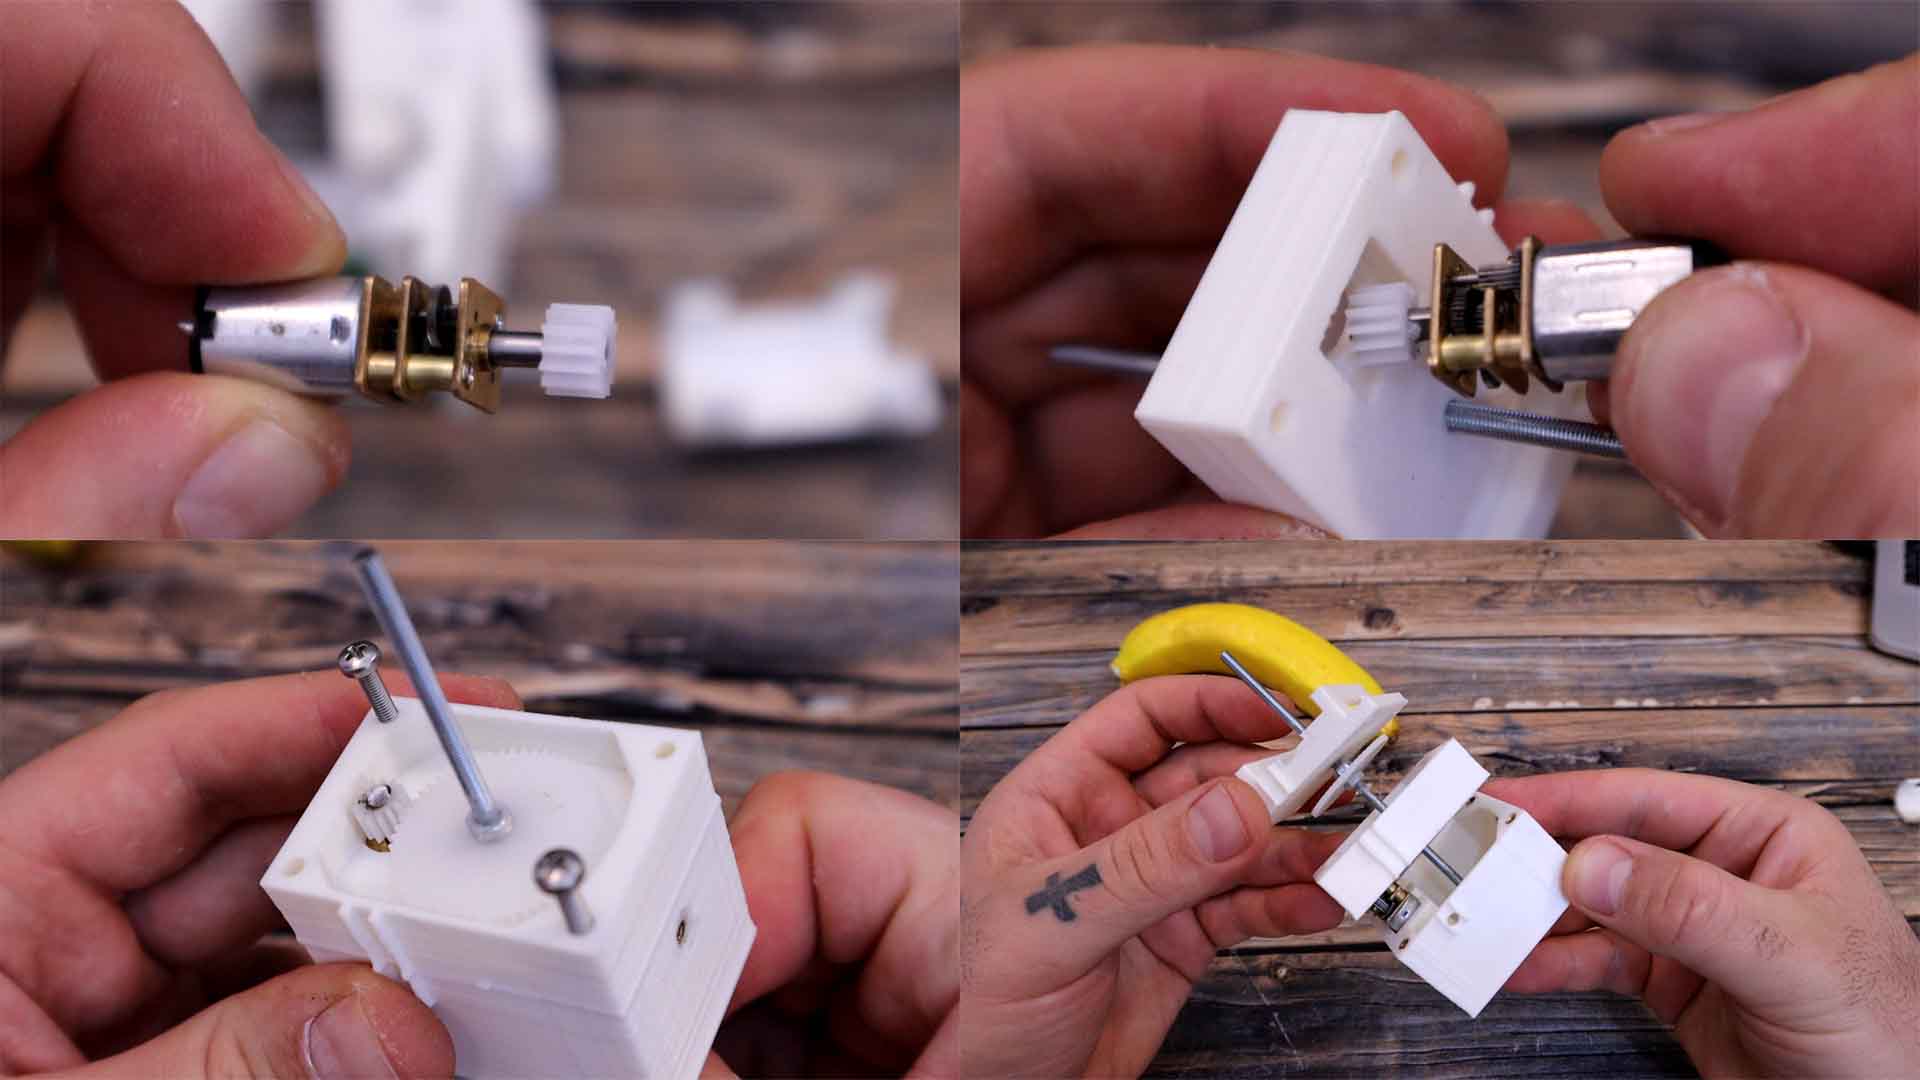
Download the STL files from below. So, let’s start assembling this project. First thing first, we sand paper the 3D parts a little bit. I’ve printed these with 2 perimeters, 20% infill, a 0.4mm nozzle and 0.2mm layer height. The material is pearl white PLA. I’ve also made sure the holes are the correct size using a M3 drill. Also check if you can fit the solder paste syringe. The model is made in such a way, that if you fit the syringe and rotate it, it will get locked in place, in that way is quite easy to use. Next step is to add the insertion brass threads. So get some of these insertions and your soldering iron. Heat up and push the insertion inside the plastic. We need 4 insertions for the big 3D case. Then we need one more on the side and we will use this to fix in place the battery socket on the side.
Next we add the bearings. We need 3. Each part has one bearing. Now get the M3 threaded rod and cut it to around 10cm. If is too long later, we could cut more but at first, cut it to 10 cm. Get the big diameter gear and place it on the screw. I measure more or less where the maximum length would be when it goes inside the syringe. Then I add some M3 nuts and fix in place the gear. Once we are sure that is the correct position, we could also add some glue to those nuts.
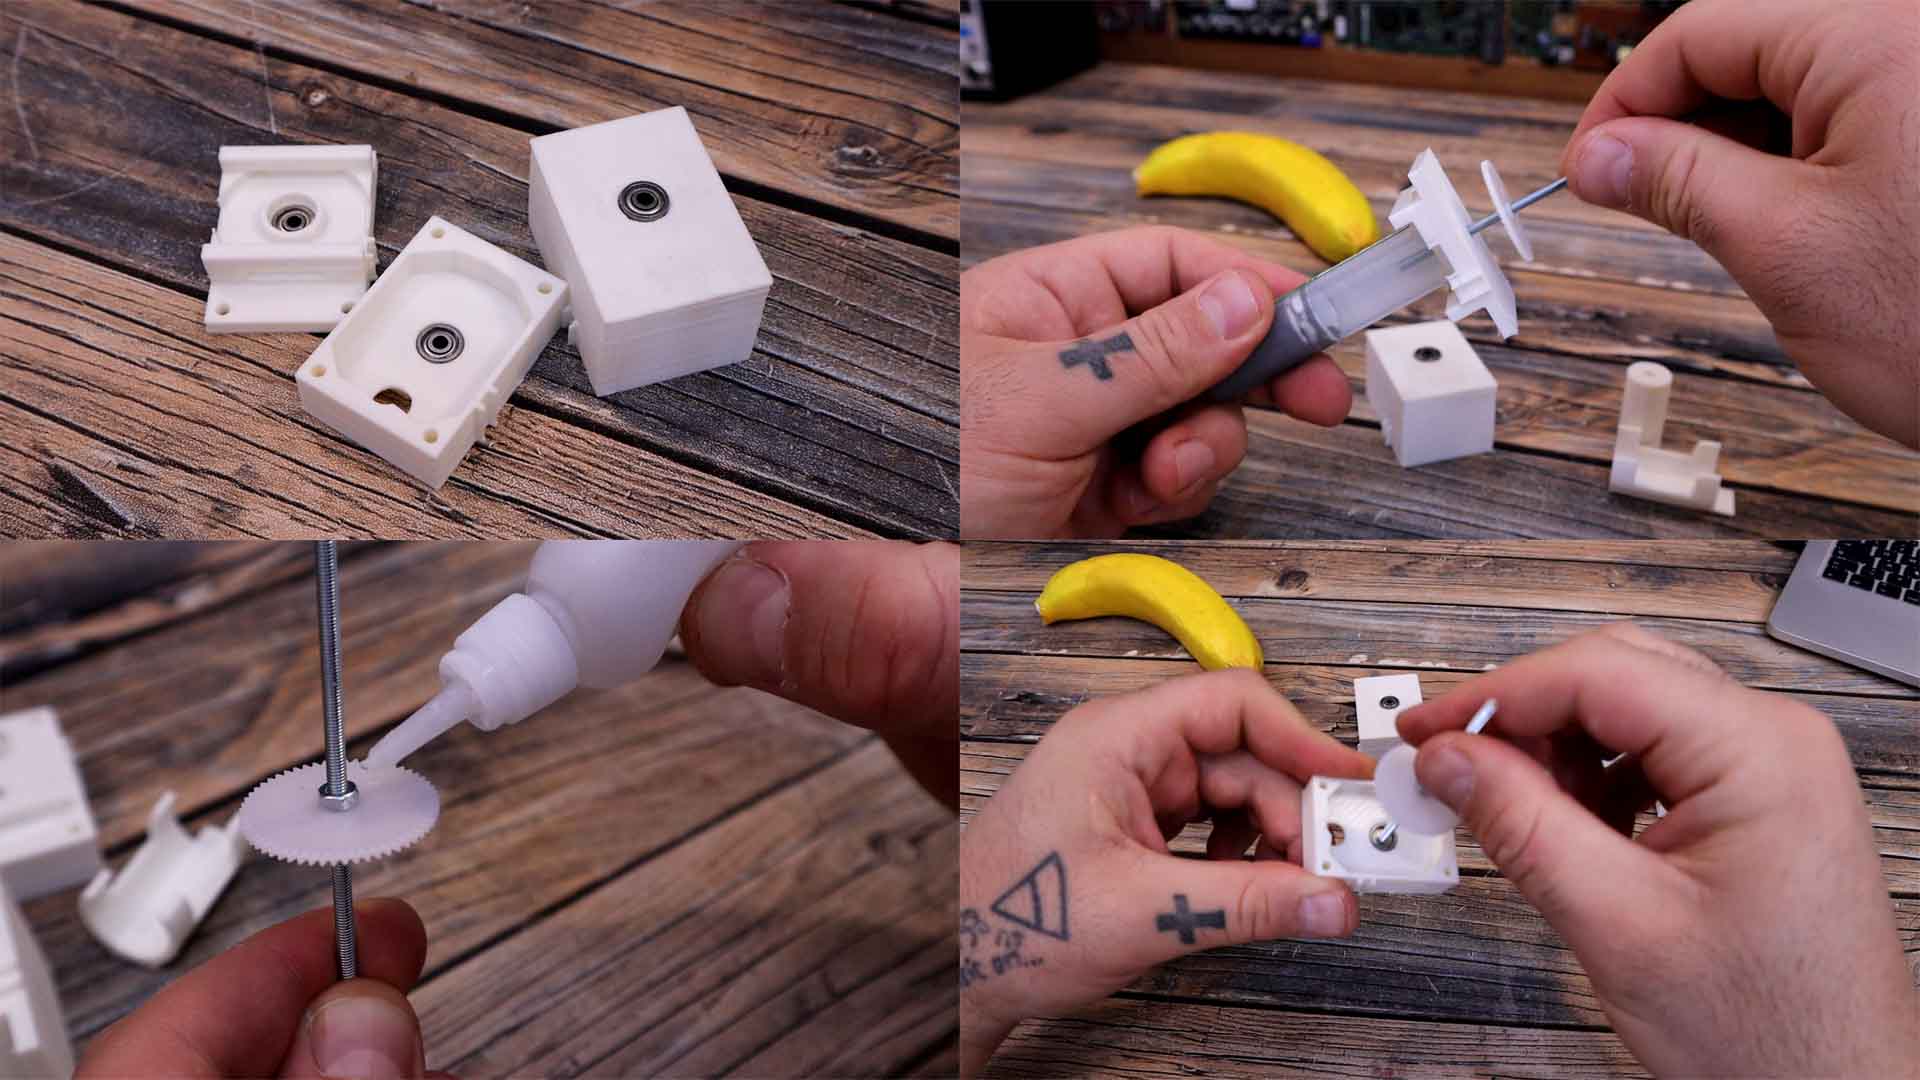
Get the DC motor with the small gear. I made a hole in the gear and fit it on the motor shaft with some glue. Get the middle 3D printed part and pass the screw with the big gear and then add the motor from below. It has its own socket. The motor gear should touch exactly the big gear and like that transfer the power. At this point the mechanical part is ready. We need to make the electronics part.
I’ve used the connections you have above on a previous part. The DC motor connected to the H bridge driver and the driver is connected to 4V from the battery and signal from the Arduino Pro mini. I solder 3 push buttons to a prototyping PCB. I connect the Arduino to the driver and the battery and so on. With thin wires I connect the buttons to the Arduino and the OLED display as well. Before I fit everything inside, I give it a test. Download from the enxt part the code and upload it to the Pro mini. For that I'm using this an FTDI programmer with USB connector. Connect it to the PC and then to the Pro mini and click upload. Add the battery. Check if you can control the rotating time with one button and then, each time you push the first button, the motor should rotate a bit according to the time set on the screen. Everything works ok, so is time to place it all inside.
The code is made in such a way, that when you press the button it will push a small amount of paste for a short time and then it will stop. But then, till you don’t release the button, the state won’t change, and in that way, we make sure it won’t pour more paste than the correct amount.
#include<SPI.h>
#include <Wire.h>
#include <Adafruit_GFX.h>         //download here: https://www.electronoobs.com/eng_arduino_Adafruit_GFX.php
#include <Adafruit_SSD1306.h>     //downlaod here: https://www.electronoobs.com/eng_arduino_Adafruit_SSD1306.php
#define OLED_RESET 7
Adafruit_SSD1306 display(OLED_RESET);
I first add the long screw and the gear into the middle part. Then I pass the button wires though the side hole of the big 3D printed part. Also, the wires for the OLED screen and for the battery. I re-solder everything inside the case. I place the motor with the gear in its place and the driver and Arduino on the side. Everything seems to fit ok. We can now close the case. I sandwich all the parts together and using 4 x M3 screws, and the insertions we have added before, we can close the case all together. The case is now closed. I add another M3 nut at the back end of the long screw just in case.
Finally, get the piston part and add another threaded insertion as before with the soldering iron. Now we can screw this on the long screw and when this will rotate, it will push the piston downwards and get the paste out. As for the buttons, I’ve printed this ring clip and I’ve glued the buttons over here. Then we could just clip tins in place over the plastic syringe and push the buttons from here. I’ve also glued the OLED screen on the side. This doesn’t look that good so maybe I will change the case design in the future. I’m also considering making a full PCB design for such a project so everything would look better.
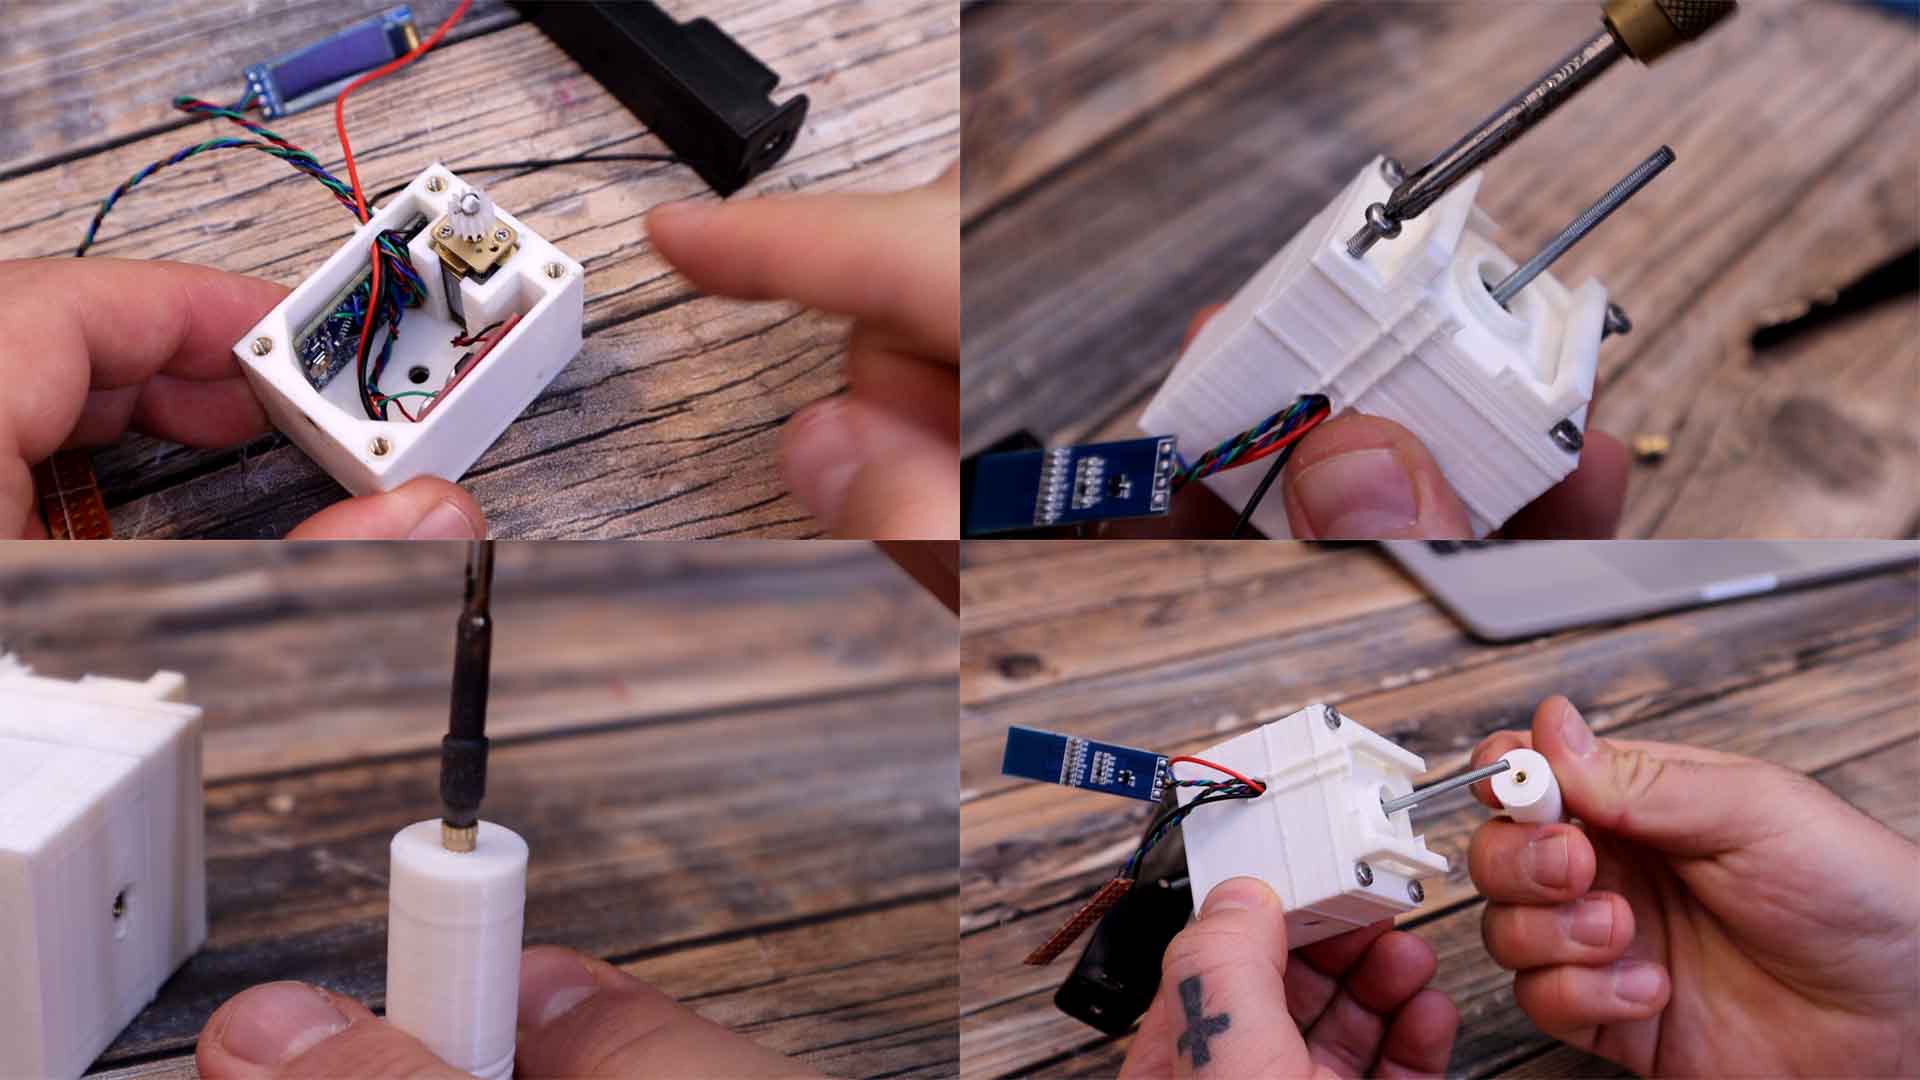
The battery socket was screwed in place on the side with a small and flat tip M3 screw. The system is missing an ON and OFF switch and for now, taking the battery out and put it back in will be the on and off process. That’s it. Get a solder paste syringe. Insert it over the plastic piston, and rotate it 90 degrees so it will get locked in place. Also clip the buttons over the syringe. Select the timing with the top button. One press will increse the value by 50 ms. A long press will get the value back to the lwoest value. Then press the other button and get out the past for each pad.
So guys, that’s how I’ve made my own solder paste dispenser, version 1 which is not that good looking but works ok. If my videos help you, consider supporting my work on my PATREON or a donation on my PayPal. Thanks again and see you later guys.